How to Contribute To Babylon.js
Introduction
Babylon.js is maintained on Github, a web-based hosting service for version control using Git. This page will introduce these and everything that is needed to make changes or additions to Babylon.js, from tools installation to testing, plus a brief description of why they are necessary. The steps are intended to be OS agnostic, allowing users to develop the same way on Windows, Mac and Linux.
Pre-Requisites
- Reading the contribution guidelines.
- An ability to code in Typescript. Babylon.js is written in Typescript then compiled and distributed in JavaScript.
- Know how to use a Command Line Interpreter (CLI), used to issue Git commands.
Install Git
A quick way for Windows and Mac is from the Git Home Page and for all three operating systems from the Git Book.
You then need to configure the installation to your details using a CLI. You can use the CLI built into your computer or one of many specialist ones for Git (Git Clients). If you use Visual Studio Code then the Terminal is a built in CLI and can be opened with Ctrl +' or Terminal > New Terminal on the menu.
In your CLI configure git globally with your user name and email:
git config --global user.name "John Doe"git config --global user.email johndoe@example.com
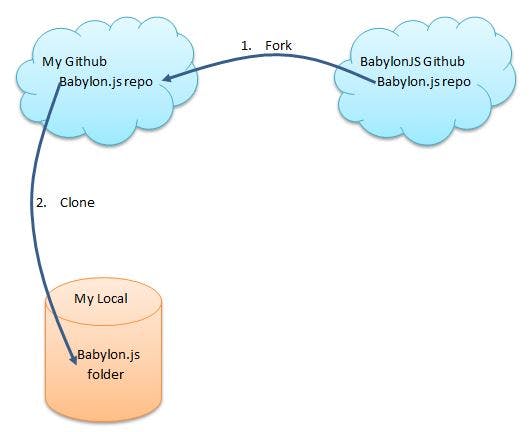
Fork from Github
If you do not have one already, open a Github account with your email address, sign in and go to the Babylon.js repository to fork with the top button.
;

Clone to Local
Now in your forked Babylon.js repository use the "Clone or Download" button to find your repository address:
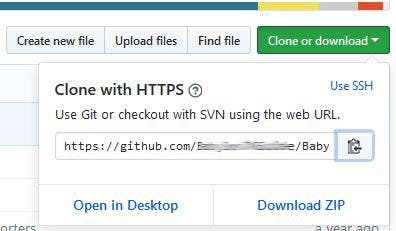
If the CLI you are using accepts pasting, then use the copy icon to the right of the address. This will save a lot of typing. If not, enter in the CLI:
git clone _**your repository address**_

The cloning may take some time.
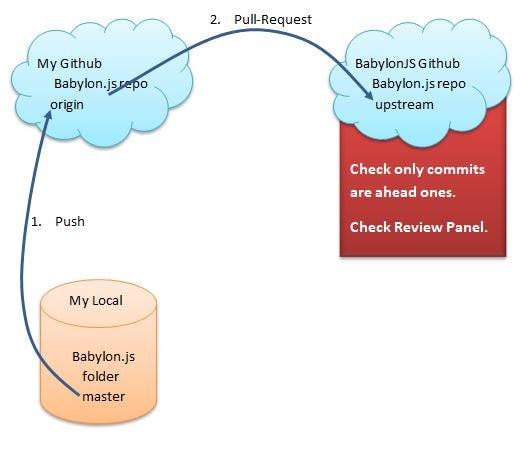
Now you have a local repository and a remote repository on Github.
From the folder where you cloned Babylon.js into you can simply change your directory to the local repository using:
cd Babylon.js
and then find the name of your remote repository with:
git remote -v
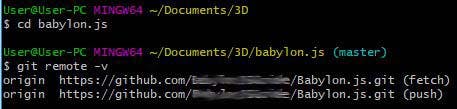
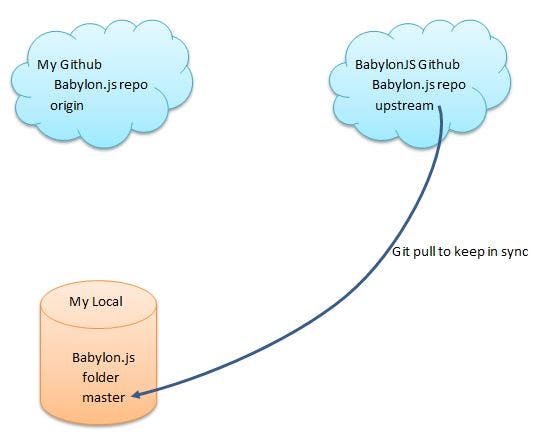
You should find it is called origin since it is the origin of the cloned local version. The local version is called the master since it is your master version of your Babylon.js.
When the time comes this will allow you push changes in your local repository to your Github repository using:
git push origin master
Keeping The Local Version Up To Date
When it comes time for you to request that your changes be pulled into the main Babylon.js then the only difference between your version of Babylon.js and the main one should be the changes you have made. Of course other people are making changes as well so you need to keep your master, the local version, up to date with the main version. The main version, often termed the upstream version, is another remote version your local repository can link to.
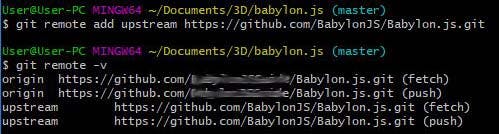
To do this you add the main version as a remote with the name upstream, making sure that your CLI is at the Babylon.js directory:
git remote add upstream https://github.com/BabylonJS/Babylon.js.git
Using
git remote -v
you can check all remotes are active.
Now before pushing your fully committed master to your origin you can pull the upstream (main) version into your master with
git pull upstream master
You can pull from upstream at any time provided any changes you have made are committed.
Editing and Building
Before embarking on editing or adding to Babylon.js please make sure you are familiar with the contribution guidelines.
Pull Requests are checked on submission. Checks include
- The addition of comments to your code as described here;
- Consistent coding style (linting).
Editing with Visual Studio Code
Visual Studio Code is a straight forward IDE with Git integration and is available for all three operating systems. It is worth a try, even though you may already have a favorite or recommended IDE.
Edit Babylon.js with your favorite IDE, for example VSCode. After editing and saving your changes should be staged with git add. Any changes during the build to files in the dist folder should be deleted before commiting.
More on using VSCode with Babylon.js
Adding files
When in doubt about where your files should be added then raise an issue in the Babyon.js repository or ask on the forum.
Commit
This can be done in Visual Studio Code using the source control icon on the left toolbar or with (Ctrl + Shift + G). After testing, some files other than those you have added or edited will appear in the source control section of VSCode. These should not be committed. Once you are ready to push to your repository these changes should be discarded. Only files you have actually changed or added should be in the commit.

When using a Git Client you should also check that you are only committing those files you have added or edited and not those produced in any testing build.
When using a CLI you need to add any files you have added or editing before committing them. So only add those files you have changed. The full path to the files from the current directory has to be used.
For example in the top directory
git add path to file/file1.ts path to file/file2.ts path to file/file3.tsgit commit path to file/file1.ts path to file/file2.ts path to file/file3.ts -m "Description of Changes"

and in the directory containing file1.ts, file2.ts, file3.ts
git add file1.ts file2.ts file3.tsgit commit file1.ts file2.ts file3.ts -m "Description of Changes"

Install Node.js and NPM
Node.js and npm can be installed from the Node.js home page.
The package manager npm is updated regularly and often to test Babylon.js you will need the latest v8 version. To update to the latest v8 version in your CLI:
npm install -g npm@8.x
the g installs npm globally so you can use it in any folder.
Note that we currently don't support npm v6.x or under.
To check your npm and node version after node was installed:
npm --versionnode --version
VSCode Extensions
If you are using VSCode, the repository comes with a list of recommended extensions. If you want to be able to debug entirely in VSCode you will need to install those extensions.
The Build
run npm install in the main directory. This will build everything needed to get started with the repository.
It is recommended to run npm run build:dev before starting to work to make sure everything is in the right place.
Using VSCode? Install the recommended extensions and start Run and Watch Dev Host to compile and get started with the esm dev host. TO use the classic UMD-based development (and have the BABYLON namespace available), run Run and Watch Babylon Server.
To build the dev sources, shaders, and assets, run npm run build:dev.
To start the dev host, run npm run serve -w @tools/dev-host. This will start the dev host in http://localhost:1338 and will run the code located in the dev-host's src folder.
Note that this will not start watching the sources in the dev folder and will only watch for changes in the dev host src folder.
To start watching the dev packages, run npm run watch:dev in a new terminal window. This will make sure to watch all changes in the dev packages, including changes to shaders and assets, like scss files, images, and so on.
Following is a list of quick ways to get started with certain tasks, both in VSCode and command line. A quick way of finding a VSCode task: Ctrl+P (or Command+P on Mac), type "task", press the space button, and select the task you want to run.
Run the Babylon server
Using VSCode:
- Start the "CDNServe and watch (Dev)" task
- If you want to debug, run "Run and watch Babylon Server" from the debug menu
Using command line:
- run
npm run watch:dev(If you want to make changes to the dev packages. Otherwise runnpm run build:dev) - run
npm run serve -w @tools/babylon-serverin a new terminal window
The Babylon server offers 2 variants - js and ts. To load the js version (the default one) navigate to http://localhost:1338. To use the TS version navigate to http://localhost:1338/index-ts. The files to edit are sceneJs.js and sceneTs.ts in the source folder of the Babylon server package.
As described in the next section, the Babylon server also offers a playground-snippet debugging.
Debug a playground snippet
To debug a snippet, run the localhost:1338 server in debug mode and add the snippet to the index. For example:
http://localhost:1338#IQN716#9
If you started the server in VSCode you will be able to debug the code straight in your IDE.
Note that the loader will react to changes in the hash (and will reload the scene), but will not save new data. To do that run the playground itself.
Run the dev host
Using VSCode:
- Start the "Run and watch Dev Host (Dev)" task
- Or if you are just testing the core without changing it, start the "Run Dev Host (Demo)" task
- If you want to debug, run "Run and watch dev host (Dev)" from the debug menu
Using command line:
- run
npm run watch:dev(If you want to make changes to the dev packages. Otherwise runnpm run build:dev) - run
npm run serve -w @tools/dev-hostin a new terminal window
Open http://localhost:1338 in your browser.
Run the playground
Using VS Code:
- Run the task "Playground Serve for core (Dev)"
- Or if you are just developing the playground itself, run the task "Playground Serve (Dev)"
- If you want to debug, run "Launch Playground (chrome)" (Or "Playground development") from the debug menu
Using command line:
- run
npm run watch:dev(If you want to make changes to the dev packages. Otherwise runnpm run build:dev) - Run
npm run serve -w @tools/babylon-serverin a new terminal window - Run
npm run serve -w @tools/playgroundin a new terminal window
Shortcuts?
- Run
npx build-tools --command dev-watch --watch-assets --watch-declarations --serve(watch and serve in one command) - Run
npm run serve -w @tools/playgroundin a new terminal window
Open http://localhost:1338 in your browser.
Run the sandbox
Using VS Code:
- Run the task "Sandbox Serve for core (Dev)"
- Or if you are just developing the playground itself, run the task "Sandbox Serve (Dev)"
- If you want to debug, run "Launch Sandbox (chrome)" (Or "Sandbox development") from the debug menu
Using command line:
- run
npm run watch:dev(If you want to make changes to the dev packages. Otherwise runnpm run build:dev) - Run
npm run serve -w @tools/babylon-serverin a new terminal window - Run
npm run serve -w @tools/sandboxin a new terminal window
Shortcuts?
- Run
npx build-tools --command dev-watch --watch-assets --watch-declarations --serve(watch and serve in one command) - Run
npm run serve -w @tools/sandboxin a new terminal window
Open http://localhost:1338 in your browser.
Run the GUI editor
Using VS Code:
- Run the task "GUI Editor Serve for core (Dev)"
- Or if you are just developing the playground itself, run the task "GUI Editor Serve (Dev)"
- If you want to debug, run "Launch GUI Editor (chrome)" (Or "GUI Editor development") from the debug menu
Using command line:
- run
npm run watch:dev(If you want to make changes to the dev packages. Otherwise runnpm run build:dev) - Run
npm run serve -w @tools/babylon-serverin a new terminal window - Run
npm run serve -w @tools/gui-editorin a new terminal window
Shortcuts?
- Run
npx build-tools --command dev-watch --watch-assets --watch-declarations --serve(watch and serve in one command) - Run
npm run serve -w @tools/gui-editorin a new terminal window
Open http://localhost:1338 in your browser.
Run tests
Using VSCode:
- Run the task
Run unit testsorrun visualization tests - To debug - launch
Run and debug unit testsorRun and debug visualization tests
Using command line:
- Run
npm run test:unitornpm run test:visualization - Or run
npm run testornpx jestto launch all tests at the same time
Link a public project to an external one
The example is linking core. Change the package name to anything else if needed.
- Build the public package you want to link:
npx nx build babylonjs(when building es6 packages remove the @babylonjs prefix, i.e.npx nx build core)
- If using the es6 packages, run
npm run prepublishOnly -w @babylonjs/core - Run
npm link -w @babylonjs/core
In your other project:
- Make sure you are linking to the right version (or use semver ranges)
- Run
npm link @babylonjs/core
When making changes to the linked package, make sure to repeat the build steps. There is no need to link again until you reinstall the public library.
Notes:
- this process will be simplified soon.
- You can link any package, not only the public one. However, you cannot rename the package. so if you link @dev/core you will need to add @dev/core to the dependencies of the external project.
Add a dependency to a project
Run npm install packageName -w @namespace/package (add -D to define a dev-dependency)
The package.json of the project should be changed.
Note - there is a bug in npm that, in certain cases, installs the dependency but doesn't add it to the package.json file. Run the command twice if that happens.
Edit Code
Once the test task (npm run start) has been launched, any saved changes in the Typescript or shader files will automatically rebuild the associated Javascript files. Simply refresh your browser to see the changes in effect and begin to debug your new code.
Hint: You may need to refresh the code before adding back a new breakpoint.
Repository structure
The repository is built similar to a mono-repo. Every package has its own package.json and can be used independently, of course taking its dependencies into account.
Packages in dev and lts are composites (https://www.typescriptlang.org/tsconfig#composite) and can compile using a single command if needed. When watching, dependent packages will be automatically compiled as well, when needed.
All packages (with the exception of public es6 packages) have the same basic structure:
- src folder holds typescript files and assets
- test folder holds tests (See testing)
- dist folder holds compiled files, including sourcemaps and declarations, and assets (if configured)
- optional public folder for public assets that will be hosted when the package is served (only where applicable)
The build/watch/test scripts will take this structure into account.
All references when developing is to the src folder of the packages, but all of the references when building is to the dist folders. That means that in order to compile a package, its dependents need to be compiled already. This is mainly taken care of by the build process and the watchers.
Dependencies are hoisted to the main directory, so the repository only has a single package lock file and a single node_modules directory.
NPM workspaces mean that you can execute any npm command on the entire repository, on a specific package, or on the root package.
To run a specific npm command on the entire repository, run npm <command> -ws.
To run a specific npm command on a specific package, run npm <command> -w <package>.
To run a specific npm command on the root package, run npm <command>.
Read more about node workspaces - https://docs.npmjs.com/cli/v7/using-npm/workspaces
naming convention
- npm packages always low case kebab case (i.e. gui-editor)
- directories in camel case (i.e. guiEditor)
Types of packages
There are 4 different types of packages:
dev packages
Packages with their name starting with @dev. These are the main packages that will be used on day-to-day work with the repository.
Those packages will hold raw assets in their dist directory, and are ready to be consumed by any packer (like webpack or rollup).
lts packages
Packages with their name starting with @lts. These are packages that are used for the long-term support of the repository. In time some code will move to the LTS packages (for example side effects or deprecated functions). LTS packages will be used to generate the public packages.
LTS packages are an extension of the dev packages and should never include duplicated code.
Tools packages
Packages with their name starting with @tools. Those packages hold tools that are using the main repository.
Tools are, for example, the playground, the sandbox, node and GUI editor.
Public packages
The public-facing packages are the ones that are served using NPM. They are mainly built using the LTS or Tools packages. They are also the only ones not marked "private" in their package.json.
Running scripts
To run a script in a package, you can either run npm run scriptname in the package directory or npm run scriptname -w @namespace/package-name in the main directory. This is the recommended wqy of working.
For example, to build the dev core library you will run:
npm run build -w @dev/core
In the main directory.
In a script is missing from the package.json, you can either add it (not forgetting to commit the change) or run the script in the package directory using npx. For example, to use the installed typescript (and not the globally installed one) you can run:
npx tsc ....
In the specific project's directory.
The following scripts should be available for most if not all packages:
- build
- compile
- clean
- test
- format
- lint
- watch (serve on tools)
This is a work-in-progress. The scripts will be added to all. Please let @RaananW on the forums know if any script is missing from a specific package that you are trying to use.
Initial source build and watch
To compile the dev code once in order to get the latest compiled code run:
npm run build:dev
To start a watcher that will watch the source code of the dev packages, run one of the following npm scripts:
"format:check"; // check formatting,"format:fix"; // fix formatting,"lint:check"; // check linting,"lint:fix"; // fix linting,
format:check and lint:check will run during CI once we have an issue-free repository.
Dealing with assets
The dev and lts packages treat binary assets as files that will be a part of their dist folder. When packing those assets the packer can decide what to do with them (for example using url-loader or file-loader in webpack). The assets, which include binary media files and (s)css files are being watched and automatically copied / processed when watching the package. To explicitly watch the assets in a specific project, run the build-tools "process assets" task (which will be fully documented later):
npx build-tools -c process-assets --isCore --watch
in the directory of the specific project. There should also be a build:assets and watch:assets script in the package.json of every package.
Shaders are also considered to be assets. They are being processed differently, but using the same script. a shader (.fx file) will generate a typescript file that will be compiled as part of the build process of the library. When building, build:assets will be executed before compile:source does. The build script will take care of that for you. For example, @dev/core has the following scripts:
"build": "npm run clean && npm run compile","precompile": "npm run compile:assets","compile": "npm run compile:source","compile:source": "tsc -b tsconfig.build.json","compile:assets": "build-tools -c process-assets --isCore",
Formatting and lint
We have a global eslint and prettier configuration in the root of the repository. This unifies code structure and formatting throughout the repository. It is running on both .js and .tsx files.
When using VSCode is is recommended to use both the Prettier formatter extension and the ESlint host in order to lint in real time.
To run linter using the command line, run:
npm run lint
Configuration options
Most packages in the repository don't need any extra configuration in order to compile. However, in certain cases you would want to control the way the files are compiled and served. A good example is enable HTTPS support, or change the standard port used for the Babylon server or the tools.
There are a few options to pass configuration to the different packages.
Command line arguments
Both the build tools (explained later) and webpack (which is used to serve our tools) accept command line arguments. The following will be examples, but not full documentation of the different options and commands. The full list of options can be found further down the page.
When running the dev watcher you can specify which packages will be watched. Looking at the standard way of starting watching dev (npm run watch:dev), you can do one of two things to add the packages to the watcher:
# option 1, extend the npm run watch:dev commandnpm run watch:dev -- --packages core,gui# option 2, run the dev watcher directly (watching sources and assets)npx build-tools --command dev-watch --watch-assets --packages core,gui
The same goes when running the serve command manually. For example, to enable production mode of the Babylon server:
# option 1, use the npm run commandnpm run serve -w @tools/babylon-server -- --env=mode=production# option 2 - use webpack directly in the Babylon server package directorynpx webpack serve --env=mode=production
In this specific case you have the task npm run serve:prod as well.
Using a .env file
When running both the playground and the Babylon server you have two servers running locally. The playground is being served, and the CDN is served on a different address. If we want to configure both of the servers at the same time, we can use a .env file to extend the command line arguments.
To use a .env file create a file called .env in the base directory of the repository. This file will be used automatically.
Think about the .env file as a way to extend process.env. The first important thing we need to know is that it will only be available during build time, but not in compiled code. So parameters set there are available in building scripts and in the build tools, but not in a .tsx file in the playground source directory. The variables are available globally.
To set a command line argument using the .env file, convert the parameter's name to upper case, and replace all - with _. For example, to set the packages from the example above, add this line to the .env file:
PACKAGES="core,gui"
To always watch assets when running the dev watch you can set the following in your .env file:
WATCH_ASSETS=true
To enable hot reload (another option existing in the webpack-enabled packages), add this line to the .env file:
ENABLE_HOT_RELOAD=trueENABLE_LIVE_RELOAD=true
To set all (webpack) builds to production mode, set the following in the .env file:
NODE_ENV=production
Other variables you can set in the .env files are:
TEST_ENGINE="webgl2" # change the engine used for visualization testTOOLS_PORT=1338 # port for tools like the playground or the node editorCDN_PORT=1337 # port for the Babylon server
Note that the .env file should never be updated on the repository. It is ignored by git.
To get the list of all the available options in each command, find it in this documentation page.
Project linking
Projects' dependencies are defined in their package.json. However, when using dev or lts packages you can use a direct reference to the files instead of using the npm package itself. That means that you can (and should!) import directly from the needed library using its basic development package name. For example, these are the imports in the inspector (advancedDynamicTextureTreeItemComponent.tsx):
// load from coreimport { Nullable } from "core/types";import { Observer, Observable } from "core/Misc/observable";import { IExplorerExtensibilityGroup } from "core/Debug/debugLayer";// load from guiimport { Control } from "gui/2D/controls/control";import { AdvancedDynamicTexture } from "gui/2D/advancedDynamicTexture";
Using the dev package names (defined in packageMapping.ts in the build tools) will allow the build system to choose which project to take sources from - dev, or lts.
Serving the repository
There are two basic ways to use the dev code:
Dev Host
The dev host allows you to write code using typescript or javascript, pack it with webpack, and serve it in your browser. The only file that should not be renamed is index.ts, which is the main entry file.
The dev host is similar to the es6 packages we offer - everything must be imported, and no BABYLON namespace is available. If you want to test a playground scene, see the Babylon server down below
To run the dev host you execute the following command:
npm run serve -w @tools/dev-host
This will start watching the dev-host src folder and will run the code in the dev-host's src folder.
When loading from the different packages in the dev host you will use the package from which you are loading. For example, if you load the scene object from the dev core package, you will use:
import { Scene } from "@dev/core";
It is important to stay consistent when importing, i.e. not to load a part from the @lts packages and another part from the @dev package, as typescript will complain they are not the same object.
The dev host is configured to be much more forgiving when developing. The best example is the noImplicitAny rule, which is set to false. This is done mainly so you could load .js files as well as typescript file. This is the reason for the allowJs flag being set to true.
The current simple structure of the dev host allows you to copy code from the playground, and making the changes needed to run it in the dev host. For example, this playground:
var createScene = function () {// This creates a basic Babylon Scene object (non-mesh)var scene = new BABYLON.Scene(engine);// This creates and positions a free camera (non-mesh)var camera = new BABYLON.FreeCamera("camera1", new BABYLON.Vector3(0, 5, -10), scene);// This targets the camera to scene origincamera.setTarget(BABYLON.Vector3.Zero());// This attaches the camera to the canvascamera.attachControl(canvas, true);// This creates a light, aiming 0,1,0 - to the sky (non-mesh)var light = new BABYLON.HemisphericLight("light", new BABYLON.Vector3(0, 1, 0), scene);// Default intensity is 1. Let's dim the light a small amountlight.intensity = 0.7;// Our built-in 'sphere' shape.var sphere = BABYLON.MeshBuilder.CreateSphere("sphere", { diameter: 2, segments: 32 }, scene);// Move the sphere upward 1/2 its heightsphere.position.y = 1;// Our built-in 'ground' shape.var ground = BABYLON.MeshBuilder.CreateGround("ground", { width: 6, height: 6 }, scene);return scene;};
translates to this:
import { canvas, engine } from "./index";import { FreeCamera, HemisphericLight, MeshBuilder, Scene, Vector3 } from "@dev/core";export const createScene = function () {// This creates a basic Babylon Scene object (non-mesh)const scene = new Scene(engine);// This creates and positions a free camera (non-mesh)const camera = new FreeCamera("camera1", new Vector3(0, 5, -10), scene);// This targets the camera to scene origincamera.setTarget(Vector3.Zero());// This attaches the camera to the canvascamera.attachControl(canvas, true);// This creates a light, aiming 0,1,0 - to the sky (non-mesh)const light = new HemisphericLight("light", new Vector3(0, 1, 0), scene);// Default intensity is 1. Let's dim the light a small amountlight.intensity = 0.7;// Our built-in 'sphere' shape.const sphere = MeshBuilder.CreateSphere("sphere", { diameter: 2, segments: 32 }, scene);// Move the sphere upward 1/2 its heightsphere.position.y = 1;// Our built-in 'ground' shape.MeshBuilder.CreateGround("ground", { width: 6, height: 6 }, scene);return scene;};
A simpler way to do that would be to load the entire @dev/core package as BABYLON:
import { canvas, engine } from "./index";import * as BABYLON from "@dev/core";export const createScene = function () {// This creates a basic Babylon Scene object (non-mesh)const scene = new BABYLON.Scene(engine);// This creates and positions a free camera (non-mesh)const camera = new BABYLON.FreeCamera("camera1", new BABYLON.Vector3(0, 5, -10), scene);// This targets the camera to scene origincamera.setTarget(BABYLON.Vector3.Zero());// This attaches the camera to the canvascamera.attachControl(canvas, true);// This creates a light, aiming 0,1,0 - to the sky (non-mesh)const light = new BABYLON.HemisphericLight("light", new BABYLON.Vector3(0, 1, 0), scene);// Default intensity is 1. Let's dim the light a small amountlight.intensity = 0.7;// Our built-in 'sphere' shape.const sphere = BABYLON.MeshBuilder.CreateSphere("sphere", { diameter: 2, segments: 32 }, scene);// Move the sphere upward 1/2 its heightsphere.position.y = 1;// Our built-in 'ground' shape.BABYLON.MeshBuilder.CreateGround("ground", { width: 6, height: 6 }, scene);return scene;};
The catch here is that this is not the actual BABYLON namespace, this is just the core namespace and will not include the loaders, for example, even if imported.
This is an extended example of how to use the dev host to integrate GUI, Loaders and the inspector:
import { canvas, engine } from "./index";import "@dev/loaders";import { Inspector } from "@dev/inspector";import { ArcRotateCamera, CubeTexture, Scene, SceneLoader } from "@dev/core";import { AdvancedDynamicTexture, Button } from "@dev/gui";export const createScene = async function () {const scene = new Scene(engine);scene.createDefaultCameraOrLight(true);const hdrTexture = new CubeTexture("https://playground.babylonjs.com/textures/SpecularHDR.dds", scene);scene.createDefaultSkybox(hdrTexture, true, 10000);// The first parameter can be used to specify which mesh to import. Here we import all meshesSceneLoader.AppendAsync("https://assets.babylonjs.com/meshes/webp/", "webp.gltf", scene, function (_newMeshes) {scene.activeCamera!.attachControl(canvas, false);// scene.activeCamera!.alpha += Math.PI; // camera +180°(scene.activeCamera as ArcRotateCamera).radius = 80;});const advancedTexture = AdvancedDynamicTexture.CreateFullscreenUI("UI");const button1 = Button.CreateSimpleButton("but1", "Click Me");button1.width = "150px"button1.height = "40px";button1.color = "white";button1.cornerRadius = 20;button1.background = "green";button1.onPointerUpObservable.add(function() {alert("you did it!");});advancedTexture.addControl(button1);Inspector.Show(scene, {});return scene;};
The dev host is configured with hot reload and live reload, making sure that if you change any file in the dev host source directory, the dev host will update (or reload) the page. However, it will not react to changes to the source code in the dev packages, as it is using the compiled version of the dev packages.
If you want to watch the source code of the dev packages you will need to start the watcher manually or use the configured VSCode tasks (more on that later). Using VSCode is recommended, but not a must.
To compile the dev code once in order to get the latest code in the dev host see "Initial source build and watch".
Note about dev host - the dev host is not using any best practices for production code. It is a tool for developing using the dev packages. It is not meant to be used in production.
Babylon Server
A new package introduced in the Babylon server, which is a direct copy of the Babylon CDN structure. The Babylon server serves javascript files, along with sourcemaps and declarations.
Similar to the dev host, the Babylon server will take the latest compiled code from the dev (or lts) packages and serve it to the browser. The default address for the local CDN is http://localhost:1338
The Babylon server's index.html has references to all of our public packages and has the BABYLON namespace populated, similar to the way the playground is working. If you want to debug a playground scene without starting the playground, edit the file sceneJs.js or sceneTs.ts for typescript, and open http://localhost:1338/index.html or http://localhost:1338/index-ts.html
To start the Babylon server, run:
npm run serve -w @tools/babylon-server
This will start a new server on port 1337 and will host all of the needed files, including a very simple index.html file to make sure the CDN is working.
The babylon-server also serves all other files needed for tools like the playground to work correctly. It hosts the physics engine, earcut, the draco decoder and more. See the public directory in the babylon-server package to see what files are available. Those files are served as static files.
The same as dev host, if you want to watch the source code of other packages, you will need to run the watcher/compile manually or use the configured VS Code tasks (more on that later). Using VSCode is recommended, but not a must. See "Initial source build and watch" for dev code compilation and watch.
The Babylon server can be used wherever the compiled packages are needed, like the playground.
In order to use the Babylon server, run the Babylon server (npm run serve -w @tools/babylon-server), and start the playground in a different terminal. As always, there is a VS Code task and launch configuration for the playground.
A few notes:
- Regarding performance - minified code loads faster (or at least SHOULD) load faster. Meaning that running the server in production mode (using
npm run serve:prod -w @tools/babylon-server) will help running code relying on the compiled packages faster. However, the actual build of the server will be roughly 2x slower than the dev build. If you want to use the server in order to work on tools like the GUI editor or the playground (working on and not with - i.e. editing those packages'code), it is recommended to run the Babylon server in production mode. - Regarding the packages created by babylon-server - The packages generated by the server are very similar to the public UMD packages, but they are not entirely the same. The babylon-server is not meant to be used in production! It is just a development tool.
As with any webpack-hosted package, there are a few properties that can be configured (using either the CLA od the .env file as discussed above):
- source: the type of source you will use. This can be either 'dev' or 'lts'. The default is 'dev'.
- mode: the type of build you will use. This can be either 'production' or 'development'. The default is 'development'.
- cdnPort: the port that the Babylon server will be hosted on. The default is 1337.
- enableHttps: whether or not to use https. The default is false.
- enableHotReload: whether or not to enable hot reload. The default is false. It iss never enabled in production mode.
- enableLiveReload: whether or not to enable live reload. The default is false. It iss never enabled in production mode.
Tools
We have several tools that we are hosting for our users. All of them (playground, sandbox, node editor and the GUI editor) are using the same architecture when it comes to referencing the core library - they use our UMD packages (the files that are hosted on our CDN). This is why, in order to get them to work you need to make sure the Babylon server is running in the background. See [Babylon Server](#Babylon Server) for more information.
All tools are packed and served with webpack, and are configured similarity.
To start the tools use the serve command:
npm run serve -w @tools/package-name
Most packages will work the same and are therefore not fully documented.
Notes:
- If the playground is served using HTTPS, the Babylon server must be HTTPS-Enabled as well.
- To load the dist files (and avoid using the babylon-server) add ?dist=true to the url.
- All tools will open on http://localhost:1338
Playground
The playground is not a public package, but is served on https://playground.babylonjs.com. It is a tool for developers to test their code and see how it works.
In order for it to work during production you will need to have a running Babylon server or use the dist query parameter.
To start the playground:
npm run serve -w @tools/playground
There are VS Code tasks that will allow you to both start the playground for playground development and to start the dev package watcher to also watch the dev packages. The first option is meant for developers working on the playground package, and the other is meant for developers of dev packages that want to test them on the playground.
Notes:
- when importing files from core, reference the
@dev/corepackage without setting the directory. The reason is that the class will eventually be loaded from the BABYLON namespace, available in the playground. - It is probably quicker to test your changes in the dev host instead of the playground.
Debugging
Every package at every stage can be fully debugged using either the browser (Chrome recommended) or the VS debugger.
To start the debugger using VS Code use the launch task you want to debug and run it. Note that it might take a little while for VS Code to initially load the files that it is debugging.
All packages are built with sourcemaps (when not in production mode), so opening the browser and choose the file to debug will allow to debug using typescript sources.
Unit tests can be debugged as well using the VS Code debugger. When in debug mode tests will run "in band" and not parallel. Set the breakpoint beforehand and run the tests. The initial run might take some time, but once the debugger is connected it will stop at that breakpoint.
Contact us in the forum with any issues regarding debugging.
Until we fix all of the ESlint issues, make sure to press "Debug anyways" when running VS Code debugger tasks.
Watchers
See build-tools dev watcher
Adding a new package
To add a new package, follow the steps below:
- Choose the location of the package
- Add a new directory in the package category
- Add a package.json (you can copy a similar one from a different package). Make sure the package is marked "private" if it's not to be published.
- make sure you name your package correctly (i.e. @tools/package-name)
- Add your code using the schema described above (src for sources and assets, test for tests, etc.)
To install new dependencies to the package you can either add them to the package.json manually, or run npm install package-to-install -w @namespace/package-name in the package directory. Add -D to the command if you want to install dev dependencies.
Once this is done you can use this package in the workspace (using the -w argument when running npm commands).
You can reference this package in other packages to link them together. Once this is done (the package is added to the dependency list of another local package) it will be available in node_modules.
Building
To build each and every package available in the repository, run npm run build -w @namespace/package-name. There is, however, a quicker and more efficient way of building a package that has dependencies.
nx is integrated in the repository, and can be seen as a local assets repository to run build much faster. When running an npm script using nx it will automatically run the same command in local dependencies and in the right order. So, for example, when building the public babylonjs-gui package using npx nx run build babylonjs-gui, nx will add the following projects to the sequence:
- @dev/build-tools (a dependency of each dev package)
- @dev/core
- @lts/core
- babylonjs
- @dev/gui
- @lts/gui
- babylonjs-gui
It will run the build in sequence (because of the predefined dependencies), but will skip building a package if it hasn't changed since the last build call. So calling npx nx run build babylonjs will build dev, lts, and public, but those 3 will be ready when building babylonjs-gui and will not build again.
This should be used only when you want to build the public packages in the repository, and will mainly be used by the CI. However, nx is available to you and is a very powerful tool. In the future we might integrate it more in the repository. TO read more about nx: https://nx.dev/getting-started/intro
Testing
There are 3 types of tests configured in the repository:
- unit
- visualization
- integration (TBD)
Each package can have a "test" folder with a specific structure. The structure of the test folder will allow tests to run automatically in the entire repository (and in a single package). The structure is as follows:
- unit tests are located in
test/unit. - visualization tests are located in
test/visualization.
All files must follow this schema:
(.*).test.{js, ts, tsx}, for example - materials.test.ts or babylon.physicsEngine.test.js
Those files will be automatically picked by jest and will run as part of the test script, using the correct environment (jsdom/node for unit tests, puppeteer for visualization tests)
The possible test environment are node and jsdom for unit tests, and also puppeteer for visualization and integration (see https://jestjs.io/docs/configuration#testenvironment-string). The default test environment is node (and puppeteer for visualization). To change the environment, add a comment at the first line of the file. For example:
/*** @jest-environment jsdom*/
will enable jsdom as the test environment and will make the window and document object available in unit tests.
Test results can be seen on the console. A junit.xml file is also generated after every test run, but it is mainly used for CI reporting.
Visualization tests will generate a report if any test failed. The report can be found at the directory jest-screenshot-report in the main directory.
To run all tests in a single command run npm run test or npx jest in the main directory.
We are testing using jest. To know everything you need to know, read their documentation - https://jestjs.io/docs/getting-started
Unit testing
Apart from what's written before, there are a few things that need to be observed when writing unit tests.
- Unit tests are meant to test a specific unit or module. Anything else must be mocked. To read more about jest mocking - https://jestjs.io/docs/mock-functions
- If you are testing the connection between two or more modules it is not a unit test and should probably be an integration test.
- It is recommended not to use puppeteer as the environment for unit testing
- jsdom does not allow adding script tags to the DOM. Anything that needs to be added externally must be mocked.
To run all unit tests run npm run test -- --selectProjects unit. To run tests only in a specific project, run the npm command with the right workspace package: npm run test -w @dev/core -- --selectProjects unit
To run a specific unit test you can use jest filtering, which is either filter per filename:
npm run test -w @dev/core -- --selectProjects unit -i "material"
This will run all tests that their filename has "material" in them.
You can also filter using term in the test name itself (the "it" and "describes" functions in your tests):
npm run test -w @dev/core -- --selectProjects unit -t "material"
This will run all tests that have the word "material" in their name.
Visualization tests
Run visualization tests using npm run test:visualization in the main directory.
Configuring the visualization tests
Visualization tests are running using puppeteer, which is an interface to control Chrome or Firefox on Node. The test will run in a browser and will generate a report if any test fails. The browser selected is the local chromium installed together with puppeteer. If you want the tests to run in a different browser you can customize the puppeteer configuration at jest-puppeteer.config.js in the main directory. Some of the options are:
module.exports = {launch: {dumpio: false, // should we see logs?timeout: 30000, // timeout of 30 secondsheadless: false, // true to run headlessproduct: browser, // can be either chrome or firefoxignoreHTTPSErrors: true, // should SSL issues be automatically resolved, in case the files are hosted locally on self-signed SSL certificatedevtools: true, // Should the dev tools open automaticallyargs: browser === "chrome" ? chromeFlags : firefoxFlags, // additional arguments for the browser, for example enabling garbage collectionexecutablePath: "C:\\Program Files\\Google\\Chrome\\Application\\chrome.exe", // choose the chrome (or firefox) to use},browserContext: "default",};
Here is the list of all parameters - https://github.com/puppeteer/puppeteer/blob/main/docs/api.md#puppeteerlaunchoptions
Puppeteer opens a different context than the node context we are at when running the tests, so all code needed should either be pre-injected (using the Babylon server, for example) or sent during code evaluation. A simple example:
const random = await page.evaluate((aRandomNumber) => {return aRandomNumber * Math.random();}, Math.random());
This will generate a random number at the node context, send it to the page, and multiply it with Math.random() result from the browser. It will return the result and will store it in the variable random.
To debug during a test you can set
await jestPuppeteer.debug();
anywhere in the test (in the node context, and not inside an evaluate function).
Executing this will halt the test (taking the timeout into account!) and will allow you to look in the dev tools of the opened browser and debug the scene there.
The tests are set to automatically show any error received from the browser's console (doesn't work in Firefox). You will see the error in the jest output screen.
For the time being the tests are defined in the visualization file itself, but this is temporary until the development is finalized.
In the future it is recommended to have visualization tests in the dev packages themselves and not in an external package. for the time being, the visualization tests are located in @tools/visualization-tests
Running specific tests
To run a specific test on a specific engine, use:
npm run test:visualization -- -i "engineName" -t "test name"
For example:
npm run test:visualization -- -i "webgl2" -t "Particle subemitters"
Guidelines
A reminder to read the contribution guidelines.
Pull-Request
Pull Requests are automatically validated with linting and testing.
When you are happy that all testing has been validated, guidelines followed, and only necessary files committed then push your local master to your origin github repository with your Git Client or from the CLI with:
git push origin master
Once this has succeeded visit your Babylon.js repository. If all your commits are ahead of the upstream Babylon.js:master you can issue a pull request using the Contribute button shown below and follow the steps:

If some of your commits are behind the upstream Babylon.js:master then you will need to to do:
git pull upstream master
and then push into your repository again.
Check for Success
Once your pull-request has been issued then it needs to be checked, reviewed, approved and merged. Find your pull-request from the list and open it:

Scroll down to the review panel. Should there be any then a red cross indicates the area of failure. Click on details for more information:
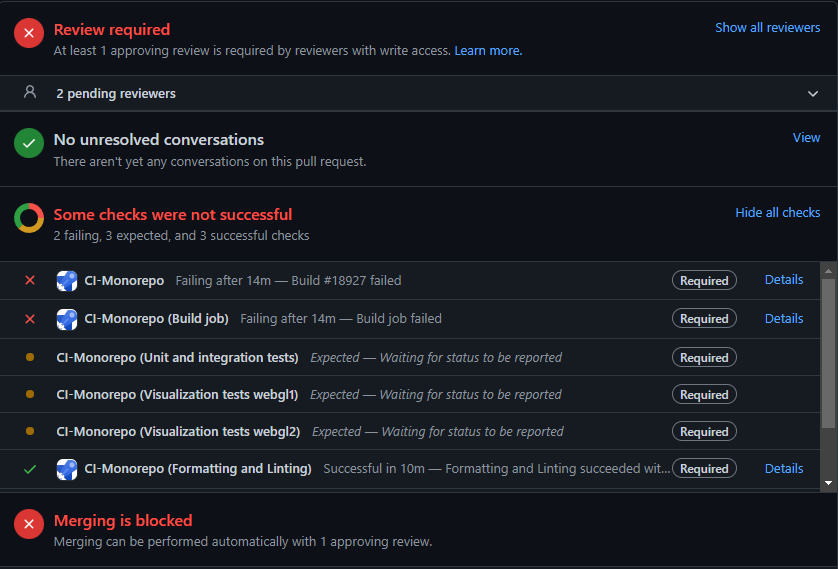
Then click on the link under "Build job failed" to be taken to an Azure Pipelines page where you can see the output of your build job and understand better why it failed:
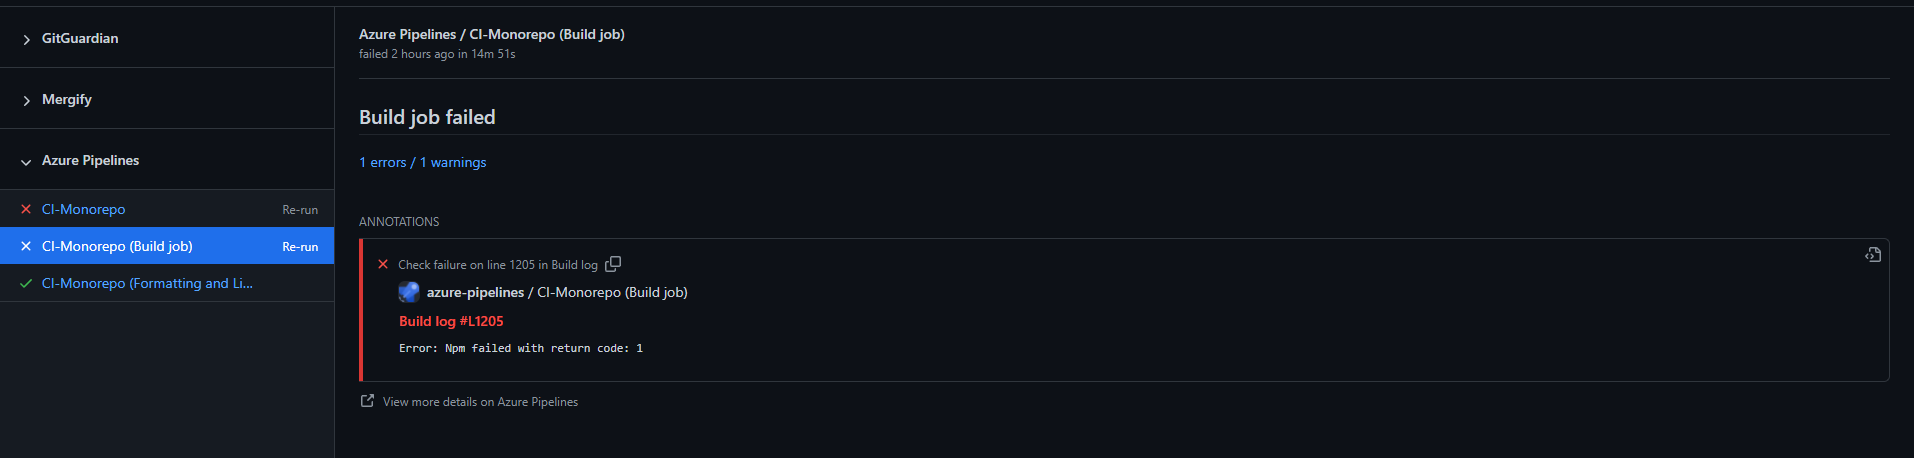
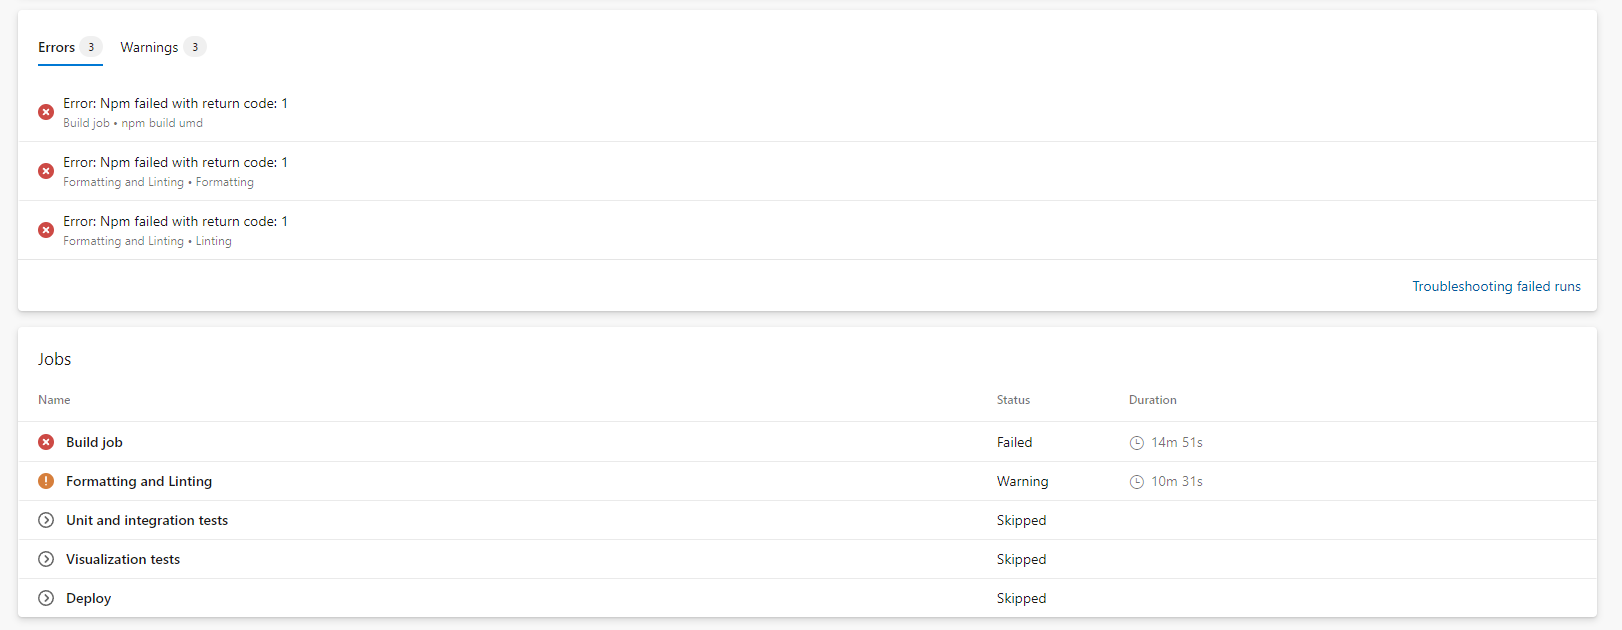
For any failures re-edit your local files, commit and push to your repository. The alterations will automatically added to your pull-request and it will be re-checked.
Its Live
Once your pull-request has been merged it will become live once any changes have been deployed into the Preview Release usually overnight but sometimes delayed a couple of days.
Summary
App Install
Node.js and Git
Fork and Clone
Name Remotes and Pull
Local Install
npm install
Local Build and Serve
Using VSCode? Install the recommended extensions and start Run and Watch Dev Host to compile and get started with the esm dev host. TO use the classic UMD-based development (and have the BABYLON namespace available), run Run and Watch Babylon Server.
To build the dev sources, shaders, and assets, run npm run build:dev.
To start the dev host, run npm run serve -w @tools/dev-host. This will start the dev host in http://localhost:1338 and will run the code located in the dev-host's src folder.
Note that this will not start watching the sources in the dev folder and will only watch for changes in the dev host src folder.
To start watching the dev packages, run npm run watch:dev in a new terminal window. This will make sure to watch all changes in the dev packages, including changes to shaders and assets, like scss files, images, and so on.
Edit
Change and save files including comments.
Test
Check if your code can be used in the local playground.
Success
Commit files you have added or edited but not those built.