Shadows
Introduction
In this tutorial, we are going to learn how to create shadows inBabylon.js. Shadows are now becoming dynamic, and they are now dynamically generated depending upon a light. You might want to visit a playground example for this tutorial:
Shadow ExampleHow can I do this?
Shadows are easy to generate using the babylon.js ShadowGenerator. This function uses a shadow map: a map of your scene generated from the light’s point of view.
The two parameters used by the shadow generator are: the size of the shadow map, and which light is used for the shadow map's computation.
var shadowGenerator = new BABYLON.ShadowGenerator(1024, light);
Next, you have to define which shadows will be rendered. Here we want the shadow of our torus, but you can “push” any meshes you want:
shadowGenerator.getShadowMap().renderList.push(torus);
Introduced with babylon.js v3.1, there are two new helper functions to deal with shadow casters:
addShadowCaster(mesh, includeDescendants): Helper function to add a mesh and its descendants to the list of shadow castersremoveShadowCaster(mesh, includeDescendants): Helper function to remove a mesh and its descendants from the list of shadow casters
And finally, you will have to define where the shadows will be displayed... by setting a mesh parameter to true:
ground.receiveShadows = true;
Soft shadows
If you want to go further, you can activate shadows filtering in order to create better looking shadows by removing the hard edges.
There are three filters available:
Poisson sampling
shadowGenerator.usePoissonSampling = true;
If you set this one to true, Variance shadow maps will be disabled. This filter uses Poisson sampling to soften shadows. The result is better, but slower.
Exponential shadow map
shadowGenerator.useExponentialShadowMap = true;
It is true by default, because it is useful to decrease the aliasing of the shadow. But if you want to reduce computation time, feel free to turn it off.
You can also control how the exponential shadow map scales depth values by changing the shadowGenerator.depthScale. By default, the value is 50.0 but you may want to change it if the depth scale of your world (the distance between MinZ and MaxZ) is small.
Blur exponential shadow map
shadowGenerator.useBlurExponentialShadowMap = true;
This is the better soften shadow filter but the slower as well. It uses blurred exponential shadow map.
The quality of the blur is defined by the following properties:
shadowGenerator.blurScale: Define the scale used to downscale the shadow map before applying the blur postprocess. By default, the value is 2shadowGenerator.blurBoxOffset: Define the offset of the box's edge used to apply the blur. By default, the value is 1 (Meaning the box will go from -1 to 1 in both directions resulting in 9 values read by the blur postprocess).shadowGenerator.useKernelBlur: You can decide to use kernel blur instead of box blur. While a bit more expensive, the quality of the shadow is far better with kernel blur. You can control the kernel size withshadowGenerator.blurKernel, which default value is 1.
Here is an example of blurred shadows: Blurred Shadow Example
Close exponential shadow map
Starting with Babylon.js 3.0, we introduced a new way of doing exponential shadow map to deal with self-shadowing issues: The Close Exponential Shadow Map (CESM). With CESM, you can get accurate self-shadowing but you will need to define additional parameters:
- You must provide the smallest range of depth values from your light by setting
light.shadowMinZandlight.shadowMaxZ. The smaller the range is, the better the shadow will be. - You must ensure that the light is as close as possible to the shadow casters.
You can enable CESM with:
shadowGenerator.useCloseExponentialShadowMap = true;
or if you want blurred shadows:
shadowGenerator.useBlurCloseExponentialShadowMap = true;
Here is an example of how CESM works: CESM Shadow Example
Percentage Closer Filtering (Webgl2 only)
Starting with Babylon.js 3.2, a new way of dealing with shadow maps was introduced. This greatly improves the performance and setup of shadows.
PCF shadows benefit from the new hardware filtering functions available in Webgl2 and produce a smoother version of Poisson sampling. They fallback to the standard Poisson Sampling when Webgl2 is not available on the target device.
You can enable PCF with:
shadowGenerator.usePercentageCloserFiltering = true;
Here is an example of how PCF works: PCF Shadow Example
As PCF requires more resources than can be available on small platforms, you can use the filteringQuality property to choose the best tradeoff between quality and performance depending on your experience (the lower the quality the better the performance).
shadowGenerator.filteringQuality = BABYLON.ShadowGenerator.QUALITY_LOW;
Contact hardening shadow (Webgl2 only)
Starting with Babylon.js 3.2, contact hardening shadows based on PCSS shadows was introduced.
PCSS could be seen as an improved version of PCF but despite looking better they are also more processor expensive and should be reserved for desktop applications. Like PCF, they will automatically fallback to Poisson Sampling if the code is running on a WebGL 1 platform.
In PCSS, the shadows will get softer when they are further away from the object casting them, simulating what happens in real life.
In order to get accurate result you will need to define additional parameters:
- You must provide the smallest range of depth values from your light by setting
light.shadowMinZandlight.shadowMaxZ. The smaller the range is, the better the shadow will be. - You can also play with the following parameter
contactHardeningLightSizeUVRatioin order to change how fast the shadow softens (between 0 and 1).
You can enable PCSS with:
shadowGenerator.useContactHardeningShadow = true;
Here is an example of how PCSS works: PCSS Shadow Example
As PCSS requires more resources than can be available on small platform, you can use the filteringQuality property to choose the best tradeoff between quality and performances depending on your experience. (the lower the quality the better the performances).
shadowGenerator.filteringQuality = BABYLON.ShadowGenerator.QUALITY_LOW;
The following link gives you a good appreciation of the softening of shadows as the shadow caster moves further away from the object receiving the shadow: Distance Shadow Softening Example
Transparent objects / shadows
For transparent objects to cast shadows, you must set the transparencyShadow property to true on the shadow generator:
Transparent Shadows Example
Starting with Babylonjs v4.2, you can simulate soft transparent shadows for transparent objects. To do this, you need to set the enableSoftTransparentShadow property to true on the shadow generator:
Soft Transparent Shadows Example
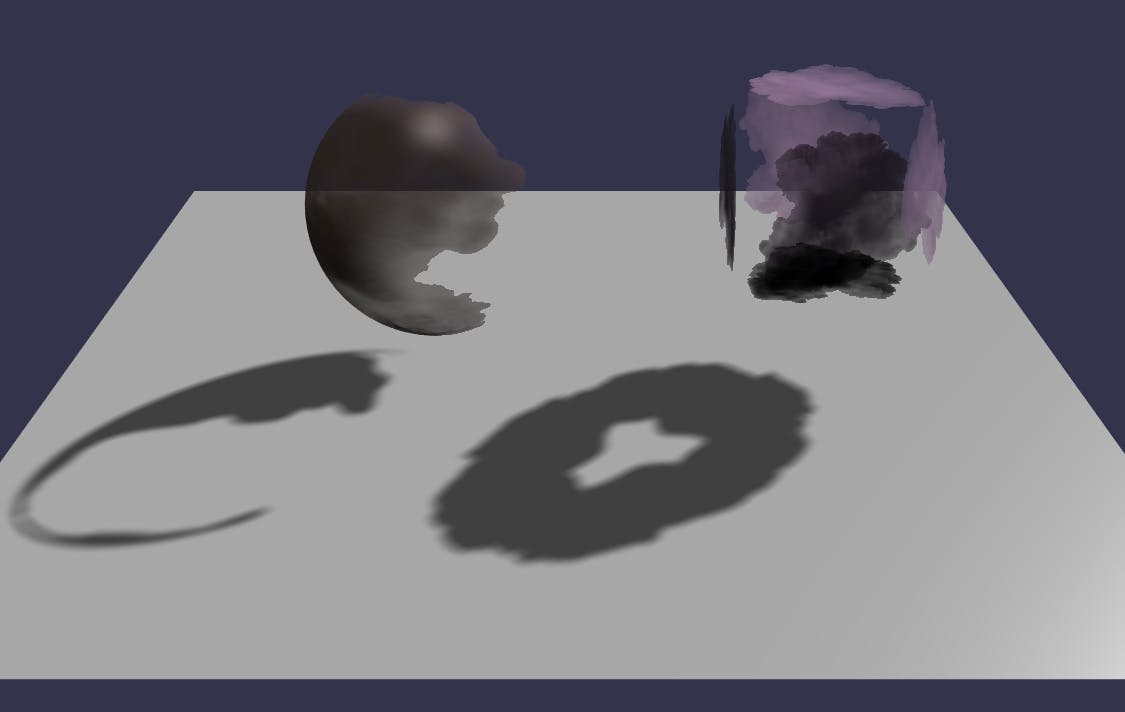
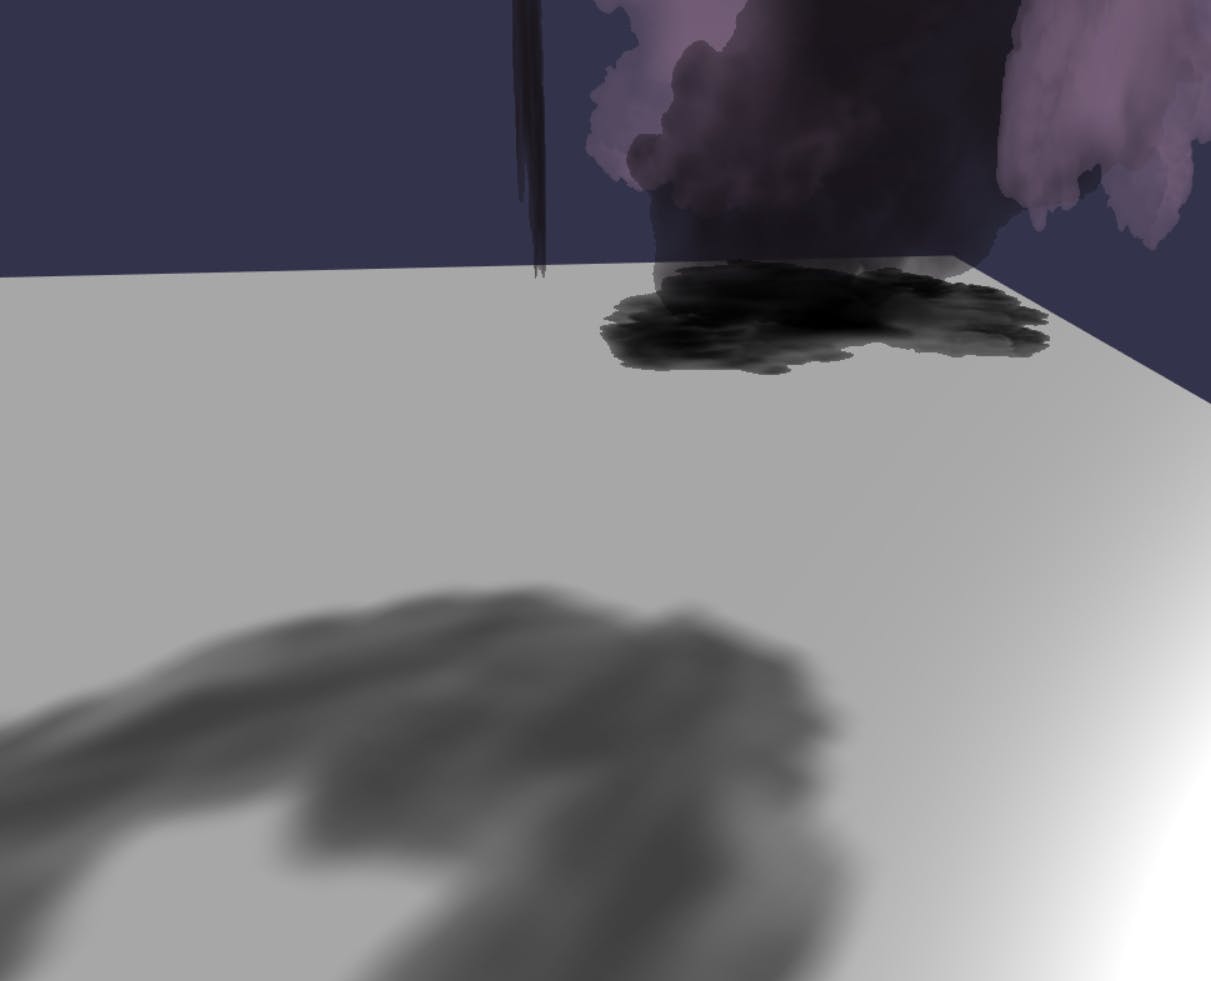
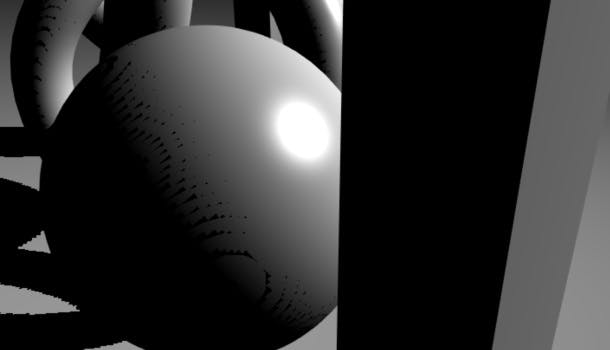
It works by generating some dithering patterns in the shadow map, based on the alpha value of the fragment. This pattern can be visible, depending on your objects (being zoomed or not) and/or on the filtering method used.
Here's for example what it looks like when you don't set a filtering method:
The patterns are clearly visible.
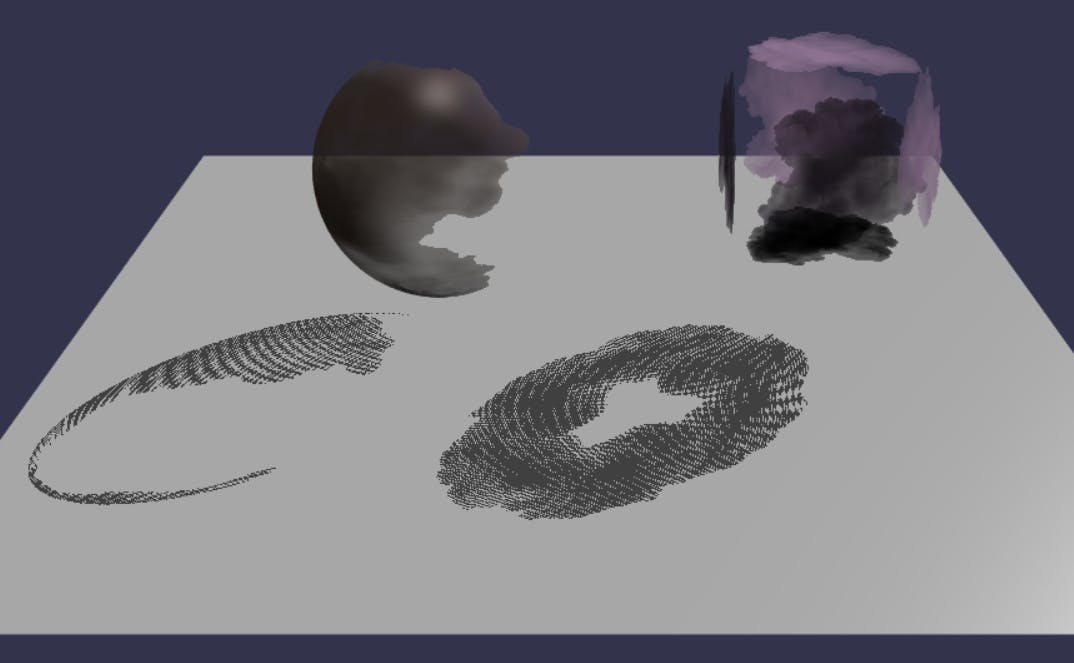
Even when using a filtering method, you could still be able to see the patterns if zooming too much (filtering=PCF):
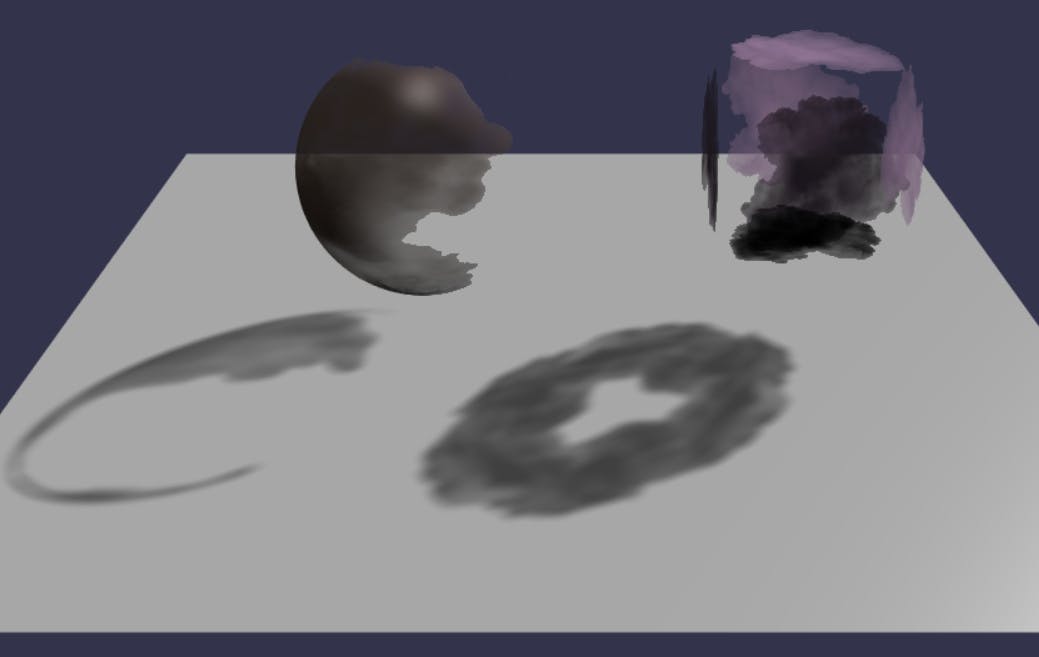
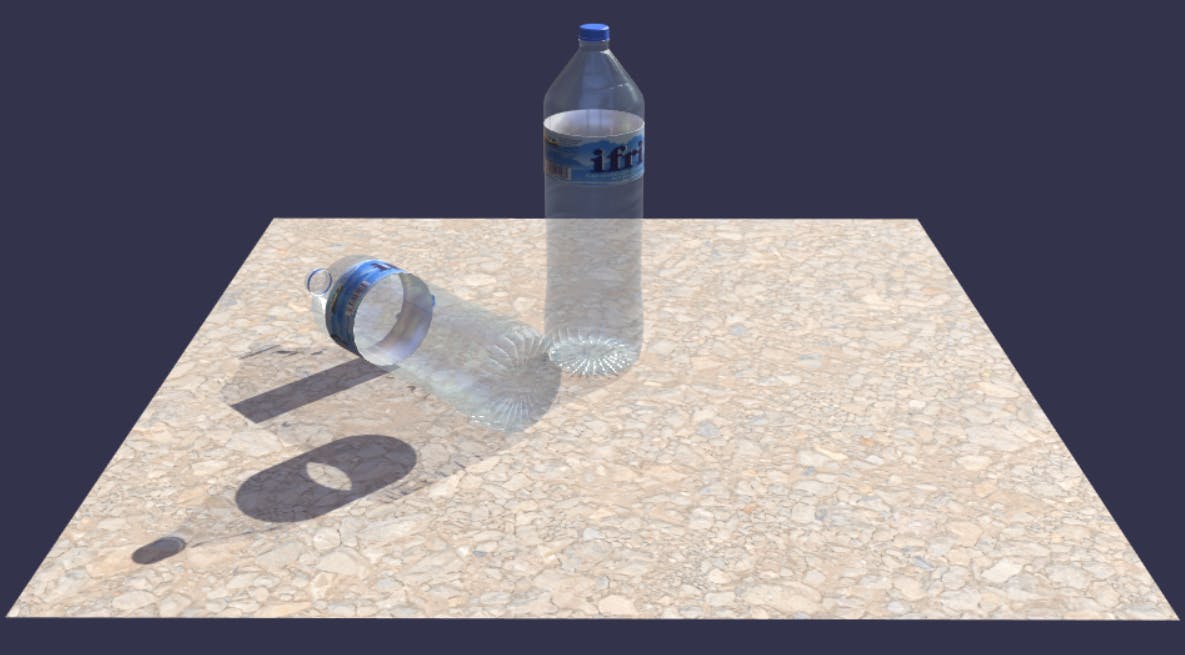
With Blur exponential, however, you can zoom quite a lot and still get good shadows:
So, you may need to test different filtering methods to find the best one for your case.
This one was generated with PCF, for eg.
Examples
You can find a live example here:
Transparent Shadow ExamplePlease find here pictures of various filters used with a spot light:
No filter
Poisson sampling
Exponential Shadow Map
Blur Exponential Shadow Map
Percentage Closer Filtering
Contact Hardening Shadow
Lights
Keep in mind that this shadow generator can only be used with one light. If you want to generate shadows from another light, then you will need to create another shadow generator.
Only point, directional and spot lights can cast shadows.
Point lights
Point lights use cubemaps rendering so please be cautious when enabling them as this could lead to some performance issues. You can also visit the [point light shadow map playground scene]( Point Light Shadow Map Example
Furthermore, BlurExponentialShadowMap and CloseBlurExponentialShadowMap are not supported by point lights (mostly because blurring the six faces of the cubemap would be too expensive).
To optimize rendering, you can also decide to use the point light like an unlimited spot light if you are sure that all shadow casters are on the same side of the light. To do so, just specify a direction for your light and automatically Babylon.js will use a simple texture for the shadow map instead of the cubemap.
Spot lights
Spot lights use perspective projection to compute the shadow map.
Directional lights
Directional lights use orthogonal projection. Light's position is evaluated automatically for you to get the best shadow map possible. You can control this behavior by turning light.autoUpdateExtends off.
You can control also the size of the projection window by modifying one of those properties:
light.shadowOrthoScale: 0.1 by default which means that the projection window is increase by 10% from the optimal size.light.shadowFrustumSize: Off by default with a value of 0. You can specify a value which will be used to define the square size of the frustum to use.
The light's position, as well as the positions of the mesh that you have pushed into the renderlist, determine where the shadows will appear. Note that your light point-of-view from this position have to view all meshes in the renderList; otherwise the shadows may not be rendered. See the following example: Animated Directional Light Example
You can also set light.autoCalcShadowZBounds = true to compute automatically the best light.shadowMinZ and light.shadowMaxZ values for each frame. Tightening those values to best fit your scene improve the precision of the depth map, and consequently the shadow rendering. Be warned, however, that when using this parameter with PCF and PCSS you may miss some shadows because of the way those filtering technics are implemented (if all your meshes are both shadow casters and receivers, you won't have any problems with PCF / PCSS, though). Note that light.autoUpdateExtends must be set to true for light.autoCalcShadowZBounds to work.
Starting with Babylon.js 4.1, Cascaded Shadow Maps are now available for directional lights. Check the dedicated page for details.
In-depth analyzing of Directional light position
The light position is set as being -light.direction at creation time, and you can change it later on by accessing light.position.
You need the light position to build the light view matrix used by the shadow generator to render the scene in the shadow map.
Even if using an orthographic projection in the end (as you do for directional lights), you still need a view matrix to transform the geometry to the light coordinate system (where the "look at" vector corresponds to the light direction for directional lights). To build this matrix, you really need a position!
Often you can read explanations about directional lights that says you don't need a position, but if you look at their code, you can see they use a (0,0,0) position to build their view matrix... Or in some others they don't explicitly put values in the translation part of the matrix, but it's still 0 values you get there by default.
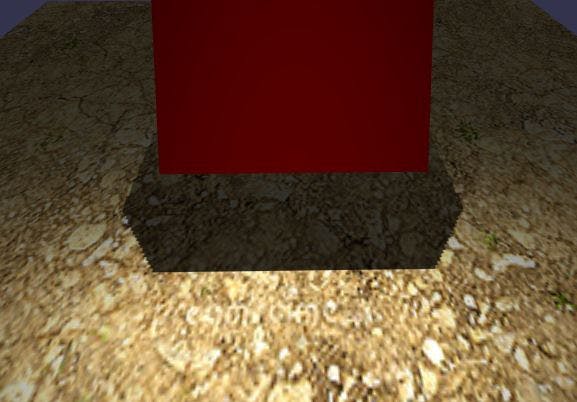
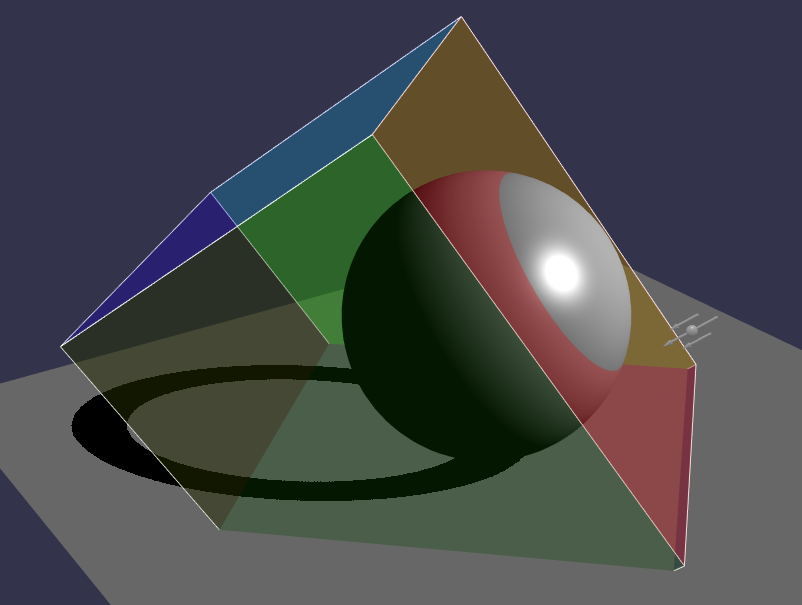
This position defines where the light frustum is positionned in the world. See the following example: Analyzing Directional Light Position
The colored box is the light frustum and you can see the light gizmo representing the light position and direction. Everything in this box (and only things in this box) will be rendered in the shadow map.

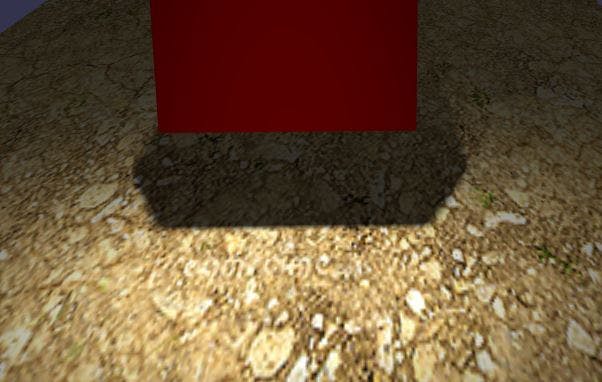
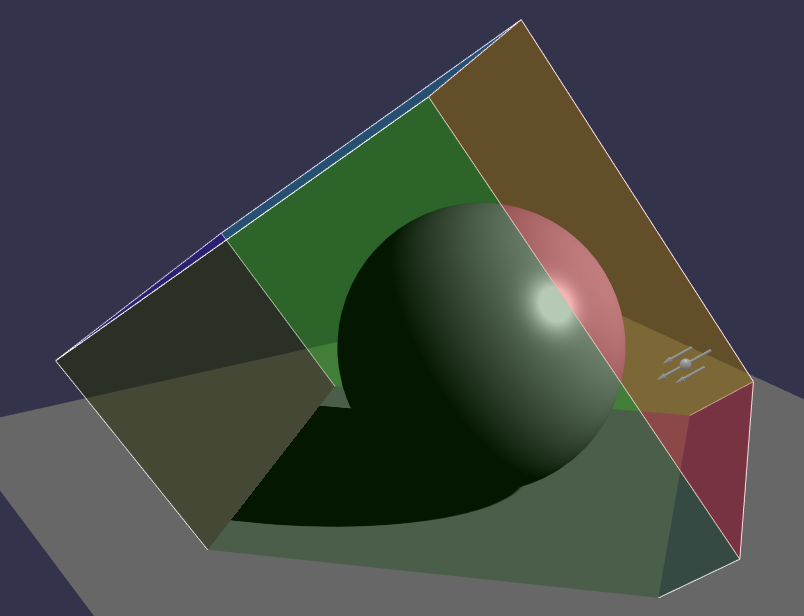
It's not very obvious in the screenshot, but the light position lies on the near plane. It's because we set light.shadowMinZ = 0 (we have also set light.shadowMaxZ = 3, which is the distance to the far plane of the light frustum). If we change the value, the near plane (and the light frustum) will be moved accordingly (the light position being still the same):
Here shadowMinZ = 0.5. As you can see, a part of the sphere is now outside of the box and so is not rendered in the shadow map, making the shadow wrong. We could also have moved the light without changing the shadowMinZ value for the same result.
You can play in the inspector by changing the position/direction of the light as well as the shadowMinZ / shadowMaxZ values of the shadow generator to better see how it works.
By default, the x and y extents of the light frustum (the position of the left/right/top/bottom planes of the frustum) are automatically computed by Babylon because light.autoUpdateExtends = true. You can set this property to false and set the frustum sizes manually by updating the orthoLeft, orthoRight, orthoTop and orthoBottom properties. You can use the shadowFrustumSize property instead if you want to set the frustum with a fixed size in all dimensions.
The values for the near/far planes are stored in shadowMinZ and shadowMaxZ, properties that you can change (as in the PG). You can also let Babylon compute them automatically by setting light.autoCalcShadowZBounds = true (false by default). Note that when Babylon computes the bounds automatically, it does so by taking into account only the objects that are shadow casters! That's why if you activate it in the PG, you will see that the light frustum does not encompass the ground, which is not a shadow caster but only a receiver.
Important:
Normally, to know if a point is in shadow, you compute its projection into the light frustum, and if it is inside you compare its depth against the depth corresponding to this position in the shadow map. So, if the point is NOT inside the light frustum, it is not considered shadowed and should be fully lit.
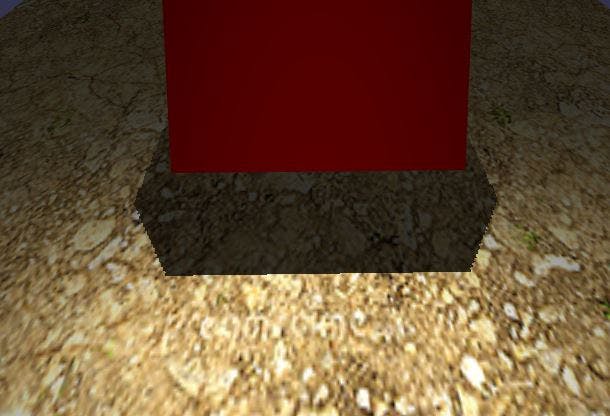
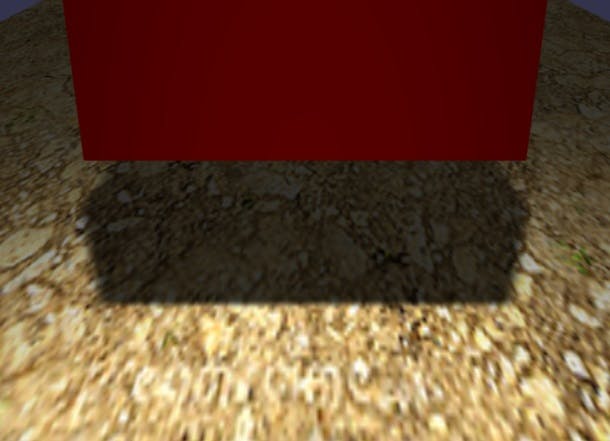
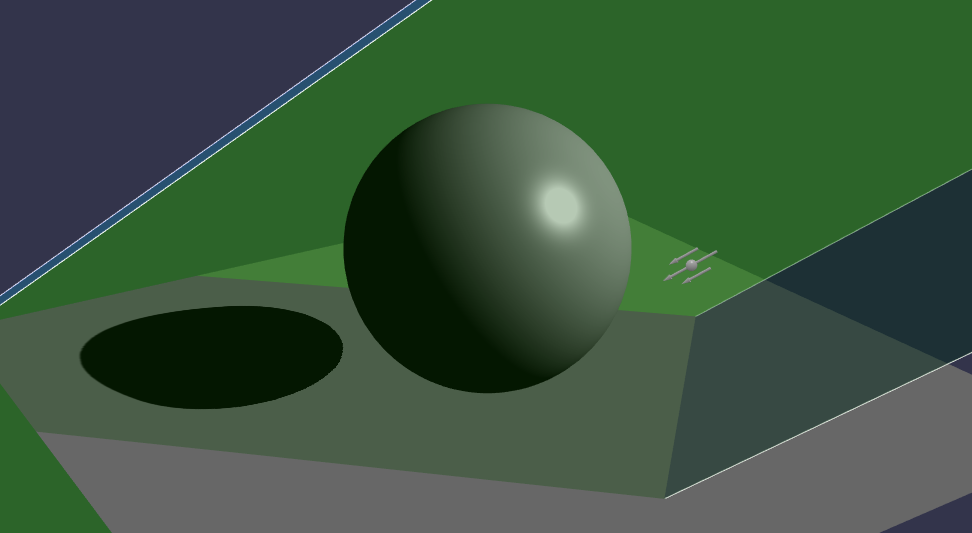
Look at this screenshot again:
According to the explanations above, the points of the ground that are not inside the cube should not be shadowed! They still are because the shadowing code does not apply a rejection based on the depth, only on the x/y coordinates: if the point is inside the frustum according to the left/right/top/bottom planes it's ok, even if the point is farer than the far plane (or nearer than the near plane).

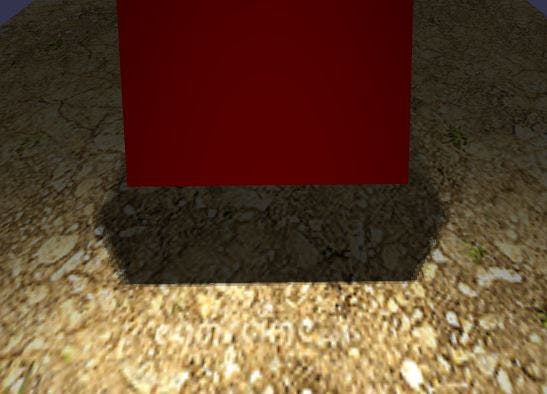
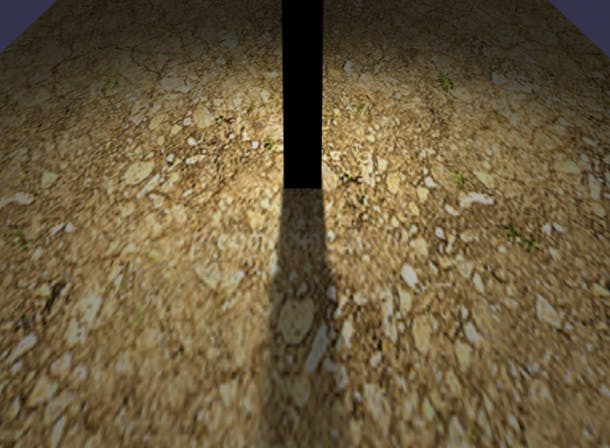
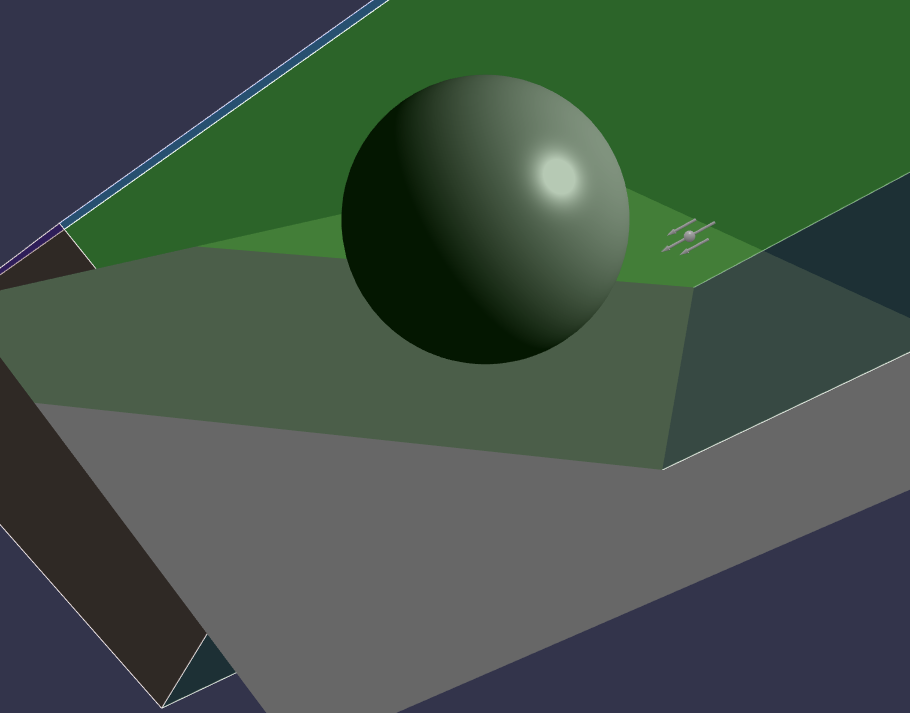
HOWEVER, that's not the case for the PCF/PCSS filtering methods, they do take into account the depth for the rejection test (for historical reasons probably). Same screenshot than above but with PCF this time:
As you can see, the shadows stop at the frustum boundaries. To correct the problem, you need to increase the light shadow far plane distance (light.shadowMaxZ).
So at this point, you ask: why not setting shadowMinZ to a very small value (-1e10) and shadowMaxZ to a very big value (1e10) to get rid of those problems? One can even set the left/right/top/bottom properties to very small/big values and call it a day, no problems anymore with directional lights, our frustum is always big enough to contain all the objects of the scene.
The problem is that you loose details/precision in the shadow map. The bigger your frustum (in x/y directions), the more objects will be projected to the same pixels in the shadow map, so the less details. The more stretched your frustum (in z direction), the less precision you have on the depth buffer as bigger ranges of Z values will have to be mapped to the [0, 1] range used for the final rendering.
Here's a screenshot with shadowMinZ=-50000 and shadowMaxZ=50000 (PCF filtering):
As you can see the shadow is wrong. The object (sphere) is very simple and the artifacts are not really visible (except that the size is wrong), but with other objects you will get much stronger artifacts. Also:
It's the biggest artifact possible, the shadow disappeared! We have set shadowMinZ=-100000.000 and shadowMaxZ=5 without filtering methods.
Customizing the projection matrix
All lights need to provide a projection matrix to shadow generators in order to build the shadow map. You can define your own version by setting light.customProjectionMatrixBuilder value:
light.customProjectionMatrixBuilder = function(viewMatrix: Matrix, renderList: Array<AbstractMesh>) {return BABYLON.Matrix.PerspectiveFovLH(angle, 1.0, activeCamera.minZ, this.shadowMaxZ);}
Troubleshooting
Shadow mapping is a great technique but it is not perfect. Several parameters can be tweaked to help improving final rendering.
Bias
You may want to reduce shadow acne resulting from not precise enough shadow map. To do so, you can define the bias (which is 0.00005 by default).:
shadowGenerator.bias = 0.01;
Shadow generators compare the depth of every pixel with the depth of occluders (shadow casters) seen from the light point of view. As we are dealing with low precision textures (when supported Babylon.js will use float textures but low-end devices only support int textures), you may want to boost the depth of occluders to facilitate self-shadowing (An object casting shadows on itself).
Back face rendering
You can improve self-shadowing issues by setting shadowGenerator.forceBackFacesOnly to true. This will force the shadow generator to render back faces of your mesh to the shadow map. This can clearly improve the overall precision and reduce the need for a bias.
Improving the projection matrix precision
By default, the projection matrix of a light uses the minZ and maxZ of the main camera. But you may want to control it in order to get a more precise shadow map by reducing the distance between minZ and maxZ. To do so you can set light.shadowMinZ and light.shadowMaxZ.
Use the best option for self-shadowing
As mentioned earlier, if you want blurred shadows on a self-shadowing object, the best option will probably to go with close exponential shadow map.
Frustum edge falloff
Depending on how you setup your shadow generator, you could face weird falloff when an object is near the edges of the shadow map. To elegantly fix this issue, you can set a property named frustumEdgeFalloff:
shadowGenerator.frustumEdgeFalloff = 1.0;
You can find an example here: Frustum Edge Falloff Example
This property controls the extent to which the shadows fade out at the edge of the frustum. It is used only by directional and spot lights. By default, the value is set to 0 (no falloff) and 1.0 (complete falloff).
Freezing shadows in static world
In case you have a static game world (objects which cast shadows) - there is no need to do the same shadow calculations 60 times per second. It could be enough to create and place a shadowMap only once. This greatly improves performance, allowing higher values of shadowMap's resolution.
Shadow generators can be frozen with:
shadowGenerator.getShadowMap().refreshRate = BABYLON.RenderTargetTexture.REFRESHRATE_RENDER_ONCE;
Ask the light to not recompute shadow position with:
light.autoUpdateExtends = false;
Cleaning bone matrix weights
Wrong or imprecise bone weights of an animated mesh may cause negative or weird shadows. In this case you can clean up the weights automatically when loading with the following code:
BABYLON.SceneLoader.CleanBoneMatrixWeights = true;
(You should set this before loading a scene or meshes.)
Self Shadow
It is probably the case that Self-Shadowing requires the biggest attention during its setup. Let's try to setup self-shadowing on the following scene): Self-Shadowing Step 1
The first step consists in adding a shadow generator in the scene and defining every meshes as both casters and receivers (we also force the bias to 0 to highlight the generated artifacts): Self-Shadowing Step 2
As you can notice there are weird patterns appearing everywhere on the surface of the self-shadowed objects. This is called shadow acnea (more information).
Fortunately, in Babylon we do have a way to solve the issue.
Bias
As detailed in the previous opengl tutorial, you can increase the value of the bias to make all the acnea disappear: Self-Shadowing Step 3
Unfortunately doing this introduces another side effect called peter panning where the shadows are not attached to their objects anymore.

This is where you can benefit from a Babylon.js 3.2 feature called normal bias.
Normal Bias (Since 3.2)
First move back the bias to be at the limit of seeing peter panning artifacts: Self-Shadowing Step 4
As you notice, there is now a bit of acnea appearing on the object where the surface is parallel to the light direction:
This is where to add a bit of normal bias. Basically, during the generation of the shadow map, this will inset the geometry in the direction of the normal where the surface is parallel to the light: Self-Shadowing Step 5
All the artifacts are now gone and it is time to make our shadows look awesome.
Soft Shadows
Try to change the shadow generator to Contact hardening: Self-Shadowing Step 6
At first, you cannot see the contact hardening effect and, not only this, you can see shadow acnea again. Taking note of the section on PCSS you realize that the light min and max should be set as close as possible: Self-Shadowing Step 7
Now the contact hardening effect is present but the acnea is even stronger. Unfortunately, the bias is applied on the normalized coordinates depth (0-1) so changing the near and far value of the light impacts how big the bias should be.
So, go back and change the bias to its maximum before seeing peter panning and then apply some normal bias to remove the rest of the acnea leads to the following result: Self-Shadowing Step 8
Your shadows are now soft without acnea or peter panning.
Custom shadow map shaders
Global custom shadow map shader
Starting with Babylon.js v4.0, you can specify your own shader to render shadow maps. To define that shader you can use the shaddowGenerator.customShaderOption property:
shadowGenerator.customShaderOptions = {shaderName: "customShadowMap",uniforms: ["customWorld"]}
The only required value is shaderName. But you can also add:
- attributes: used to specify additional attributes you need in your shader
- uniforms: used to specify additional uniforms you need in your shader
- samplers: used to specify additional samplers you need in your shader
- defines: used to specify additional defines you need in your shader
The shadow map generation is a complex task and requires to take in account several defines (like the type of the shadow map between int and float, or the need for alpha test). It is recommended to check the current default shaders here:
- Vertex:https://github.com/BabylonJS/Babylon.js/tree/master/packages/dev/core/src/Shaders/shadowMap.vertex.fx
- Fragment: https://github.com/BabylonJS/Babylon.js/tree/master/packages/dev/core/src/Shaders/shadowMap.fragment.fx
In order to update your own uniforms, you can rely on shadowGenerator.onBeforeShadowMapRenderObservable observable. This will be called for you everytime the shadow map will be rendered and it will give you the current compiled effect.
You can find a complete example here: Global Custom Shadow Map Shader
Note that this shader will be used to render all the shadow caster objects pertaining to the shadow generator. If you need more fine-grained control, see next section.
Per-material shadow depth map shader
Starting with Babylon.js v4.2, you can specify for each material your own shader to render objects in the shadow maps.
It can come in handy when you have distorting / warping objects (through the use of custom shaders) in different ways and need the shadows to follow the deformations.
Also, you may want to implement custom ways for alpha rejection, and in this case the standard shadow map material will not be able to render your shadows correctly.
Basic usage
Take a look at this example: Incorrect Shadows
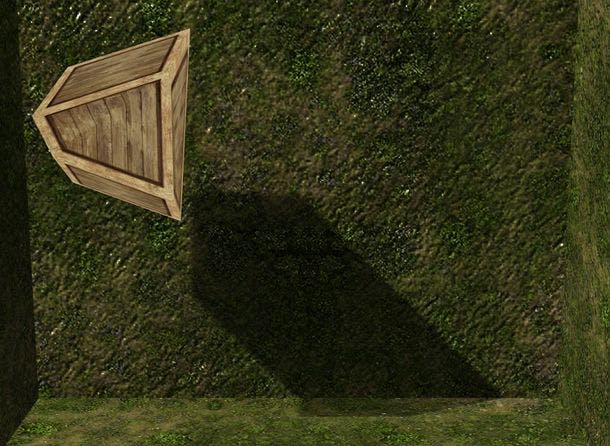
The cube is distorted thanks to a custom shader and the shadows are wrong, it should be:
You can define a custom shadow map shader by using the new ShadowDepthWrapper class.
The easiest way to do this is by doing:
const shadowDepthWrapper = new BABYLON.ShadowDepthWrapper(material, scene);
material being the material (shader) for which you want to generate accurate shadows.
Then assign this wrapper to the corresponding Material.shadowDepthWrapper property of your base material:
material.shadowDepthWrapper = shadowDepthWrapper;
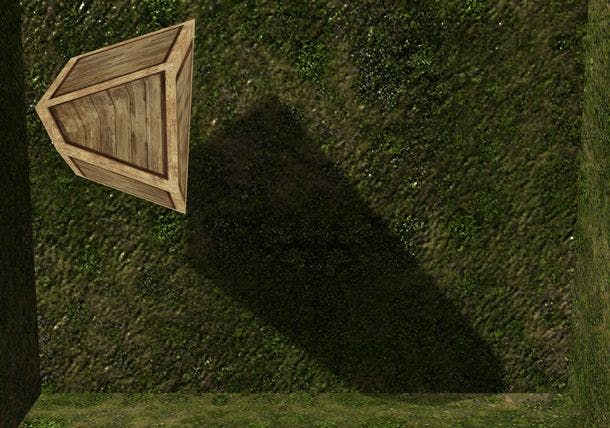
Et voilà! You now have proper shadows: Fixed Shadows
It works for any type of materials, being a CustomMaterial, PBRCustomMaterial, ShaderMaterial or NodeMaterial instances. There's no point of using this for StandardMaterial and PBRMaterial materials because the standard shadow map shader already handles the types of deformation / alpha rejection those materials can generate (namely morph targets / bones / alpha testing).
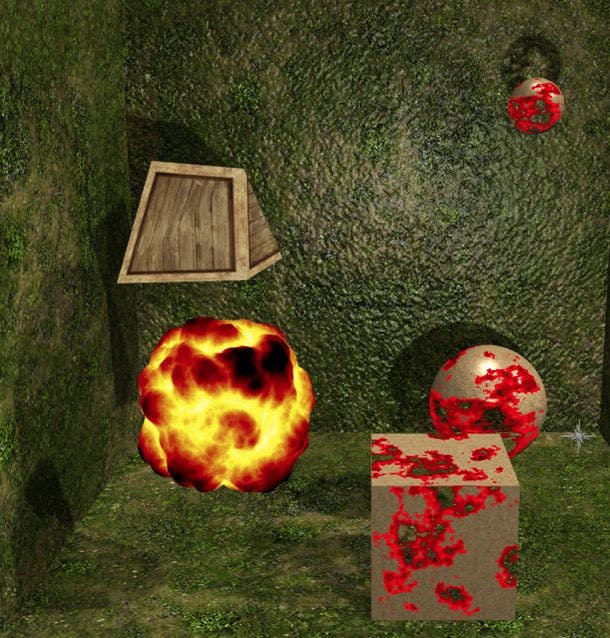
In this demo: Shadows with Various Materials
- the floating cube is using a
ShaderMaterialfor its base material - the grounded cube and sphere are using a
CustomMaterialfor their base material: they are both using the same material (thanks to @Wigen for the dissolving effect!) - the fire sphere is using a node material for its base material (thanks to @dannybucksch for this node material!)
- the small floating sphere is using the same base material (a copy in fact) than the grounded cube and sphere but a specifically crafted
ShaderMaterialfor its shadow depth wrapper: see next section for more explanations
For the node materials, you need to instruct the wrapper of the variable name that holds the final world position of the vertex, as it is needed for the shadow depth computation.
Here's how to do it:
BABYLON.NodeMaterial.ParseFromSnippetAsync("XXXXXX", scene).then((nodeMaterial) => {var worldPosVarName = nodeMaterial.getBlockByName("worldPosFinal").output.associatedVariableName;mesh.material = nodeMaterial;mesh.material.shadowDepthWrapper = new BABYLON.ShadowDepthWrapper(nodeMaterial, scene, {remappedVariables: ["worldPos", worldPosVarName]});});
After loading the node material, this snippet gets the variable name associated to the output of the block named worldPosFinal and passes it to the constructor of the wrapper.
Be aware that the block that outputs the final world position may not be named worldPosFinal in your own node materials, pick the right name depending on your specific case!
One caveat: for the time being, wrapped node materials are not able to handle normal bias.
In-depth explanations and advanced usage
The ShadowDepthWrapper makes its magic happen by injecting some blocks of code in the vertex and fragment shaders of the material you pass when creating an instance (note it does so on a copy of the material, not on the material itself which remains unchanged).
Controlling the code injection
The blocks can be injected at any location in your shaders if you use these #define in your base material to locate the spots where the code should be injected:
#define SHADOWDEPTH_NORMALBIASin the vertex shader#define SHADOWDEPTH_METRICin the vertex shader#define SHADOWDEPTH_SOFTTRANSPARENTSHADOWin the fragment shader#define SHADOWDEPTH_FRAGMENTin the fragment shader
If not used, by default the code is injected just before the end of each shader for the METRIC and FRAGMENT blocks and:
- at the
#define CUSTOM_VERTEX_UPDATE_WORLDPOSlocation for theNORMALBIASblock - at the
#define CUSTOM_FRAGMENT_BEFORE_FOGlocation for theSOFTTRANSPARENTSHADOWblock
for the CustomMaterial and PBRCustomMaterial materials.
For custom shader written code (through a ShaderMaterial class), if you don't declare a #define SHADOWDEPTH_NORMALBIAS somewhere in your vertex shader code, the normal bias code won't be injected and so the normal bias feature won't work (it won't bug, however, it will simply do nothing). Same thing for the soft transparent shadows: if you don't declare a #define SHADOWDEPTH_SOFTTRANSPARENTSHADOW somewhere in your fragment code, the soft transparent shadows won't be available.
Note: as said above, normal bias is not supported yet for NodeMaterial based materials
Injection in the vertex shader
The NORMALBIAS block is used to implement the normal bias feature of the shadow generators.
If you create a custom ShaderMaterial material and needs to support this functionality, you need to put #define SHADOWDEPTH_NORMALBIAS somewhere in your vertex code.
To work correctly, this block needs the vertex final world position and the vertex final world normal. In the NORMALBIAS block of code, those variables are named worldPos and vNormalW respectively. If those are not the names you use in your vertex code, you can instruct ShadowDepthWrapper to remap them:
shaderMaterial.shadowDepthWrapper = new BABYLON.ShadowDepthWrapper(shaderMaterial, scene, {remappedVariables: ["worldPos", "p", "vNormalW", "normalW", "alpha", "1."]});
This is the code used in the demo for the shadow depth wrapper of the floating cube. In the vertex code, the final world position is named p and the final world normal normalW, hence the remapping you can see above (the alpha remapping is explained below).
The METRIC block also needs the vertex final world position, as well as the gl_Position variable being set with the right value. That's why it's injected by default at the end of the vertex code and normally should be left this way. However, if you need it to be injected somewhere else, use #define SHADOWDEPTH_METRIC in your vertex code and make sure to remap the vertex world position if necessary.
Injection in the fragment shader
For the fragment shader, injecting the FRAGMENT block at the very end can be sub-optimal because the fragment shader may execute some code that is not needed for the shadow depth rendering. Typically, the fragment shader will discard the current fragment based on some custom logic that can be done at the start of the shader.
When using a CustomMaterial or a PBRCustomMaterial, a lot of code related to light and color calculation is run in the shader that is not needed for fragment discarding. So, being able to inject the block of code earlier in the process and stop the fragment shader from running after this block is executed will improve performance.
You can inject the shadow depth fragment block by putting a #define SHADOWDEPTH_FRAGMENT anywhere in your fragment code. If this define is not found in your shader code, the block is injected at the very end of the shader, as explained above. Note that this block ends with a return; instruction, so it will make the processing of the shader automatically stops there.
In the demo linked above, the custom material created for the grounded sphere and cube uses this possibility:
mat.Fragment_MainBegin(`float n = texture2D( noise, vUv ).x - dissolve;if (n < 0.0) { discard; }#define SHADOWDEPTH_SOFTTRANSPARENTSHADOW#define SHADOWDEPTH_FRAGMENT`);
The first two lines are the code that implements the custom discard logic and the #define SHADOWDEPTH_FRAGMENT will make the ShadowDepthWrapper class inject the shadow depth fragment block of code here. As all of this is injected right at the beginning of the fragment shader (Fragment_MainBegin), all the code that comes afterwards won't be executed when the shader is used for shadow depth rendering.
Use #define SHADOWDEPTH_SOFTTRANSPARENTSHADOW to indicate where to inject the code handling the soft transparent shadows. By default, the code is injected near the end of the fragment shader because it needs the alpha value to be able to generate the soft shadows, but you can generate it anywhere you want with this define, as shown above.
For the code injected by #define SHADOWDEPTH_SOFTTRANSPARENTSHADOW to work, a variable named alpha must exist (the output transparency of the fragment). If you have this information but in a variable with another name, use the remapping possibility to remap the name of this variable. If you don't have a variable with this information (because your shader does not compute alpha values for eg), you can simply pass 1. as the remapping value, as we did above:
shaderMaterial.shadowDepthWrapper = new BABYLON.ShadowDepthWrapper(shaderMaterial, scene, {remappedVariables: ["worldPos", "p", "vNormalW", "normalW", "alpha", "1."]});
Optimizing further and standalone shadow depth wrapper
In the example above we optimized the fragment shader used for shadow depth rendering by injecting the code early. However, the shadow depth material is still a CustomMaterial at its root (or a PBRMaterial if you used a PBRCustomMaterial) as it is created by wrapping such a material.
It means some extra code can still be executed in the vertex/fragment shaders (depending on where you inject the blocks of code) and that all the uniforms / samplers used by the full material are still bound (even if not used) when the depth material is used for rendering. Also, on the javascript side, a fair amount of code is involved to check that a standard / PBR material is ready because it must deal with all the options provided by those materials, code that could be avoided if you used a ShaderMaterial material to implement the depth shader: that's what a standalone shadow depth wrapper is used for.
A standalone shadow depth wrapper is created simply by passing the standalone: true option when you create the wrapper:
const shadowDepthWrapper = new BABYLON.ShadowDepthWrapper(shaderMaterial, scene, {standalone: true});
This means that this shader will only be used for depth rendering and won't be used as a material to render regular meshes.
In the demo, this is used for the small floating sphere:
- the base material of the sphere is a
CustomMaterial - the wrapper bound to
sphereFloating.material.shadowDepthWrapperis a wrapper generated around a specificShaderMaterialmaterial that only implements the logic for fragment discarding, so which is much more lightweight than the shader that would be generated were it based on theCustomMaterialbase material