Transparent Rendering
This article has been written to help you understand how things are drawn on screen, and how transparency is handled inBabylon.js. Feel free to contribute in whatever way seems fit to you!
General Considerations
A general rule of thumb in real-time 3D rendering is that drawing several overlapping opaque objects is always easier than non-opaque ones. This is due to the fact that opaque objects are compatible with the use of a depth buffer, and thus no specific order is required when rendering them.
A depth buffer is a surface using the same dimensions as the screen, and holding for every pixel the following information: how far from the camera was the last pixel drawn here. With this information, we can draw as many objects as we want and always be sure that we will never draw something that was supposed to be hidden by another object.Babylon.js offers access to this information with a special DepthRenderer object.
Rendering objects without a depth buffer would require resorting to an old-school technique called Painter's Algorithm, which is extremely simple: draw further objects first. Sky, then backdrop, etc. all the way to foreground objects. This is basically ordering objects by distance from camera (a.k.a. depth), and clearly not enough for most cases.
Testing against a depth buffer during render is a very common technique, simple to implement and performance-inexpensive. However, things get more complicated for non-opaque objects, as a depth buffer can't be used anymore (since these objects don't completely hide what's behind them).
This is what a depth buffer looks like for a scene which contains only opaque meshes:
Rendering Order
General Order
Before actually drawing meshes on the screen,Babylon.js puts them in the following categories, which are presented in the order in which they are drawn:
-
Depth pre-pass meshes
-
Opaque meshes
-
Alpha tested meshes
-
Sprites (handled by SpriteManager)
-
Particles (handled by ParticleSystem)
-
Alpha blended meshes, sorted by depth (= distance to camera)
Categories 4 and 5 should be self-explanatory, we won't discuss them further.
Rendering Groups
Renderable objects can be organized into rendering groups, which act as layers. Layers are rendered in ascending order by ID, starting with the default one (which has the ID of 0). Within each rendering group, the "General Order" above will also be used.
To use rendering groups, you simply need to set the property .renderingGroupId on the objects you want to put in other layers than the default one.
This property exists on meshes, particle systems and sprite managers.
By default, there are 4 rendering groups in total, meaning that the only valid IDs are 0, 1, 2 and 3. This can be increased by setting the static property BABYLON.RenderingManager.MAX_RENDERINGGROUPS to the max ID you'd like (ex. set to 8 to support 7 rendering groups).
Alpha Index
Meshes have another property that has an influence on the rendering order: .alphaIndex
By default, this property is set to Number.MAX_VALUE, which is the highest value that a numerical variable can hold (around 1.79E+308).
Unlike opaque and alpha-tested meshes, theBabylon.js rendering engine sorts alpha-blended meshes by depth before drawing them on screen (see below). The .alphaIndex property allows you to override this sorting, as one mesh which has a lower alpha index than another will always be rendered before it, regardless of their respective depth.
To phrase it more simply: alpha-blended are sorted first by alpha index, and then by depth (distance to camera).
Keep in mind that this property works only for alpha-blended mesh, and has absolutely no effect for opaque and alpha-tested ones.
Note: this property can be manually set on meshes in 3DS Max with theBabylon.js exporter plugin.
Opaque or Transparent?
How your meshes are categorized may be very important for the final aspect of your scene. Let's take a closer look at the way categories 1 to 4 are defined.
Depth pre-pass meshes
The depth pre-pass meshes define an additional rendering pass for meshes. During this pass, meshes are only rendered to depth buffer. The depth pre-pass meshes are not exclusive. A mesh can have a depth pre-pass and an opaque or alpha blend pass. To enable the depth pre-pass for a mesh, just set mesh.material.needDepthPrePass = true.
The goal is either to optimize the scene by rendering meshes to the depth buffer to reduce overdraw or to help reducing alpha blending sorting issues.
Opaque Meshes
These will be the easiest to render: their polygons are fully drawn on screen with their colors and textures. A depth buffer will be used to make sure nothing is drawn over something that is closer to the camera.
Alpha Tested Meshes
Same as opaque meshes, except that some parts of these meshes can be defined as completely transparent. Alpha test means that each pixel of the mesh can be either opaque (and then drawn on screen and in the depth buffer) or transparent, which means the pixel is completely discarded. Although very efficient, this type of render usually produces aliased borders and does not allow for smooth transparency effects.
By default, a pixel is considered transparent if its alpha value is < 0.4, and opaque if not. For the StandardMaterial and PBR materials, you can change the 0.4 value by updating the mesh.material.alphaCutOff property.
Alpha Blended Meshes
These meshes have translucent parts that may have an alpha value of 0.0 (completely transparent) to 1.0 (completely opaque). Their color is blended with what's behind them to reflect that. These meshes are sorted by depth, based on the center of their bounding sphere. This does not prevent some problems when several alpha-blended meshes overlap.
Also, note that backface culling is pretty much obligatory for alpha blended meshes, otherwise polygons from the front and the back of the objects will be garbled (unless you use a depth pre-pass)
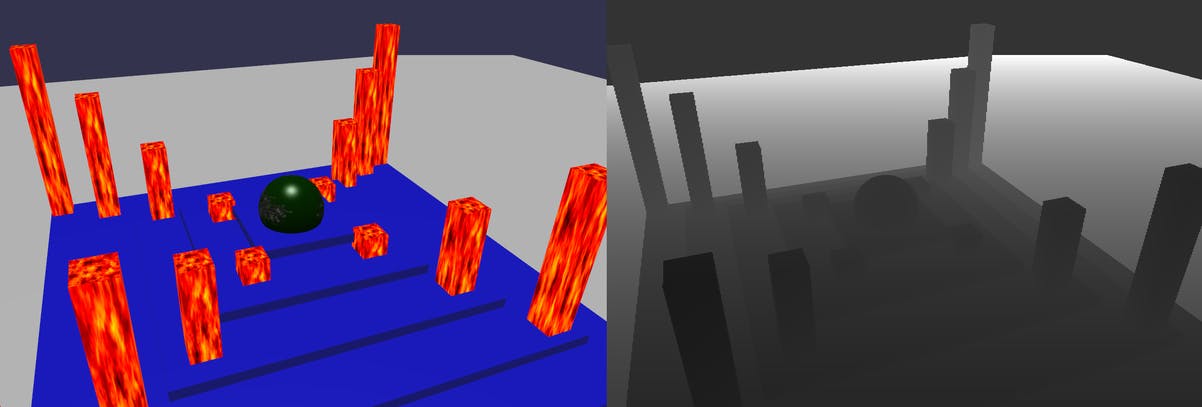
This is what a depth buffer looks like for a scene that contains each of those type of meshes:

In this scene, the sphere is alpha tested, the base blocks are opaque and the pillars are alpha blended. As you can see, the alpha blended meshes are not written to the depth buffer!
Categorizing meshes
The following list will help you understand which categories your meshes will be put into. For more information on each of the properties mentioned here, take a look at the Materials tutorial.
Alpha blended meshes:
- Any mesh that either has :
- the property
hasVertexAlphaset to true (automatically set for exported meshes if vertices have individual alpha (transparency) values) mesh.visibilityvalue < 1
- the property
- In case of a mesh using
StandardMaterial, if it either has:material.alphaproperty < 1- an opacity texture defined
- the opacity Fresnel effect active
- a diffuse texture with
hasAlpha = trueanduseAlphaFromDiffuseTexture = true
- In case of a mesh using a PBR material, if it either has:
material.alphaproperty < 1- an opacity texture defined
- an albedo texture with
hasAlpha = trueanduseAlphaFromAlbedoTexture = true
- In case of another type of material, if the material's
.needAlphaBlending()function returnstrue
Alpha tested meshes:
- In case of a mesh using
StandardMaterial, if it has:- a diffuse texture with the property
.hasAlphaset totrue
- a diffuse texture with the property
- In case of a mesh using a
PBRmaterial, if:- the sub surface module does not disable alpha blending
- AND an albedo texture is defined with the property
.hasAlphaset totrue
- In case of another type of material, if the material's
.needAlphaTesting()function returnstrue
Notes:
- alpha testing is linked to the diffuse/albedo texture: to enable it, you must set the
.hasAlphaproperty of the diffuse/albedo texture totrueeven if all you are interested in is to apply alpha testing to the opacity texture for eg. Alternatively, you can override theMaterial.needAlphaTesting()method and returntrueif you want alpha testing to be enabled:myMat.needAlphaTesting = () => myMat.opacityTexture !== null;
- for the standard material:
- if
transparencyMode(see next section for details about this property) isnull, the alpha test is applied only on the alpha value read from the diffuse texture - if
transparencyModeis notnull, the alpha test is applied near the end of the pipeline, when all alpha contributions have been taken into account (vertex alpha, opacity texture alpha, fresnel alpha). Note however that the computation is applied BEFORE the visibility property of the mesh is factored in!
- if
- for the PBR material:
- the alpha test is applied after the contributions from the albedo / vertex alpha / opacity texture have been factored in
Opaque meshes:
- Any mesh that does not fit into one of the above categories
Occasionally, you may have some of your meshes falling into the wrong category, e.g. an alpha tested mesh unnecessarily marked as alpha blended, or a mesh staying opaque when it shouldn't. This will give you weird glitches, which can sometimes be very annoying. You should refer to this article to check how your meshes and materials properties are set.
You're welcome to use this example to experiment on the different things explained here: Transparency Rendering Example Pressing F9 will switch between normal render and depth buffer render.
It's important to note that these categories are evaluated from top to bottom, so if a mesh is considered as an alpha blended mesh, it can't be alpha tested at the same time, which is something you may need/want to do nonetheless! Enter the transparencyMode property.
The transparencyMode property
This is a property on StandardMaterial and PBR materials. It exists for PBR materials since they were introduced, and since v4.1 for StandardMaterial.
As you may see above, categorizing a mesh depends on a number of properties and it is not always easy to infer the right category. The transparencyMode property can help in that matter, as well as enabling alpha test + alpha blend modes simultaneously.
By default, it is null and everything works as described above. The other values it can take are:
| Value | Description |
|---|---|
Value Material.MATERIAL_OPAQUE | Description No transparency mode, Alpha channel is not use |
Value Material.MATERIAL_ALPHATEST | Description Alpha Test mode, pixels are discarded below a certain threshold defined by the alpha cutoff value |
Value Material.MATERIAL_ALPHABLEND | Description Pixels are blended (according to the alpha mode) with the already drawn pixels in the current frame buffer |
Value Material.MATERIAL_ALPHATESTANDBLEND | Description Pixels are blended (according to the alpha mode) with the already drawn pixels in the current frame buffer. They are also discarded below the alpha cutoff threshold to improve performances |
If transparencyMode equals:
- Material.MATERIAL_OPAQUE. Mesh will always be opaque, there will be no alpha blending nor alpha testing whatever the other properties you modify, EXCEPT if you set
mesh.visibility< 1, in which case alpha blending is automatically turned on. - Material.MATERIAL_ALPHATEST. Mesh will only be alpha tested (as long as you set the
hasAlphaproperty of the diffuse/albedo texture totrue), not alpha blended whatever the other properties you modify, EXCEPT if you setmesh.visibility< 1, in which case alpha blending is automatically turned on AND alpha testing is disabled- a difference between standard and PBR materials is that for PBR materials the alpha channel of the albedo texture is still used even if
useAlphaFromAlbedoTextureis set tofalse, which is different from the standard material where the alpha channel of the diffuse texture is not used ifuseAlphaFromDiffuseTextureis set tofalse
- a difference between standard and PBR materials is that for PBR materials the alpha channel of the albedo texture is still used even if
- Material.MATERIAL_ALPHABLEND. Mesh will only be alpha blended and not alpha tested
- Material.MATERIAL_ALPHATESTANDBLEND. Mesh will be both alpha tested and alpha blended
- a difference between standard and PBR materials is that for PBR materials the alpha channel of the albedo texture is still used even if
useAlphaFromAlbedoTextureis set tofalse, which is different from the standard material where the alpha channel of the diffuse texture is not used ifuseAlphaFromDiffuseTextureis set tofalse
- a difference between standard and PBR materials is that for PBR materials the alpha channel of the albedo texture is still used even if
You're welcome to use this example to experiment on the different values of transparencyMode for both the standard and PBR materials: Transparency Modes Example
Things To Do And Not To Do
- Make sure your alpha blended meshes do not intersect, as this will inevitably lead to render glitches.
- Avoid having heavily-stretched alpha blended meshes (i.e. large planes); since the center of its bounding sphere is used for depth sorting, doing this may result in a mesh being sorted as far away from the camera but actually closer to many other meshes.
- Use alpha test as much as possible; this may look perfect for a pixel art style, or if the transparent parts boundaries are straight horizontal or vertical lines.
- To get rid of jagged edges on your alpha tested meshes, use anti-aliasing for your scene (FxaaPostProcess); when using anti-aliasing, you can even disable the built-in smoothing of WebGL when creating the engine object:
engine = new BABYLON.Engine(canvas, false); // built-in smoothing will be disabled
This may help you with visible seams between meshes and other similar issues.
- Do not forget to enable backface culling with alpha blended meshes!
- Use rendering groups to have better control over the order in which your meshes are displayed. These are especially useful if you know that some meshes will be above others 100% of the time (for example, an overlayed UI drawn on top of the scene).
- A mesh's
alphaIndexproperty can be very useful as well, since they allow you to override the depth sorting of alpha-blended meshes. Also this property does not suffer from the same limitation as Rendering Groups (4 layers at most), and only has an effect on alpha-blended meshes. - You can rely on
needDepthPrePassto help fixing issues with self transparency. - You can also use
separateCullingPasson materials to force the engine to render the transparent objects in 2 passes: first the back faces and then the front faces. This can help a lot with self transparency. twoSidedLightingwill not take effect ifseparateCullingPassis enabled. For double sided, transparent PBR materials you can instead useforceNormalForward = true, which will in practice result in the same effect. If used, you can settwoSidedLighting = falseandbackfaceCulling = trueto slightly improve shader performance.- To prevent both the cost of either
needDepthPrePassorseparateCullingPassif the sum of your alpha stays below 1.0, you can change the alphaMode of the material to eitherEngine.ALPHA_PREMULTIPLIEDorEngine.ALPHA_PREMULTIPLIED_PORTERDUFFwhich prevent the need of ordering the triangles.
Concave meshes and transparency
The transparent concave meshes render obviously with the same rules than explained before: Concave Meshes And Transparency Example 1
For some reasons (example : camera flying from outside to inside a sphere), you may want to remove the backface culling in order to also render the back side of the mesh : Concave Meshes And Transparency Example 2
As you can notice, the transparency rendering rules may lead to some weird things making some parts of the mesh geometries visible.
In this very case, an acceptable workaround would then be to enable the backface culling but to build the meshes as double sided with the parameter sideOrientation set to BABYLON.Mesh.DOUBLESIDE: Concave Meshes And Transparency Example 3
Other option will be to rely on depth pre-pass: Concave Meshes And Transparency Example 4
At last, if you accept to spend some CPU cycles to get a correct self transparency, you can use the FacetData feature and enable the facet depth sort.
Example, depth sorted on the left, standard on the right: Concave Meshes And Transparency Example 5
Order Independent Transparency
Generality
As of 5.0.0, we introduced a new feature on the scene that allows for correct transparency, without any of the considerations above. You don't need to sort your meshes, or use alpha test, OIT handles everything in the rendering process ! You can just add this simple line :
scene.useOrderIndependentTransparency = true;
Of course, the tradeoff is that, under the hood, the engine will render transparent meshes many more times, consuming effectively more CPU (and GPU to a lesser extent).
This is using the dual depth peeling method and the renderer can be accessed by scene.depthPeelingRenderer.
To avoid some internal state switching, you can set backFaceCulling = false on the materials used by the transparent meshes, which may save some tiny bits of performance.
You can change the number of passes that the depth peeling renderer is doing by updating scene.depthPeelingRenderer.passCount which is 5 by default, meaning that at most 10 layers of transparency are displayed. If your scene has a lot of transparency layers, meaning a lot of transparent objects one over the other, you may have to raise this value if you want the scene to be rendered correctly. However, at some point, you won't see the difference when stacking a lot of layers so caping the value to a small value will save you some performances.
Important notice : As the feature is still in beta version, it will not work on some cases. You might encounter problems if you combine order independent transparency with post processes, or custom materials. Try it out and see if it works for your case! If it doesn't, report to the forum and we will see what can be done about it.
This effect is only compatible with WebGL 2 and WebGPU.
Support in WebGPU
Regarding WebGPU, as of this writing (2021/10/26), the RG32Float format is not blendable, meaning we can't use it for our depth buffers. So, we must use RG16Float instead which has less precision which in turn leads to some visual artefacts: try to browse the PG given above in WebGPU, you will see some artefacts in the whole rendering.
Fortunately, enabling the reverse depth buffer feature will get rid of those artefacts: just set engine.useReverseDepthBuffer = true; at scene creation time.
In WebGPU, you can get better performances by setting scene.depthPeelingRenderer.useRenderPasses = true and engine.compatibilityMode = false: see the doc page for the compatibilityMode property for more information.
