Node Material
Node Material
The Node Material is a simple, highly customizable material that you can build yourself piece by piece. Combined with the powerful node-based editor, you can easily create stunning custom GPU shaders and FX for your Babylon.js scenes.
The Node Material allows you to avoid writing complicated shader language code, instead replacing it with simple processes of either using UI (the Node Material Editor) or by creating and connecting node blocks in your scene code (the Node Material blocks).
To get started, it's important to understand how the Node Material works under the hood, starting by learning how to create a Node Material using code.
Creating a Node Material using code
Initial steps
If you are interested in learning how to create node materials through code, you might consider starting with the video below as it goes over 3 important tips to help you get started:
To start using the Node Material, you just need to instantiating one:
var nodeMaterial = new BABYLON.NodeMaterial("node material", scene, { emitComments: true });
Please note that the third parameter will contain optional values that will let you configure how the material will build its shader:
emitComments: Set this value to true if you want the blocks to emit comments in the shader code
Adding blocks
Blocks can be added by just instantiating them:
var morphTargets = new BABYLON.MorphTargetsBlock("morphTargets");
For input blocks, you can then define either their value or the source of the value:
var timeInput = new BABYLON.InputBlock("time");timeInput.value = 0;
or
var viewProjectionInput = new BABYLON.InputBlock("viewProjection");viewProjectionInput.setAsSystemValue(BABYLON.NodeMaterialSystemValues.ViewProjection);
System values can be:
- BABYLON.NodeMaterialSystemValues.World
- BABYLON.NodeMaterialSystemValues.View
- BABYLON.NodeMaterialSystemValues.WorldView
- BABYLON.NodeMaterialSystemValues.Projection
- BABYLON.NodeMaterialSystemValues.ViewProjection
- BABYLON.NodeMaterialSystemValues.WorldViewProjection
- BABYLON.NodeMaterialSystemValues.CameraPosition
- BABYLON.NodeMaterialSystemValues.FogColor
- BABYLON.NodeMaterialSystemValues.DeltaTime
Input blocks can also take their value from a mesh attribute:
let positionInput = new BABYLON.InputBlock("position");positionInput.setAsAttribute("position");
Attributes can be:
- position
- normal
- tangent
- uv
- uv2
- matricesIndices
- matricesWeights
- matricesIndicesExtra
- matricesWeightsExtra
When you manually set the value of an InputNode, you can flag it as node.isConstant to indicate that the value will not be dynamically updated and thus the node material will be able to optimize the block by not generating an uniform for this value.
The following functions will let you get information about your InputNode:
isSystemValueisAttributeisUniformisConstant
When an InputNode is an uniform (eg. a manual value that will be sent to the shader) and not a constant, you can set inputNode.visibleInInspector to true so users will be able to visually control the value of the node using Babylon.js Inspector.
You can even csutomize the look and feel of the Inspector UI by defining inputNode.min and inputNode.max to get a slider instead of an input text box.
Connecting blocks
By default calling block.connectTo(otherBlock) will try to establish a connection by picking an output from the first block and connect it to an available input in the second one:
var positionInput = new BABYLON.InputBlock("position");positionInput.setAsAttribute("position");var worldInput = new BABYLON.InputBlock("world");worldInput.setAsSystemValue(BABYLON.NodeMaterialSystemValues.World);var worldPos = new BABYLON.TransformBlock("worldPos");positionInput.connectTo(worldPos);worldInput.connectTo(worldPos);
If you do not want to use the automatic connection you can then pick the output and the input you want to connect directly:
worldInput.output.connectTo(boneBlock.world);
You can check if two connection points can connect with
if (worldInput.output.canConnectTo(boneBlock.world)) {...}
The system will throw an exception if you try to connect two incompatible connection points.
When connected, two connection points can be disconnected with:
worldInput.output.disconnectFrom(boneBlock.world);
Gettings blocks
Once a graph is built inside a NodeMaterial, you can use the following API to get a specific node by name:
let block = nodeMaterial.getBlockByName("MyBlock");
You can also get a block using a predicate:
let block = nodeMaterial.getBlockByPredicate((b) => b.getClassName() === "AddBlock" && b.name === "foo");
Or you can also use this API to get an InputNode and use it to setup its value if the node is set manual value:
let block = nodeMaterial.getInputBlockByPredicate((b) => b.name === "foo");block.value = 10;
Note that while this API generically works for all input blocks, not all input blocks have a "value" attribute. For example texture blocks would have block.texture instead of block.value. Be sure to check the API documentation for detail.
You can access the list of InputBlocks with:
nodeMaterial.getInputBlocks();
Or you can get all blocks registered with a node material with:
nodeMaterial.attachedBlocks;
Be sure to also check out the full API documentation.
Building the Node Material
Once setup, you can ask the Node Material to build its internal shaders (vertex and fragment) by calling nodeMaterial.build(true). You can set the boolean parameter to true to get a log of the final shaders on the console.
The build function will throw an exception if the shaders cannot be compiled:
try {nodeMaterial.build(true);} catch (err) {console.log("Unable to compile because " + err);}
Once successfully built, you can use the Node Material like any other materials:
myMesh.material = nodeMaterial;
Example
Here is one of the simplest code using the Node Material:
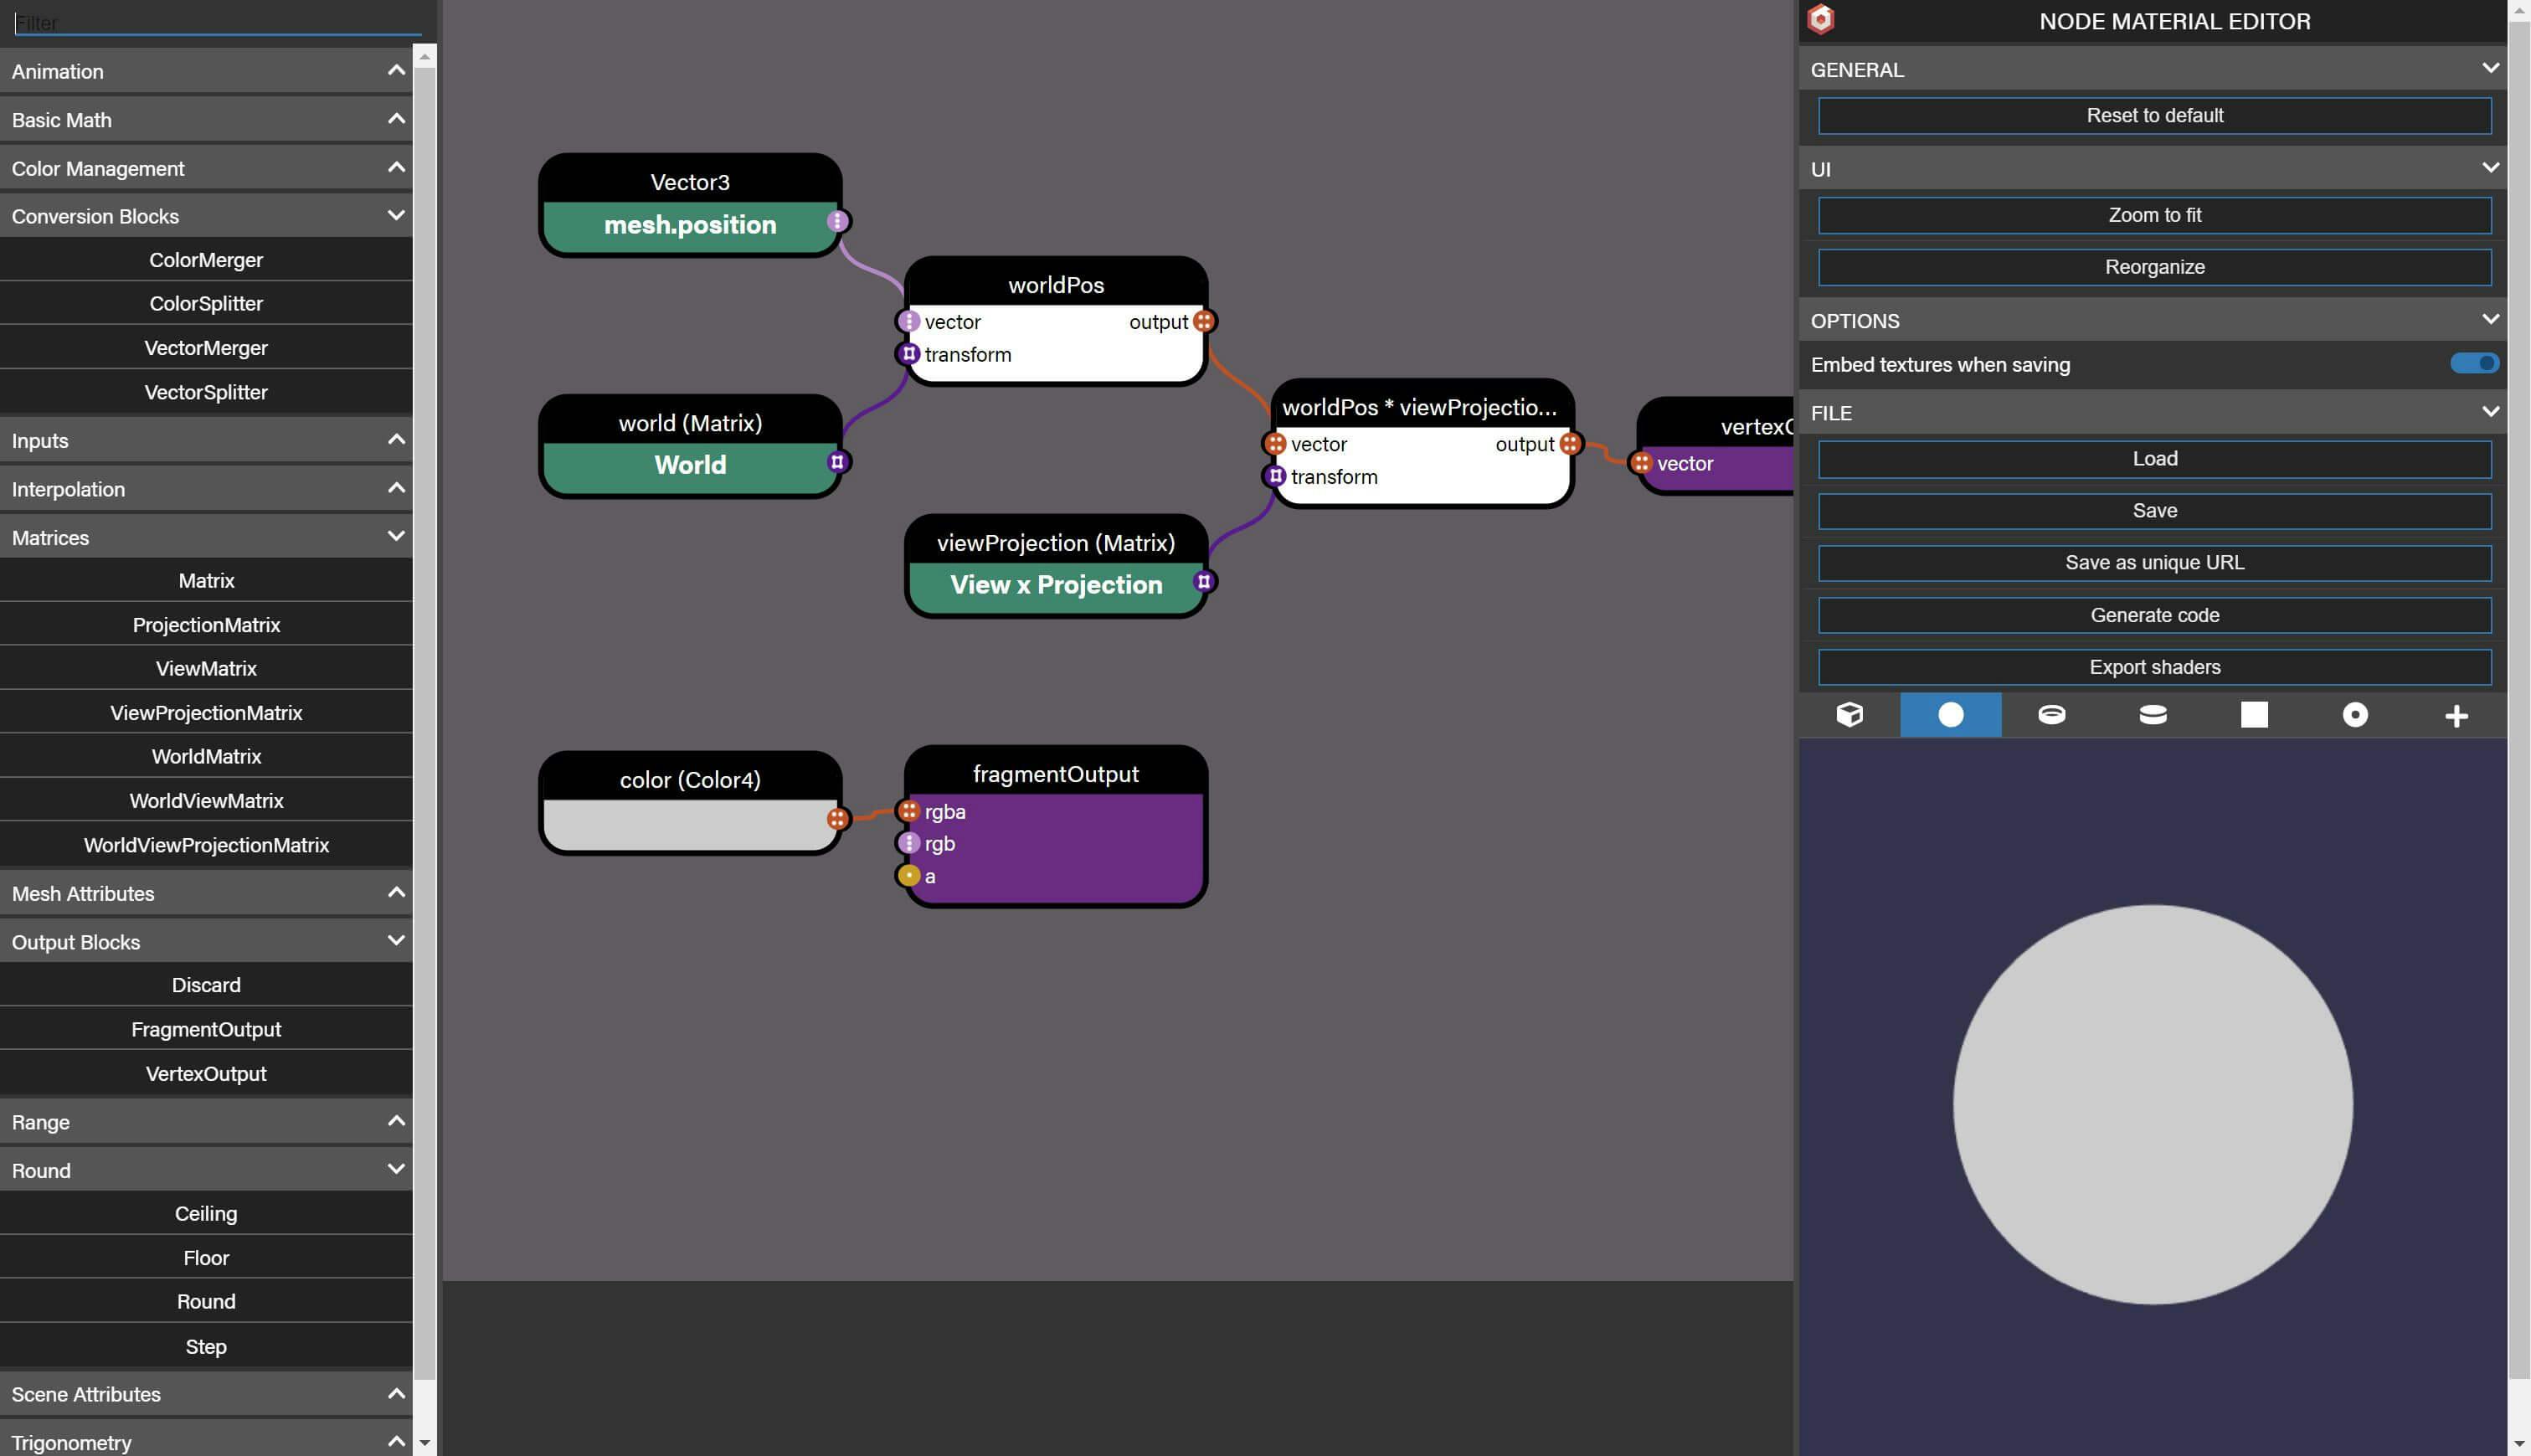
var nodeMaterial = new BABYLON.NodeMaterial("node material", scene, { emitComments: true });var positionInput = new BABYLON.InputBlock("position");positionInput.setAsAttribute("position");var worldInput = new BABYLON.InputBlock("world");worldInput.setAsSystemValue(BABYLON.NodeMaterialSystemValues.World);var worldPos = new BABYLON.TransformBlock("worldPos");positionInput.connectTo(worldPos);worldInput.connectTo(worldPos);var viewProjectionInput = new BABYLON.InputBlock("viewProjection");viewProjectionInput.setAsSystemValue(BABYLON.NodeMaterialSystemValues.ViewProjection);var worldPosdMultipliedByViewProjection = new BABYLON.TransformBlock("worldPos * viewProjectionTransform");worldPos.connectTo(worldPosdMultipliedByViewProjection);viewProjectionInput.connectTo(worldPosdMultipliedByViewProjection);var vertexOutput = new BABYLON.VertexOutputBlock("vertexOutput");worldPosdMultipliedByViewProjection.connectTo(vertexOutput);// Pixelvar pixelColor = new BABYLON.InputBlock("color");pixelColor.value = new BABYLON.Color4(0.8, 0.8, 0.8, 1);var fragmentOutput = new BABYLON.FragmentOutputBlock("fragmentOutput");pixelColor.connectTo(fragmentOutput);// Add to nodesnodeMaterial.addOutputNode(vertexOutput);nodeMaterial.addOutputNode(fragmentOutput);
Please note that this code is equivalent to:
var nodeMaterial = new BABYLON.NodeMaterial("node material", scene, { emitComments: true });nodeMaterial.setToDefault();
Here's an advanced and fantastic example of creating an impressive Node Material manually.
Advanced Dissolve Node MaterialUsing the Node Material Editor
Now that you've learned how the system works and understand how you can use it to create complex shaders more quickly than learning a new shader language, you should probably know that it can actually get even easier!
The Node Material Editor is an incredibly powerful tool that allows you to create and connect blocks in a simple visual editor.
To invoke the editor you can call nodematerial.edit() but this code must be called inside a user interaction (like a click event). You can also call it through the Inspector:
scene.debugLayer.show();scene.debugLayer.select(nodeMaterial);
When selected in the Inspector, you can find an edit button in the Node Material property pane.
You can also use a standalone version of the editor here: Node Material Editor
Learn more about the Node Material Editor here.
Recreating the StandardMaterial
As a training exercise and to show what is possible to do with the Node Material Editor, the StandardMaterial has been recreated in the NME:
- Full Standard Material NME
- Standard Material Without Alpha NME
- Playground of Standard Material and NME Standard Material
Note that the only difference between the full material and the material without alpha support is that nothing is wire to the fragmentOutput.a input. If you don't need alpha support, you should use the "non alpha" node material as alpha-based materials have some constraints:
- they don't write to the zbuffer and are only sorted among themselves, so some sorting rendering artifacts can arise
- they need the
transparencyShadowproperty to betruefor shadow rendering
Let's see how the material has been created and how to use it.
Main building frames
The material is divided into several frames, mirroring the main features of the standard material:
- Instances
- Morphs and bones
- Ambient
- Diffuse
- Specular
- Reflection
- Emissive
- Bump (normal map)
- Opacity
- Lightmap
- Vertex color
- Fog
In each of these frames, you generally find a boolean float node that enable/disable the feature, and possibly some other properties to fine-tune the feature. Most of these properties are Constant properties, meaning they won't consume a uniform in the shaders and won't be visible in the Inspector / be updatable in javascript: you must change their value directly in the material (they correspond to the #define you can find in the standard material shader code).
Note that you won't find this enable/disable property in the Instances, Morphs and bones and Fog frames: they are always enabled. That's because they depend on the mesh geometry / settings (or on a scene setting for Fog): those frames will be a simple "pass-through" if the corresponding feature doesn't exist on the mesh / scene, so no need to explicitly disable it in that case.
Additional building frames
There are a number of additional frames that help organizing the graph more cleanly:
- Final normal. This frame takes the output from the Bump frame and builds the final world normal used in subsequent computations (Reflection and Lights). You can change the
TWOSIDEDLIGHTINGboolean if you want the lighting to be applied whatever the triangle side facing are. - Final diffuse computation. It is the frame responsible for computing the final diffuse component, taking into account the ambient, emissive and vertex color components. Here you can modify the
LINKEMISSIVEWITHDIFFUSEandEMISSIVEASILLUMINATIONbooleans to change the way the diffuse value is computed. - Final color computation. Everything is brought together to compute the final rgb color: ambient (texture), specular, reflection and emissive.
- Final alpha computation. After the opacity (alpha) is generated from the Opacity frame, a number of additional computation is performed to produce the final alpha value. You can step in this computation by mean of two booleans,
REFLECTIONOVERALPHAandSPECULAROVERALPHA. - Premultiply alpha to color. This one does what its title says and is enabled by the
PREMULTIPLYALPHAboolean.
Construction notes
The material itself is not so complicated as each feature is generally restricted to its own frame and has few connections with other frames. That helps to keep each building block manageable and easily understandable.
Below are a few things of note.
Working without a if statement
As you may know, there's no if statement / block in the node material editor, so one must be creative to overcome this. Luckily, the standard material does not use this statement heavily (as it's better to avoid it for performance sake), so it is easy enough to deal with it. Most of the time, it is something like if boolean is true, use this value in subsequent computation, else use that other value instead. A Lerp block is the tool to use:
Lerp(a, b, gradient)
gradient is the boolean: if it is 0, a is the output, if it is 1, b is the output. Then use the output in subsequent computation.
Example:
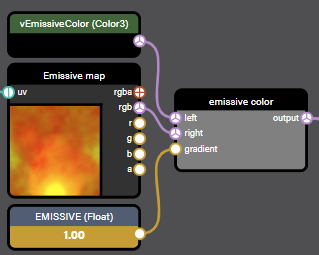
If EMISSIVE is set to 0, the output is vEmissiveColor, else it is the color from the emissive map. In effect, the EMISSIVE boolean lets you choose to use either the constant vEmissiveColor color or the color from the texture map as the emissive color.
Discarding the fragment based on alpha cutoff value
This construct is meant to discard the fragment if alpha testing is enabled and if the alpha value is below some threshold value (cutoff value). It looks like this:
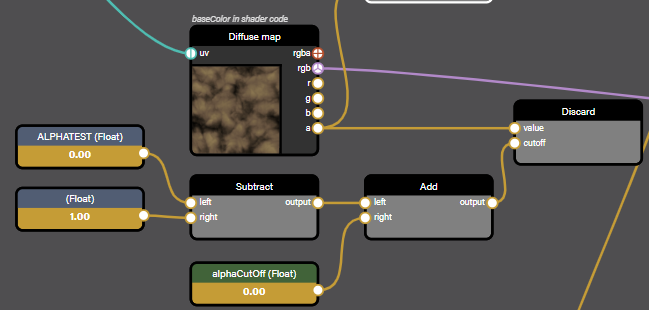
As you can see, the alphaCutOff node is not directly connected to the cutoff input of Discard (the Discard block will discard the fragment if the value input is lower than the cutoff input). That's because we need to let the user enable or disable this feature.
What it does instead is comparing the alpha value from the diffuse texture to ALPHATEST - 1 + alphaCutOff, ALPHATEST being the boolean value that lets the user enable (1) or disable (0) the feature.
If ALPHATEST = 1, the computed value is alphaCutOff, which is the expected input for Discard.cutoff in that case (alpha testing is enabled).
If ALPHATEST = 0, the computed value is -1 + alphaCutOff. As alphaCutOff is a value between 0 and 1, -1 + alphaCutOff will always be lower or equal to 0. So, Discard.cutoff <= 0 in that case, meaning the fragment will never be discarded (which is the expected result when alpha testing is disabled).
You could also have used Lerp(0, alphaCutOff, ALPHATEST) as the input for Discard.cutoff, but it's likely that the addition + subtraction used above is faster than a Lerp on GPUs (would need some benchmarking to be sure), even if it's by a small (negligible) margin.
Loading from a file saved from the Node Material Editor
You can directly setup a Node Material from a file saved from the Node Material Editor.
Here is the code to use:
let nodeMaterial = await BABYLON.NodeMaterial.ParseFromFileAsync("Name For Your Shader", "URL To Your Saved Shader", scene);
Here's an example of how to load a saved shader file and apply it to a mesh.
Load a Saved Shader FileSharing unique URLs
When using the Node Material Editor, you can have an additional option to save your work using a unique URL (like the Playground for instance). You can then share these urls (which are immutable).
Example: Node Material Editor Unique URL Example
Loading from a snippet (unique URL)
You can use the following code to load a saved node material from a unique URL:
BABYLON.NodeMaterial.ParseFromSnippetAsync("2F999G", scene).then((nodeMaterial) => {sphere.material = nodeMaterial;});
When using NME within the Playground, you have the opportunity to edit your material with the Inspector and let the Playground update your snipped id automatically (each time NME will save a new snippet id it will inform the playground to also change the id in your code.
And to begin with you can simply call this code to start a new Node Material from scratch:
BABYLON.NodeMaterial.ParseFromSnippetAsync("_BLANK", scene).then((nodeMaterial) => {sphere.material = nodeMaterial;});
Note:
- There is a use case where you may want to load a node material, but ignore any embedded or linked textures stored in the json. This could be where you are going to supply new textures in code and you don't want to incur the cost of loading the old textures or if you are reusing a node material from an old project where only the textures need to be updated. To do this, place this static property in your code before creating or loading your node materials:
BABYLON.NodeMaterial.IgnoreTexturesAtLoadTime = true;
And then from there you could have used the Inspector to edit it (The inspector can replace the __BLANK with the right id later on).
Node material examples
Here are some node material examples that you can use "as is" or extend with the NME:
- Incredible NME Ocean Shader
- GridMaterial Recreated in the Node Material Editor
- 'Mist' Post Process in the Node Material Editor
- 'Dissolve' Post Process in the Node Material Editor