The Journey Starts
The Journey Starts
Welcome to the start of your journey. You will learn a basic workflow for hosting a website built using the features of Babylon.js. This document is designed for absolutely EVERYONE to give an overview experience to set you on your way to building greater and better with Babylon.js. Whether you're an expert web developer diving into 3D, an amazing artist wanting to create 3D experiences on the web, a student/tinkerer curious about programming, or an absolute beginner, this is your very first step to learning Babylon. We strongly encourage everyone new to Babylon to go through this doc before going any futher through the docs.
This doc will take you on a VERY brief journey of creating and hosting your very first Babylon.js Web Experience. You'll learn about the Babylon.js playground, scratch the surface of learning the core engine, and save your work as a ready-to-host .html file.
The Babylon.js Playground
The single most important tool available to you as you learn and develop with Babylon, is the Babylon.js Playground.
The playground is your toybox, your tinker environment, your laboratory. This simple website allows you to write Babylon code on the left, and see instant updates on the right. It's really that simple.
The playground is CRITICAL to your learning journey for two reasons:
-
- An amazing cycle of code --> see updates instantly. Learn by doing!
-
- It's saveable & shareable!
Why is saveable & shareable important for learning? Through your Babylon journey, you will undoubtedly come across something that you could use some help figuring out. It is important that you have a safe and welcoming space to ask for help! This is why the core dev team staffs the Babylon.js Forum every weekday, so we can be there alongside you to help you learn.
And when it comes time to help you learn or solve a problem, we need to SEE and UNDERSTAND the context behind the problem. Sharing your saved playgrounds is the PERFECT solution and is mandatory on the forum. When you're stuck, save your playground, head to the forum, reach out for help, and share the playground. We think you'll be pleasantly surprised at how quickly you'll get help by following this process.
So now that you know the playground is the single most important tool to start learning, let's open it up in a new tab.
Your First Creation
Welcome to the Playground! Using the playground is as simple as modifying/creating code in the code editor on the left, and seeing updates in the live Babylon scene on the right! You'll also see a default Babylon scene that we've set up for you. Take a quick look at the comments in green font in the code editor. These comments should give you a basic idea of what's happening with each line of code that's written. Pretty simple right?
There's no better way to start learning than by doing, so let's make our first scene update!
On lines 20-24 you see the following lines of code:
// Our built-in 'sphere' shape.var sphere = BABYLON.MeshBuilder.CreateSphere("sphere", {diameter: 2, segments: 32}, scene);// Move the sphere upward 1/2 its heightsphere.position.y = 1;
Go ahead and highlight those lines of code and hit DELETE! You've just made your first change! Feel good? But wait, nothing happened in the scene? That's because we have to re-run the scene with our changes. You can do that by either pressing ALT+ENTER on your keyboard or pressing the 'run' button in the UI.

BOOM! The sphere is gone!
Playground 1Quick side note - Throughout this document we'll add links to playgrounds showing you exactly what changes were just made. You can reference these playgrounds with your own progress if you ever get stuck. The little arrow symbol will open these playgrounds in a new tab.
Let's make another change!
Find the line of code that creates the ground plane and add these new lines underneath it:
let groundMaterial = new BABYLON.StandardMaterial("Ground Material", scene);ground.material = groundMaterial;ground.material.diffuseColor = BABYLON.Color3.Red();
Run the scene again (ALT+ENTER, or run button)
Playground 2Congratulations! You just created a new material, assigned that new material to the ground plane, and assigned it's diffuse channel to be the color red! Pretty cool huh?! Don't worry if some of that is still a bit confusing, the takeaway here is that you're making code changes on the left and seeing updates on the right.
Ok time for another change.
Find this line:
ground.material.diffuseColor = BABYLON.Color3.Red();
Replace it with these two lines and run the scene again:
let groundTexture = new BABYLON.Texture(Assets.textures.checkerboard_basecolor_png.rootUrl, scene);ground.material.diffuseTexture = groundTexture;
Pretty cool! You've now created your first Babylon.js texture and assigned it to the texture property of your ground material!
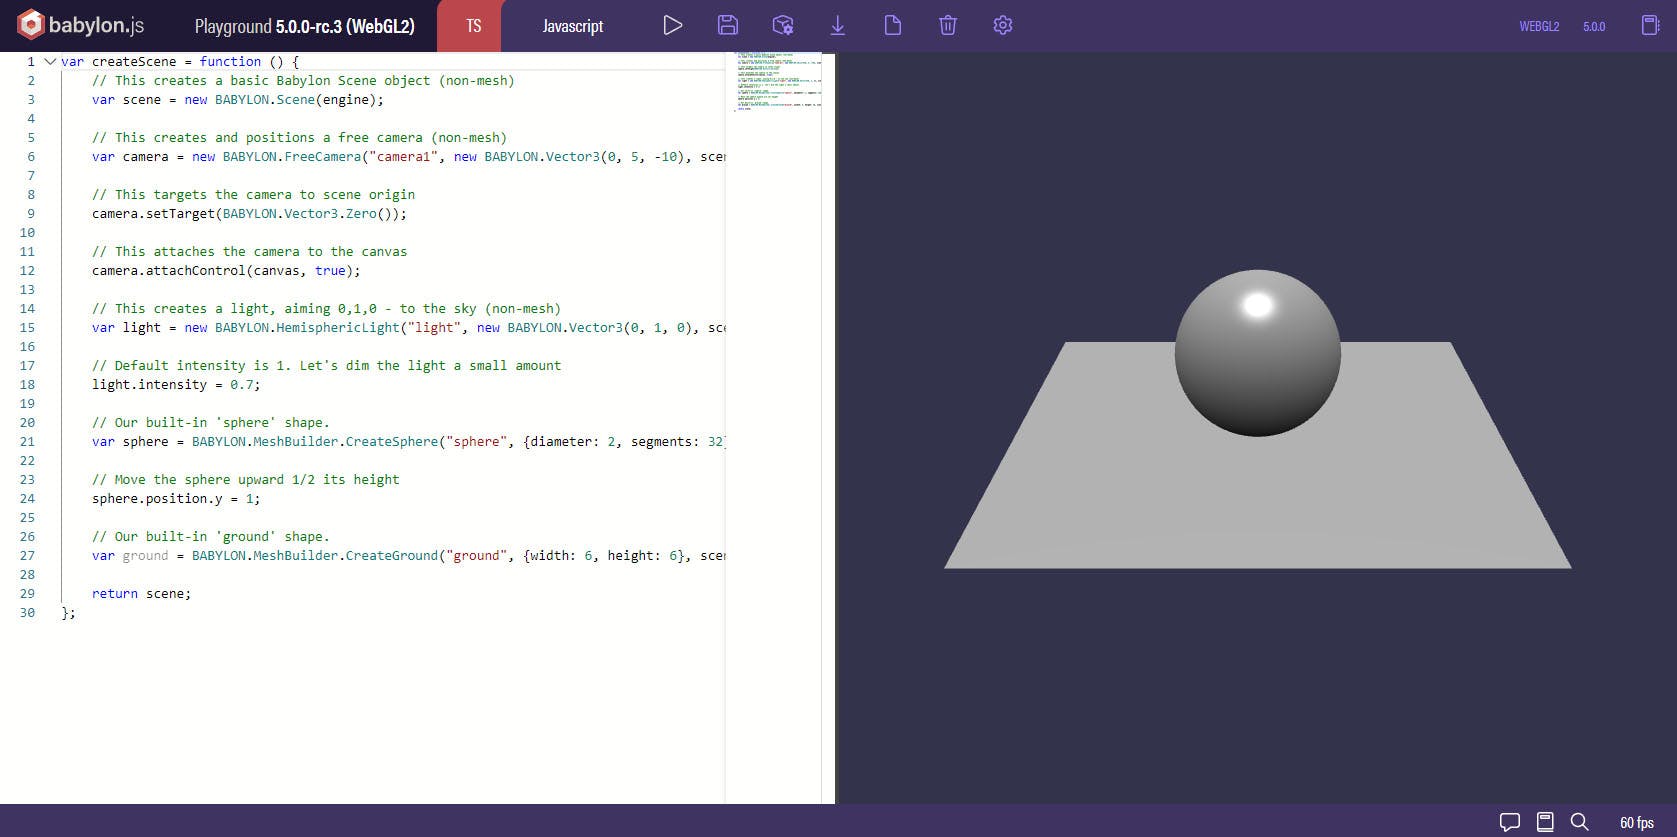
Ok it's time for another addition to the scene. After all of your ground-related code, give yourself a little space by hitting enter and on a new line press CTRL+SPACE. This will spawn a list of playground templates. These templates are handy pieces of code that you will likely reuse over and over again through your Babylon learning journey. Go ahead and select the template that says "Import a Mesh w/Callback".
You should see the following lines of code pop right into the playground:
BABYLON.SceneLoader.ImportMesh("meshName", "url to the mesh parent directory", "Mesh filename.fileextension", scene, function(newMeshes){});
let's do a few more things:
-
- Delete the word 'meshName' but leave the quotes "".
-
- Replace "url to the mesh parent directory" (including quotes) with this:
Assets.meshes.Yeti.rootUrl
-
- Replace the "Mesh filename.fileextension" (including quotes) with this:
Assets.meshes.Yeti.filename
-
- After the BABYLON.SceneLoader.ImportMesh line, but before the "});" add the following line:
newMeshes[0].scaling = new BABYLON.Vector3(0.1, 0.1, 0.1);
-
- Run the scene
Whoa! Cool! You just added an animated .gltf object into the scene! And you also scaled it down to fit on the groundplane! Well done!
Let's change one final thing. We want our scene to be interactive, after all isn't that what why you're here - to create interactive web experiences?
Delete lines 5-9.
Press CTRL+SPACE to bring up the playground templates and create an Arc Rotate Camera.
Run the scene and click+drag or touch+drag on the Babylon scene.
Playground 5WooHoo! You've added interaction to the scene! Great job! Go ahead and save your playground by pressing CTRL+S or hitting the save button.

The .html File
At this point, let's say we're happy with our creation, and we want to put the Babylon scene (without the code editor and UI) out into the world for everyone to play with.
Getting your Babylon scene ready to host is as simple as pressing a button. Either press SHIFT+CTRL+S or press the Download button to download an .html file of your Babylon scene to your system.

That's it! You've got everything you need for the world to see your first Babylon experience! Now all we need to do is host it somewhere for the world to see it!
Hosting Your Babylon Project
Ok time to host this experience. If you're not familiar with web hosting, it basically means putting your web experience in a place where the whole world can access/see it. The world of hosting web pages is HUGE and what follows is just ONE example of how to do it. It is by no means the only way to host a page.
For this first step into Babylon we're going to use something github pages, because it's easy and free.
Let's start by heading over to GitHub.
You'll need to log in (or sign up if you're new to github...it's free).
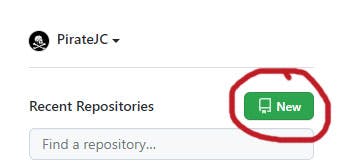
Next, we'll create a new repository.
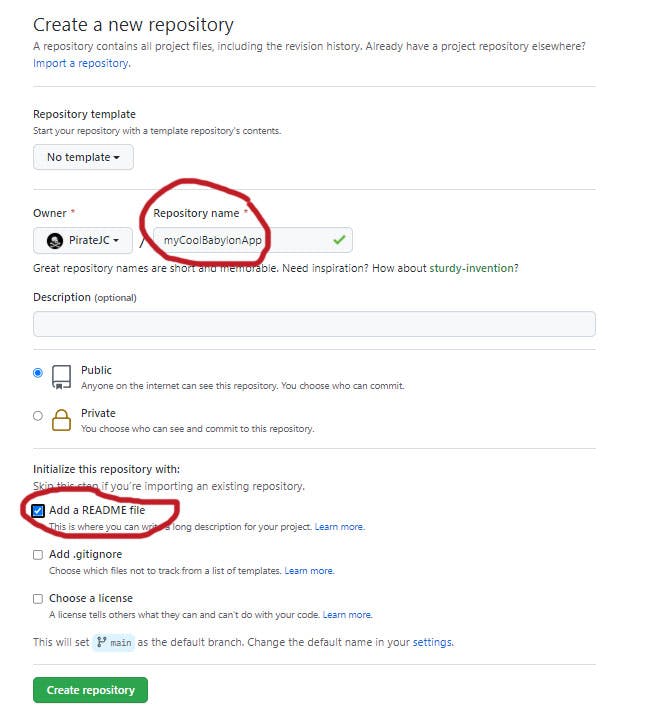
Give your new repo a cool name and make sure to check the "Add a README file."
Congratulations! You've just set up a new GitHub repository! Yay!
Now let's add the downloaded Babylon Playground files to this repository.
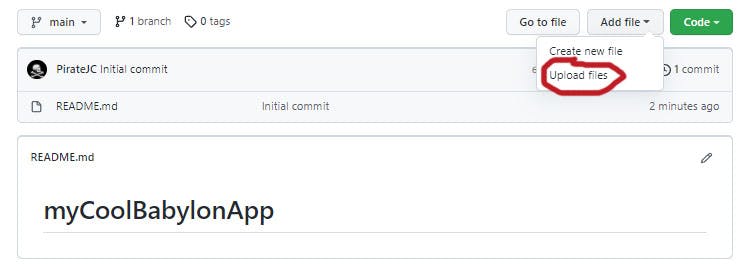
Click on "Add file" and then "Upload files"
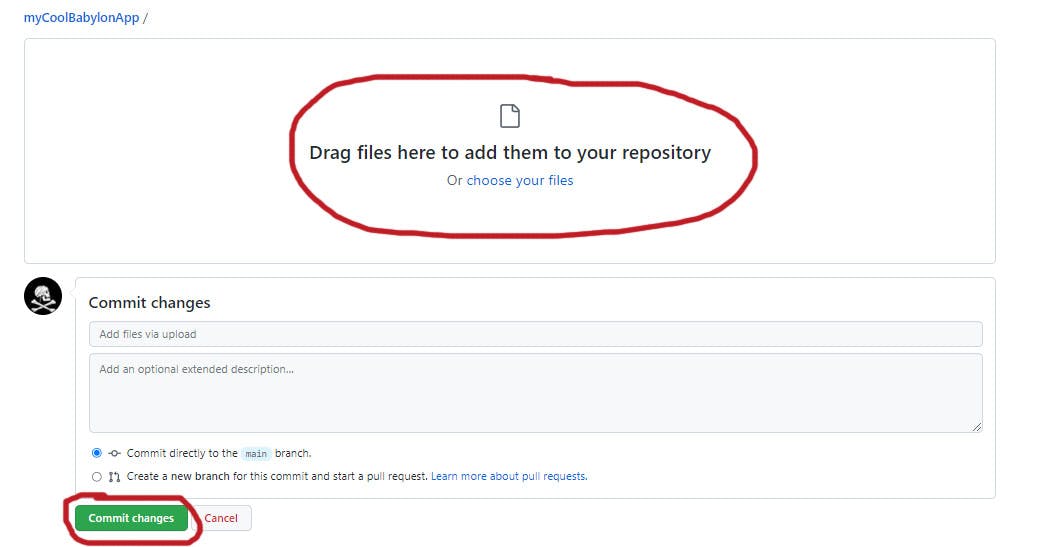
Locate the file that you downloaded from the Babylon.js playground and drag it onto this page. Then press the "Commit changes" button.
One last step and then your Babylon Experience will be hosted with a live url for anyone to see.
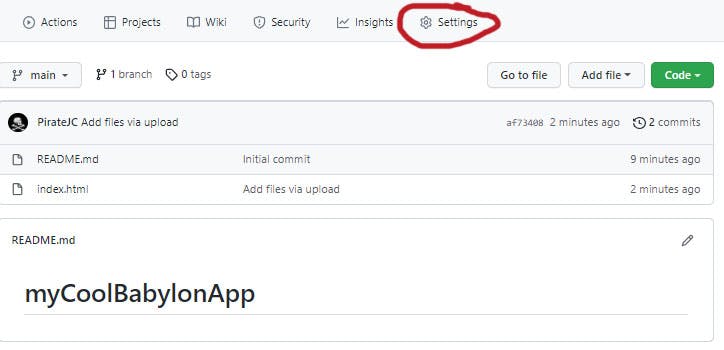
Hit the "Settings" button on the main repo page.
Navigate to the "Pages" menu item, set the "Branch" to "main", and hit the save button.
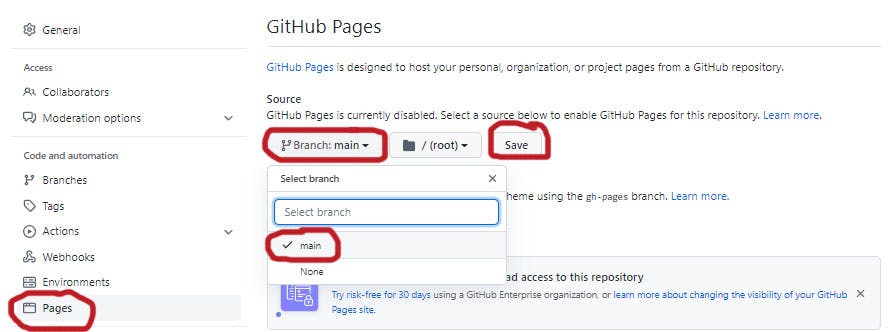
After your settings are saved you'll see the url to your new live website! You can share that url with anyone that you'd like!

Congratulations! You just built and hosted your very first Babylon.js web experience!
Documentation Overview
Before you take off and explore Babylon further, we humbly ask that you read one additional article. Babylon.js is a rich and powerful engine and we've worked hard to provide a LOT of documentation to help you learn it. The last part of the first step of your Babylon journey is to get an overview of how the Documenation is organized.