Node Material and Particles
How To use the Node Material with Particles
The Node Material Editor (aka NME) is a powerful tool that can be used to design shaders, particles, and post processes.
This article will help you set up a simple scene that will contain only a few lines of code, because all of the work will be done using our editors.
You can see the final result here:
Node Material With ParticlesSetting up the scene
Setting up this scene is actually quite simple. We only need a scene, a camera, and a sphere to act as the particle emitter:
var scene = new BABYLON.Scene(engine);var camera = new BABYLON.ArcRotateCamera("Camera", 0, 0.8, 10, BABYLON.Vector3.Zero(), scene);camera.attachControl(canvas, true);// Create a random emittervar sphere = BABYLON.MeshBuilder.CreateSphere("sphere", {diameter: 0.01, segments: 4}, scene);
Invoking the inspector to create our particle system
If you are executing this code in the Playground, you can simply click on the Inspector button inside the header bar.
If you are running the code on your own, you can call scene.debugLayer.show().
Once there, you can right click on the "Particle Systems" node to create a new particle system:
The inspector will then let you play with all the parameters to define the system the way you want.
When you're done setting up your system, you can go to the Snippet zone and click "Save to Snippet Server":
This will give you a snippet ID that we will use later to load the particle system from our code.
You can see my setup in this playground:
Particles Created In the InspectorWorking with the snippet server
The beauty of the snippet server is that it gives you a central place to store and update your particle system without having to modify your code.
We can use the async/await pattern in our example to load a snippet asychronously. We can flag our function as async and then await a link to our particle system using the snippet ID:
var createScene = async function () {var scene = new BABYLON.Scene(engine);var camera = new BABYLON.ArcRotateCamera("Camera", 0, 0.8, 10, BABYLON.Vector3.Zero(), scene);camera.attachControl(canvas, true);// Create a random emittervar sphere = BABYLON.MeshBuilder.CreateSphere("sphere", {diameter: 0.01, segments: 4}, scene);// Load the previously setup particle system (it was setup with the inspector)let system = await BABYLON.ParticleHelper.CreateFromSnippetAsync("T54JV7#13", scene, false);system.emitter = sphere;return scene;};
As you can see, you can simply call BABYLON.ParticleHelper.CreateFromSnippetAsync to download your particle system from the snippet server.
If you do not want to (or cannot) use async / await, you can get the same outcome using Promises:
BABYLON.ParticleHelper.CreateFromSnippetAsync("T54JV7#13", scene, false).then(system => {system.emitter = sphere;});
Creating the node material for our particle system
We are going to use the same approach for the node material.
To setup our material, let's open the NME at https://nme.babylonjs.com/
The NME can be used for materials, particles and postprocesses. We'll switch to particles mode:
For this demo, I created a material where the particles are displayed with one texture when above ground (y = 0) and with another one below ground, with a smooth transition between the two. Here is the the shader I ended up with: Node Material Particle Shader Example
In a nutshell, I'm checking the particle position in world space and using a smoothstep to output a value between 0 and 1, which is then used with a gradient between black and white. This color is then used to mix (lerp) between two textures.
Just like the particle system, you can save your creation to the snippet server and gets a snippet Id.
Applying the material
The final step is to get that shader from the snippet server and use it with our particle system.
To do so, we will use the exact same approach as before:
// Load our node materiallet nodeMaterial = await BABYLON.NodeMaterial.ParseFromSnippetAsync("#345ATT#4", scene);// Apply it to the particle systemnodeMaterial.createEffectForParticles(system);
As you can see the NodeMaterial class has a handy function to apply it to a particle system.
And voila! The final code is extremely simple (thanks to async/await in particular):
var createScene = async function () {var scene = new BABYLON.Scene(engine);var camera = new BABYLON.ArcRotateCamera("Camera", 0, 0.8, 10, BABYLON.Vector3.Zero(), scene);camera.attachControl(canvas, true);// Create a random emittervar sphere = BABYLON.MeshBuilder.CreateSphere("sphere", {diameter: 0.01, segments: 4}, scene);// Load the previously setup particle system (it was setup with the inspector)let system = await BABYLON.ParticleHelper.CreateFromSnippetAsync("T54JV7#13", scene, false);system.emitter = sphere;// Load our node materiallet nodeMaterial = await BABYLON.NodeMaterial.ParseFromSnippetAsync("#345ATT#4", scene);// Apply it to the particle systemnodeMaterial.createEffectForParticles(system);return scene;};
Automatic updates
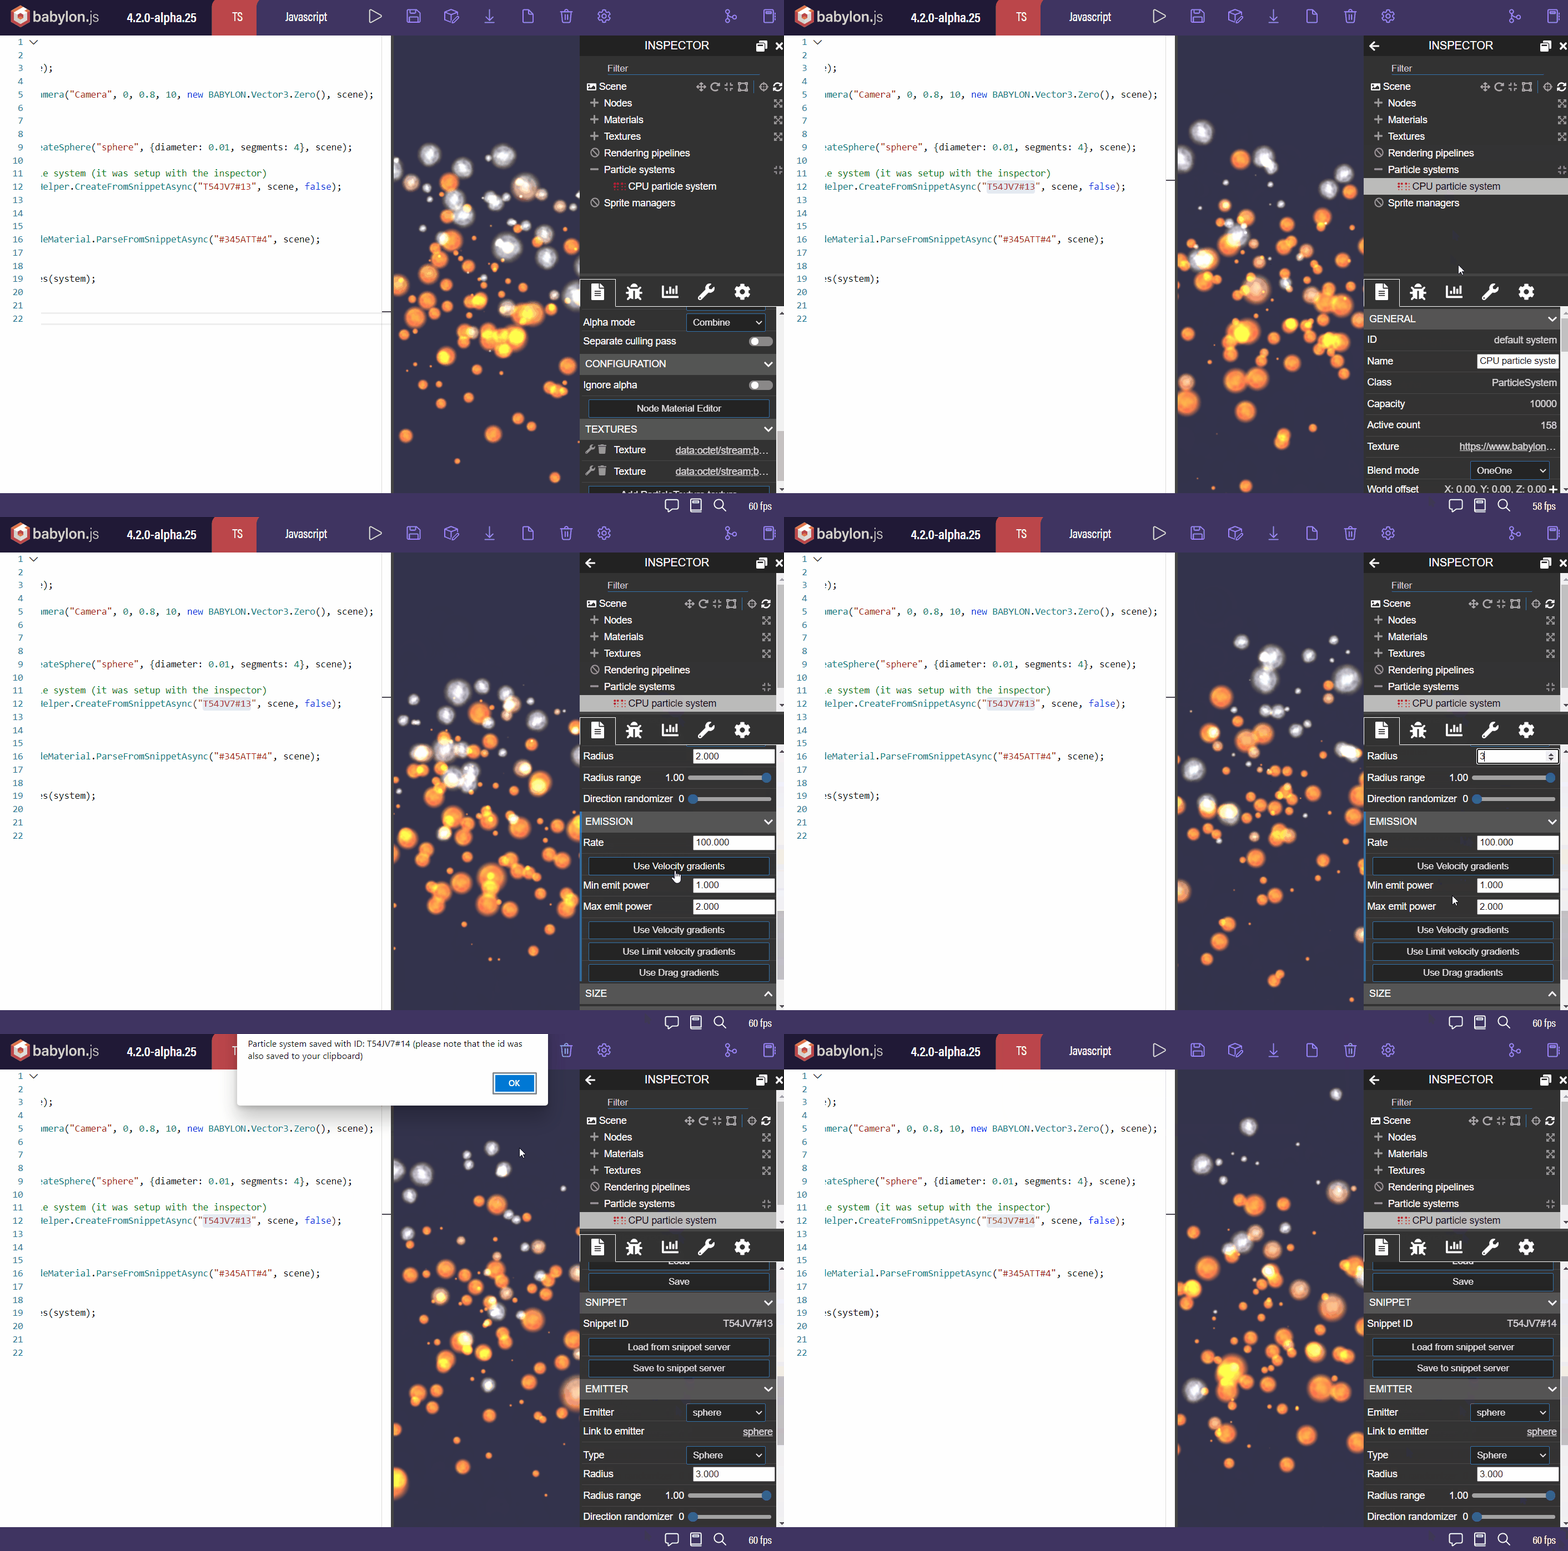
The best part is that our Playground can evolve automagically. If you open the main Playground (referenced at the beginning of this article), you can keep editing the particle system or the material, and your code will automatically update. This happens every time open the Inspector and use one of the editors. When you click "Save to Snippet Server", the system will be smart enough to work with the Playground and update the link for you:

You can see in the GIF that the Snippet ID for the particle system is updated to version #14 when I hit the save button.
Now that we know about that automatic update,there was another option to create the initial particle. You could have called the CreateFromSnippetAsync with a "__BLANK" id:
BABYLON.ParticleHelper.CreateFromSnippetAsync("_BLANK", scene, false).then(system => {system.emitter = sphere;});
And then from there you could have used the Inspector to edit it (The inspector can replace the __BLANK with the right id later on)