Mastering PBR Materials
Introduction
The two simplified versions of PBR Materials e.g. PBRSpecularGlossinessMaterial and PBRMetallicRoughnessMaterial, are a good introduction to PBR, however using PBRMaterial itself will allow you to have more control over the material using features such as
- Refraction
- Standard Light Falloff
- LightMaps
- Dedicated image processing
This page addresses the differences between the PBRMaterial and its the simpler versions.
From MetallicRoughness To PBRMaterial
In order to setup the PBRMaterial in Metallic/Roughness mode, at least one of the following properties has to be set (else it by default works in Specular/Glossiness):
- metallic
- roughness
- metallicTexture
To switch from the PBRMetallicRoughnessMaterial to the bigger PBRMaterial, a few of the properties need to be renamed (rename has not been done in the richer material in order to keep backward compatibility with prior versions):
| PBRMetallicRoughnessMaterial | PBRMaterial |
|---|---|
PBRMetallicRoughnessMaterial baseColor | PBRMaterial albedoColor |
PBRMetallicRoughnessMaterial baseTexture | PBRMaterial albedoTexture |
PBRMetallicRoughnessMaterial metallicRoughnessTexture | PBRMaterial metallicTexture |
PBRMetallicRoughnessMaterial environmentTexture | PBRMaterial reflectionTexture |
PBRMetallicRoughnessMaterial normalTexture | PBRMaterial bumpTexture |
PBRMetallicRoughnessMaterial occlusionTexture | PBRMaterial ambientTexture |
PBRMetallicRoughnessMaterial occlusionTextureStrength | PBRMaterial ambientTextureStrength |
As the channels used for metallic or roughness can be customized, in order to be setup as the simple material, you will need to add the following flags:
pbr.useRoughnessFromMetallicTextureAlpha = false;pbr.useRoughnessFromMetallicTextureGreen = true;pbr.useMetallnessFromMetallicTextureBlue = true;
Once the conversion done, let's see the custom options available on this version:
- useRoughnessFromMetallicTextureAlpha: the metallic texture contains the roughness information in its alpha channel.
- useRoughnessFromMetallicTextureGreen: the metallic texture contains the roughness information in its green channel (useRoughnessFromMetallicTextureAlpha needs to be false).
- useMetallnessFromMetallicTextureBlue: the metallic texture contains the metallic information in its blue channel (it is considered in the red channel by default).
- useAmbientOcclusionFromMetallicTextureRed: the metallic texture contains the ambient occlusion information in its red channel.
- useAmbientInGrayScale: the ambient occlusion is forced to read only from the red channel of the ambient texture or from the red channel of the metallic texture.
From SpecularGlossiness To PBRMaterial
Setting up the PBRMaterial in Specular/Glossiness mode is different.
The following properties need to be null or undefined:
- metallic
- roughness
- metallicTexture
To switch from the PBRSpecularGlossinessMaterial to the richer PBRMaterial, a few of the properties need to also be renamed:
| PBRSpecularGlossinessMaterial | PBRMaterial |
|---|---|
PBRSpecularGlossinessMaterial diffuseColor | PBRMaterial albedoColor |
PBRSpecularGlossinessMaterial diffuseTexture | PBRMaterial albedoTexture |
PBRSpecularGlossinessMaterial specularGlossinessTexture | PBRMaterial reflectivityTexture |
PBRSpecularGlossinessMaterial specularColor | PBRMaterial reflectivityColor |
PBRSpecularGlossinessMaterial glossiness | PBRMaterial microSurface |
PBRSpecularGlossinessMaterial normalTexture | PBRMaterial bumpTexture |
PBRSpecularGlossinessMaterial occlusionTexture | PBRMaterial ambientTexture |
PBRSpecularGlossinessMaterial occlusionTextureStrength | PBRMaterial ambientTextureStrength |
Also, as the channel used for glossiness can be customized, in order to be setup as the simple material, you will need to add the following flag:
pbr.useMicroSurfaceFromReflectivityMapAlpha = false;
Once the conversion done, let's see the custom options available on this version:
- microSurfaceTexture: Enables the ability to store the glossiness on the red channel of a separate texture.
- useAlphaFromAlbedoTexture: the opacity information is contained in the alpha channel of the albedo texture.
- useMicroSurfaceFromReflectivityMapAlpha: the reflectivity texture contains the microSurface or glossiness information in its alpha channel.
- useAmbientInGrayScale: the ambient occlusion is forced to read only from the red channel of the ambient texture or from the red channel of the metallic texture.
Opacity
Another interesting addition to the reflection is the ability to keep the most luminous part of the reflection over transparent surface... Yeah, it does not make much sense... Actually, if you look through a window at night from a lit room, you can see the reflection of lights or TV on the glass. This is the same for reflection in the PBR Material. A special property pbr.useRadianceOverAlpha = true; has been added to allow you to control this effect. Not only reflection (AKA radiance) but specular highlights can be seen on top of transparency.
glass.reflectionTexture = hdrTexture;glass.alpha = 0.5;
This behaviour can be turned off through the properties:
useRadianceOverAlpha = false;useSpecularOverAlpha = false;
Refraction (Back Compat)
Refraction is a little bit like reflection (Please purists, do not kill me now, I only said a little) because it is heavily relying on the environment to change the way the material looks. Basically, if reflection could be compared to seeing the sun and cloud on the surface of a lake, refraction would be seeing weird shaped fish under the surface (through the water). There is more on refraction on the next page.
As refraction is equivalent to how you can see through different materials boundaries, the effect can be controlled via the transparency in BJS. A special property helps you to do it, simply put pbr.linkRefractionWithTransparency=true; in your code and then the alpha will control how refractive the material is. Putting it to false leaves the alpha controlling the default transparency.
var glass = new BABYLON.PBRMaterial("glass", scene);glass.reflectionTexture = hdrTexture;glass.refractionTexture = hdrTexture;glass.linkRefractionWithTransparency = true;glass.indexOfRefraction = 0.52;glass.alpha = 0; // Fully refractive material
You can still notice some reflection on your material due to the energy conservation. Please note that you should since 4.0 rely on the next section settings to define every thing impacting what happens under the material surface. But no worries we will keep the current setup in place for backward compatibility.
Sub Surface
The sub surface section of the material defines everything happening below the surface. It currently supports Refraction and Translucency.
Refraction
I will not redefine the refraction component here as it has been addressed in the previous section but only highlights the main differences Here
Enabling the refraction would be done through a flag on the sub surface section:
Enabling Refraction In PBRvar pbr = new BABYLON.PBRMaterial("pbr", scene);sphere.material = pbr;pbr.metallic = 0;pbr.roughness = 0;pbr.subSurface.isRefractionEnabled = true;pbr.subSurface.refractionIntensity = 0.8;
As before you can control the index of refraction:
Controlling The Index Of Refractionvar pbr = new BABYLON.PBRMaterial("pbr", scene);sphere.material = pbr;pbr.metallic = 0;pbr.roughness = 0;pbr.subSurface.isRefractionEnabled = true;pbr.subSurface.indexOfRefraction = 1.5;
Please note that here the index of refraction represents the value you can find in the nomenclature and not its inverse like in the legacy setup.
You can control the tint of the material (representing its color below the surface) by configuring two properties:
tintColor: defines the color of the tint.tintColorAtDistance: defines at what distance under the surface the color should be the defined one (simulating absorption through beer lambert law).
var pbr = new BABYLON.PBRMaterial("pbr", scene);sphere.material = pbr;pbr.metallic = 0;pbr.roughness = 0;pbr.subSurface.isRefractionEnabled = true;pbr.subSurface.indexOfRefraction = 1.5;pbr.subSurface.tintColor = BABYLON.Color3.Teal();
By default the thickness of the material is understood to be the maxThickness value of the subSurface. You could easily change the thickness by relying on a thickness map:
var pbr = new BABYLON.PBRMaterial("pbr", scene);sphere.material = pbr;pbr.metallic = 0;pbr.roughness = 0;pbr.subSurface.isRefractionEnabled = true;pbr.subSurface.indexOfRefraction = 1.5;pbr.subSurface.tintColor = BABYLON.Color3.Teal();pbr.subSurface.thicknessTexture = texture;pbr.subSurface.minimumThickness = 1;pbr.subSurface.maximumThickness = 10;
The actual thickness per pixel would be then = minimumThickness + thicknessTexture.r * maximumThickness. This helps clamping the actual value between a min and max defined by a texture.
Translucency
The refraction is good to represent the light passing through on low density medium such as beer or wine. But what if your material was more dense like milk where the light would be diffused throughout the material ?

In this case, you can rely on the translucency properties of the material.
Translucency In PBRvar pbr = new BABYLON.PBRMaterial("pbr", scene);sphere.material = pbr;pbr.metallic = 0;pbr.roughness = 0;pbr.subSurface.isTranslucencyEnabled = true;pbr.subSurface.translucencyIntensity = 0.8;
Sharing some setup with the refraction (it actually makes sense as we are speaking about the same material), you can rely upon the tint color to define the color of the material below the surface:
Tint Color In PBRvar pbr = new BABYLON.PBRMaterial("pbr", scene);sphere.material = pbr;pbr.metallic = 0;pbr.roughness = 0;pbr.subSurface.isTranslucencyEnabled = true;pbr.subSurface.tintColor = BABYLON.Color3.Teal();
The setup will be identical relying on the both previously defined values:
tintColor: defines the color of the tint.tintColorAtDistance: defines at what distance under the surface the color should be the defined one (simulating absorption through beer lambert law).
It also fully respect the previously defined thickness configuration: The actual thickness per pixel would be then = minimumThickness + thicknessTexture.r * maximumThickness.
Scattering
To further add a layer of detail over what really happens beneath the surface of the material, you can add scattering. It simulates all small bounces of the light that takes place inside the material, causing light to go out at a different location than where it entered.
It can be really useful on materials like skin, foliage, wax, dense colored liquids, icecubes, gemstones, etc...
You can use this in addition of translucency to accurately represent the spread of the light inside the material.
Sub-Surface Scattering In PBR

var pbr = new BABYLON.PBRMaterial("pbr", scene);sphere.material = pbr;scene.enablePrePassRenderer().enableSubSurfaceForPrePass().metersPerUnit = 0.01;pbr.metallic = 0;pbr.roughness = 0.2;pbr.subSurface.isScatteringEnabled = true;
For this effect to be physically accurate, you have to indicate the ratio between scene units and the real world distance in meters, by filling the property metersPerUnit of the scene pre-pass renderer. It is by default set to 1 meter = 1 unit.
Diffusion profiles
Pushing realism even further, material volume albedo affects how far light travels inside the material. Thus you can register your material profile as the average volumic albedo that it is made of.
Let's say you want a skin tone diffusion profile, you can add this to your subsurface configuration by doing :
Skin Tone Using A Diffusion Profile In PBRpbr.subSurface.scatteringDiffusionProfile = new BABYLON.Color3(0.750, 0.25, 0.20);
You can have up to 5 different colors registered as diffusion profiles.
Warning ! Performance and compatibility notice
This effect is using a lot of WebGL 2 structures under the hood, therefore it is only compatible with WebGL 2.
Furthermore, please note that the use of subsurface scattering triggers a post-process, and it adds a lot of additionnal work for the GPU.
In other terms, use it wisely, and mind smaller GPUs that won't necessarily have the ressources to run this effect.
Mask
Would you wish to define the intensity of the different effects (Refraction or Translucency), you can use the left over channels of the thickness map. Actually, as we are trying to limit the overall number of textures used in the materials we decided to pack the mask information in the g channel for the transluency intensity factor and the alpha channel for the refraction intensity (b has been reserved for the next release).
As this might be counter intuitive considering the black and white texture generated by external tools, we put this feature under an opt-in flag to prevent any surprises:
var pbr = new BABYLON.PBRMaterial("pbr", scene);sphere.material = pbr;pbr.metallic = 0;pbr.roughness = 0;pbr.subSurface.isRefractionEnabled = true;pbr.subSurface.indexOfRefraction = 1.5;pbr.subSurface.isTranslucencyEnabled = true;pbr.subSurface.translucencyIntensity = 0.8;pbr.subSurface.tintColor = BABYLON.Color3.Teal();pbr.subSurface.thicknessTexture = texture;pbr.subSurface.minimumThickness = 1;pbr.subSurface.maximumThickness = 10;pbr.subSurface.useMaskFromThicknessTexture = true;
Clear Coat
Clear coat is a way to simulate the coating you can find in automotive car paint for instance. It usually is a transparent layer of paint that can be used to cover the colored coat.

The clear coat is the uppersurface of the material.
Clear Coat In PBRvar pbr = new BABYLON.PBRMaterial("pbr", scene);pbr.metallic = 0.0;pbr.roughness = 1.0;pbr.clearCoat.isEnabled = true;pbr.clearCoat.intensity = 0.5;
As the clear coat is the final interaction layer with the external medium it applies on top of the bump map, which can be amazing to simulate coating above small geometries represented by the bump map:
Clear Coat and Bump Map In PBRvar pbr = new BABYLON.PBRMaterial("pbr", scene);// Ensures irradiance is computed per fragment to make the// Bump visiblepbr.forceIrradianceInFragment = true;pbr.bumpTexture = new BABYLON.Texture("textures/floor_bump.png", scene);pbr.metallic = 0.0;pbr.roughness = 1.0;pbr.clearCoat.isEnabled = true;
This goes without saying that sometimes even the coating as some imperfection who can have a different shape than the bump map:
Clear Coat, Imperfections, and Bump Map In PBRvar pbr = new BABYLON.PBRMaterial("pbr", scene);// Ensures irradiance is computed per fragment to make the// Bump visiblepbr.forceIrradianceInFragment = true;pbr.bumpTexture = new BABYLON.Texture("textures/floor_bump.png", scene);pbr.metallic = 0.0;pbr.roughness = 1.0;pbr.clearCoat.isEnabled = true;var coatBump = new BABYLON.Texture("textures/waterbump.png", scene);pbr.clearCoat.bumpTexture = coatBump;
This is all great but what about a different color (all coatings are not transparent, think about the coating around candies). You can control the tint of the clear coat through four properties:
isTintEnabled: enables or disables the tint.tintColor: defines the main color of the tint.tintColorAtDistance: defines at what distance under the surface the color should be the defined one.tintThickness: defines the thicness of the coating.
It is intuitive enough to understand the thicker the coat is, the darker the color of the surface under the coating would appear. We are following carefully Beer Lambert's law in order to deduce the final color based off the chosen color, the "at distance" and the thickness.
Clear Coat Thickness In PBRpbr.clearCoat.isTintEnabled = true;pbr.clearCoat.tintColor = BABYLON.Color3.Teal();pbr.clearCoat.tintColorAtDistance = 1;pbr.clearCoat.tintThickness = 1.5;
By default the clear coat is fully glossy. Yet, you can define a special roughness value for the coating simulating for instance a used coating:
Clear Coat Roughness In PBRpbr.clearCoat.roughness = 0.15;
Finally, you can play with the Index of Refraction of the coating to change the fresnel effect applied to the environment. The default configuration represents a polyurethane layer:
Clear Coat Index Of Refraction In PBRpbr.clearCoat.isTintEnabled = true;pbr.clearCoat.indexOfRefraction = 2;
All of the configuration here can also for convenience be stored in textures:
texture: defines the clear coat basic data. r is an intensity factor, and g is a roughness factor.bumpTexture: defines the clear coat specific bump texture.tintColorAtDistance: defines at what distance under the surface the color should be the defined one.tintTexture: defines the clear tint values in a texture. rgb is tint and a is a thickness factor.
Iridescence
Iridescence is a way to simulate the thin film effect you can find on thin layers of oils on the ground. It usually looks like amazing rainbow colors.
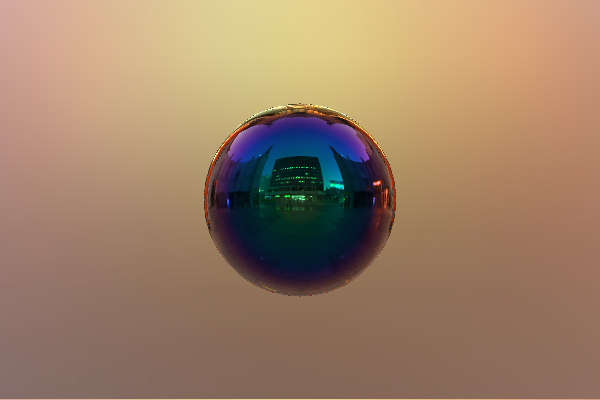
In the PBR material, you can enable iridescence with the following code:
Iridescence In PBRvar pbr = new BABYLON.PBRMaterial("pbr", scene);pbr.albedoColor = new BABYLON.Color3(0.1, 0.1, 0.1);pbr.metallic = 1.0;pbr.roughness = 0.0;pbr.iridescence.isEnabled = true;pbr.iridescence.intensity = 0.9;
You can control the iridescence index of refraction and thickness through their relative properties:
var pbr = new BABYLON.PBRMaterial("pbr", scene);pbr.albedoColor = new BABYLON.Color3(0.1, 0.1, 0.1);pbr.metallic = 1.0;pbr.roughness = 0.0;pbr.iridescence.isEnabled = true;pbr.iridescence.indexOfRefraction = 1.3;pbr.iridescence.minimumThickness = 100; // in nanometerspbr.iridescence.maximumThickness = 400; // in nanometers
By Default, the thickness will be used as a fixed value equal to the maximum thickness.
To provide more control, a texture can be used to control the intensity. The value of the R channel will be used to deduce the thickness from the interpolation between min and max thickness:
var pbr = new BABYLON.PBRMaterial("pbr", scene);pbr.albedoColor = new BABYLON.Color3(0.1, 0.1, 0.1);pbr.metallic = 1.0;pbr.roughness = 0.0;pbr.iridescence.isEnabled = true;pbr.iridescence.texture = intensityTexture;
On the same topic, a texture can be also used to control thickness (will be read from the G channel):
var pbr = new BABYLON.PBRMaterial("pbr", scene);pbr.albedoColor = new BABYLON.Color3(0.1, 0.1, 0.1);pbr.metallic = 1.0;pbr.roughness = 0.0;pbr.iridescence.isEnabled = true;pbr.iridescence.thicknessTexture = thicknessTexture;
The thickness read from the texture will be considered as a percentage of how thick it is between the minimumThickness and maximumThickness.
Anisotropy
By default the PBR material is isotropic. This means the shape of the reflection is identical in every direction. Nevertheless, in real life some materials shows really elongated highlights. For instance, looking an old vinyl disc (yes, I am that old), you can see the specular lighting being spread from the center to the border:

In the PBR material, you can enable anisotropy with the following code:
Anisotropy In PBRvar pbr = new BABYLON.PBRMaterial("pbr", scene);pbr.metallic = 1.0;pbr.roughness = 0.0;pbr.anisotropy.isEnabled = true;pbr.anisotropy.intensity = 0.5;
Please note that the anisotropic effect follows the tangent space of the material and thus, it requires it to be well defined. As you can notice in the previous demo, I used a highly tessellated sphere to make the effect look right. The best effect would be achieved by defining the tangents of your meshes.
The anisotropic direction is by default along the tangent direction. You can modify it by using the following parameter:
Modified Anisotropy In PBRvar pbr = new BABYLON.PBRMaterial("pbr", scene);pbr.metallic = 1.0;pbr.roughness = 0.0;pbr.anisotropy.isEnabled = true;pbr.anisotropy.direction.x = 0.5;pbr.anisotropy.direction.y = 1;
As usual, you can control all of those parameters by using a dedicated texture. rg is direction (stored like bump map) b is an intensity factor.
var pbr = new BABYLON.PBRMaterial("pbr", scene);pbr.metallic = 1.0;pbr.roughness = 0.0;pbr.anisotropy.isEnabled = true;pbr.anisotropy.texture = texture;
Sheen
Some materials have a totally different shapes for the specular lobe. By default in the PBR, material the specular lobe would for instance not be adapted to define the wide specular lobe we can see on fabric materials like satin. This is the main reason we introduced sheen in the material so that you can since 4.0 represents fabric materials relying on the PBR.
In the PBR material, you can enable sheen with the following code:
Sheen In PBRvar pbr = new BABYLON.PBRMaterial("pbr", scene);pbr.metallic = 1.0;pbr.roughness = 0.0;pbr.sheen.isEnabled = true;pbr.sheen.intensity = 0.5;
Please note that the sheen effect will only be useful on rough dielectric materials (metallic = 0). Actually, if the roughness is small, the shape of the specular lobe is so thin that you would not see any differences with the none sheen specular lobe.
To help with multi color material like special kind of satin, you can control the tint of the sheen with the following code:
Multi Color In PBRvar pbr = new BABYLON.PBRMaterial("pbr", scene);pbr.metallic = 0.0;pbr.roughness = 0.5;pbr.sheen.isEnabled = true;pbr.sheen.color = BABYLON.Color3.Red();
As usual, you can control all of those parameters by using a dedicated texture. rgb is tint and a is an intensity factor.
var pbr = new BABYLON.PBRMaterial("pbr", scene);pbr.metallic = 0.0;pbr.roughness = 0.5;pbr.sheen.isEnabled = true;pbr.sheen.texture = texture;
Normal Map / Parallax
Normal mapping and Parallax are supported in the exact same way than the standard material. Please, refer to the following links for more information:
LightMaps
LightMaps are available in the same way they are in the standardMaterial by affecting a texture to the lightmapTexture property. This can also be used as a shadowMap instead by switching the dedicated control flag useLightmapAsShadowmap to true.
Image Processing
The Processing Configuration can be applied directly on the material as explained in the image processing documentation.
Light Setup
Always considering what "Nature does", we reconsidered the BJS light falloff effect in the PBR Material.
Three main properties have been added to offer a better simulation of the lights.
Inverse Square Falloff
This is a type of falloff that is pretty close from what light does in real life (It is implemented in the best engines like BJS and Unreal, I may oversell it here :-) )
Compared to the BJS lighting model, instead of playing with an arbitrary range for the lights, the light impact will decrease proportionally to the inverse of the light distance squared.
float lightDistanceFalloff = 1.0 / ((lightDistanceSquared + 0.0001));return lightDistanceFalloff;
So, the further you are, the bigger your intensity will need to be to reach a surface.
To even go further, the intensity you define on the lights follows physics notions:
- Point and Spot lights are defined in luminous intensity (candela, m/sr)
- Directional and Hemispheric lights in illuminance (nit, cd/m2)
To make it compatible with the standard material, you can easily disable this behaviour and use the Physical Falloff like this:
pbr.usePhysicalLightFalloff = false;
IntensityMode
The lights now have an intensity which enable you to convert the intensity metric from one type to another one. This can help setting up your analytical lights close from real life measure:
// Default automatic mode best fitting with the light type.light.intensityMode = BABYLON.Light.INTENSITYMODE_AUTOMATIC;// Lumen (lm)light.intensityMode = BABYLON.Light.INTENSITYMODE_LUMINOUSPOWER;// Candela (lm/sr)light.intensityMode = BABYLON.Light.INTENSITYMODE_LUMINOUSINTENSITY;// Lux (lm/m^2)light.intensityMode = BABYLON.Light.INTENSITYMODE_ILLUMINANCE;// Nit (cd/m^2)light.intensityMode = BABYLON.Light.INTENSITYMODE_LUMINANCE;
Light Radius
Light Radius has been added as a property of each light and controls the fact that in real life most of the lights are not a single point.
Why? Simply because if your material is really glossy, each specular highlights (from the direct lights) will only be seen as a simple dot.
Small Dot Light Radius Using PBRNow, increasing the light radius makes this dot wider
Wider Dot Light Radius Using PBRThis uses internally a lot of approximation like Tan(theta) is almost theta for small angles so if you try to put bigger radius than a tenth of the light distance you will not see the desired effect.
Shadows (as the standard material)
Shadows are fully equivalent to the Standard material. All the documentation can be found here: Shadows;
Notes
You can find below a few notes which could be helpful during the creation of your scenes.
Specular Aliasing
Glossy materials are subject to Specular Aliasing artifacts. These artifacts are usually visible as bright dots flickering on meshes when animating the model or moving the camera.
They could be the result of several factors:
- Sharp Edges in the geometry
- Bump Map Texture
- ... For more information, you can consult this page about anti-aliasing techniques
Babylon version 3.2 includes a simple way to enable Specular anti-aliasing in PBR materials:
pbr.enableSpecularAntiAliasing = true;
Environment Irradiance
A big part of the lighting in PBR is assured by the environment texture. This provides two kinds of light contributions, radiance which could be considered alike reflection and irradiance which could be thought as the diffuse component of the Image Based Lighting.
In case you are creating a model rough and not metallic (in metallic workflow) or not specular (in specular glossiness mode), most of the illumination will be provided by both the analytical lights and the environment texture.
In Babylon JS in order to optimize the computation of the irradiance, it is computed in the vertex shader and interpolated in the fragment. Unfortunately, this prevents us to rely on the normal map to realize the computation and then might introduce artifacts by not emphasizing the bumpiness of the surface. It is most of the time acceptable but with rough none reflective material it changes a lot the visual result.
You can see below on the left on rough none reflective model in the default configuration and on the right a model with forceIrradianceInFragment enabled.
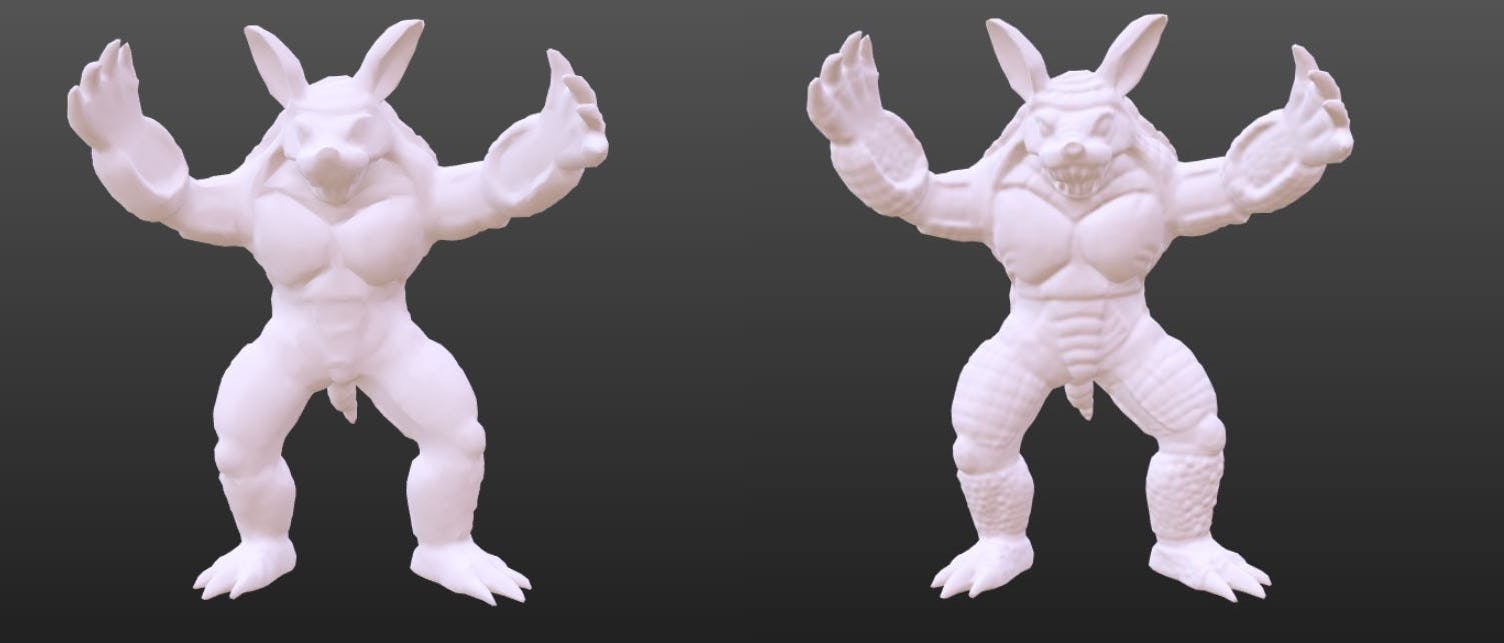
In order to force the computation of the irradiance in fragment, one can set to true the according parameter:
pbr.forceIrradianceInFragment = true;
Another point is that the irradiance or diffuse part of the IBL could cover your shadows if the environment lighting is strong. You could if you wish reduce its intensity separately from the reflection by scaling the polynomials used to create it:
scene.onReadyObservable.addOnce(() => {hdrTexture.sphericalPolynomial.scale(0.1);});
Spherical Harmonics
As we noticed in 4.0, our fast approach to compute the environment irradiance, may have not been accurate enough in certain use cases. We now, by default, have a more accurate representation of the diffuse IBL. In case you would prefer to focus on speed, you can easily revert to our previous method by switching the sphericalHarmonics property to false:
pbr.brdf.useSphericalHarmonics = false;
Here is how the difference looks like in live (toggle the Spherical Harmonics switch on and off to see the difference):
Spherical Harmonics in PBRIf you want to hear the full story behind it, you can have a read at our blog post : A tale of a bug.
Irradiance Map
In some special cases where the environment texture is highly dynamic (like a bright sun having a really high exposure value), the spherical representation of the diffuse IBL might not be enough. Actually, we are for performance reasons limiting the representation to the first 3 bands. A highly dynamic texture can not be represented through 3 bands only. In this case you can rely on a texture instead of a spherical representation.
In order to rely on a texture, you can set the irradianceTexture field of your environmentTexture as follow:
scene.environmentTexture = BABYLON.CubeTexture.CreateFromPrefilteredData("specular.dds", scene);scene.environmentTexture.irradianceTexture = new BABYLON.CubeTexture("irradiance.dds", scene);
Please, note that both textures should have the same properties: Cube vs 2D, Gamma vs Linear, RGBD or the chosen coordinates mode. Those properties do not need to be set on the main environmentTexture to prevent redundancy.
Energy Conservation
As we knew from the beginning, our PBR lighting model was not energy conservative, thanks to a lot of new white papers on this area, we have been able to introduce a way to embrace energy conservation in real time. This basically means that your rough metallic models will look brighter and closer from what nature does.
In case you would like to turn this feature off, to for instance get a closer cross engine rendering look, you can turn off the energy conservation flag on the PBR material.
pbr.brdf.useEnergyConservation = false;
Here is how the difference looks like in live (Left sphere is using energy conservation while the right one does not):
Energy Conservation in PBRImage Based Lighting: Babylon VS RayTracers
We spent a lot of time working on the implementation of our IBL environments. We reworked how we generate the DDS prefiltered environments so that we aligned with what perceptual ray tracers and popular game engines like Unity and Unreal are doing with their IBL rendering. We are approximating a perceptual roughness model which drops what is perceived to be 50% rough falls in the middle of middle of the linear ramp for roughness. The GGX algorithm that we use for our lighting calculations has more of a linear roughness scale which loses clarity in reflections quickly (by around 0.3 roughness). We adjusted the falloff to mirror what happens in Arnold ray tracing, which is the renderer we chose as our ground truth for this work:
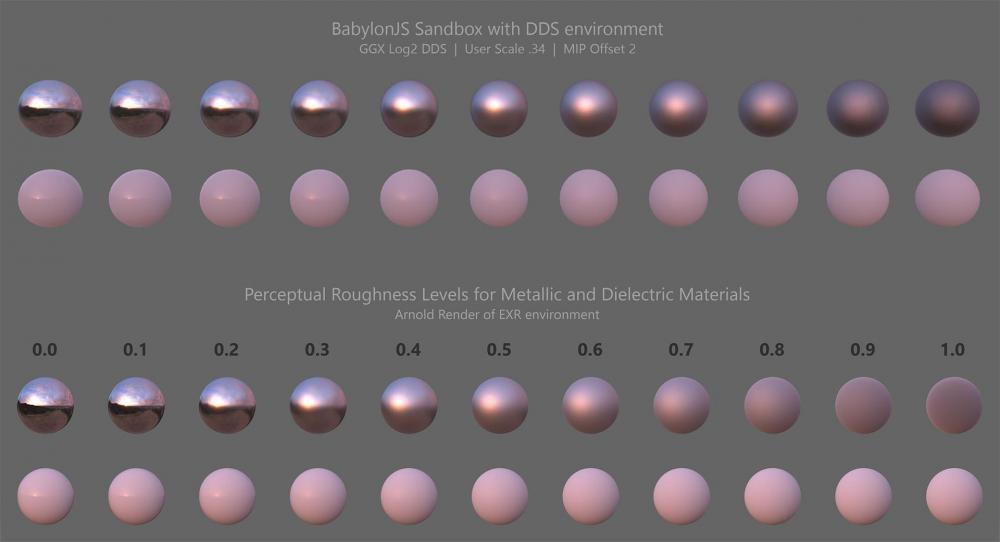
We were able to largely match the perceptual falloff from the Arnold ray tracer, while using a prefiltered MIP chain in the DDS ignoring the last two MIP levels. We have some deviation from the high roughness in the ray traced ground truth, but since fully rough materials don't really exist in the real world, there is no way to know if Arnold is right in these areas.
How to Debug
In order to simplify troubleshooting within the PBR material, a special section has been added to the inspector:
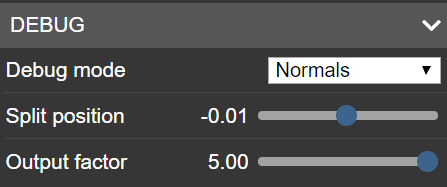
You can choose from the exhaustive list of information what you would like to see. You can also use the split position to choose from which horizontal position the debug mode starts on the screen. This can help looking side by side at the different renders. The output factor can be helpful if you are looking at values pretty small as it would help seeing different colors on screen.
Using The Inspector with PBR