WebXR
Current state
The WebXR W3C Proposal is currently in its draft phase. It is, however, already implemented in Chrome (check caniuse.com to know about others browsers). Starting with version 79, WebVR has been deprecated and WebXR is enabled by default. Earlier browser versions had WebXR behind a configuration flag. One of its goal is deprecating WebVR and other AR implementation and provide a single VR and AR API.
As the API continuously changes, it is difficult to keep up with feature changes. The latest chrome canary is notably the most XR-feature-complete browser and Google continuously updates the browser with new features. This is the main reason we introduced the Features Manager, which allows us to implement the newest version of official features with internal versioning without breaking backwards compatibility.
Note that most of the time when we say WebXR, we actually mean WebXR in VR immersive mode. This is currently the most used mode of WebXR.
Device and browser support
PC
Chrome 79 on windows officially supports WebXR with all Microsoft Mixed Reality Devices. Unofficially, WebXR is working well with the oculus SDK (Rift, Rift S, and Quest with Link). As of this writing, Oculus support is still behind a flag.
Mobile and Quest
WebXR AR features on Android's Chrome Browser (Stable and Canary) can be enabled behind a flag at chrome://flags, including AR features such as plane detection, hit-tests and anchors. Note that the AR features' architecture is constantly changing, so expect different results from version to version.
Oculus Quest supports WebXR (in VR mode) in the latest oculus browser. Babylon's specs implementation works well with the quest.
No official iOS/iPhone support is planed at the moment. Mozilla has built the WebXR iOS Viewer which is a (very) limited AR-oriented browser.
Polyfill
For older browsers that support WebVR but not WebXR you can use the WebXR Polyfill which is the WebXR API implementation using WebVR features. Some functions will not work (or will simply return without changes) but the basic functionality works well.
Babylon does not intend on integrating the polyfill in the framework itself or in the playground. We encourage the developer to offer the polyfill to users not using a WebXR-Supported browser.
To use the polyfill in the playground, please add the following to your playground (before 'createScene'):
const xrPolyfillPromise = new Promise((resolve) => {if (navigator.xr) {return resolve();}if (window.WebXRPolyfill) {new WebXRPolyfill();return resolve();} else {const url = "https://cdn.jsdelivr.net/npm/webxr-polyfill@latest/build/webxr-polyfill.js";const s = document.createElement("script");s.src = url;document.head.appendChild(s);s.onload = () => {new WebXRPolyfill();resolve();};}});
afterwards, make sure to await it before initializing WebXR:
const xrPolyfillPromise = new Promise((resolve) => {if (navigator.xr) {return resolve();}if (window.WebXRPolyfill) {new WebXRPolyfill();return resolve();} else {const url = "https://cdn.jsdelivr.net/npm/webxr-polyfill@latest/build/webxr-polyfill.js";const s = document.createElement("script");s.src = url;document.head.appendChild(s);s.onload = () => {new WebXRPolyfill();resolve();};}});var createScene = async function () {// wait for the polyfill to kick inawait xrPolyfillPromise;console.log(navigator.xr); // should be there!console.log(await BABYLON.WebXRSessionManager.IsSessionSupportedAsync("immersive-vr")); // should be true// create your scenevar scene = new BABYLON.Scene(engine);var camera = new BABYLON.DeviceOrientationCamera("DevOr_camera", new BABYLON.Vector3(-30, -30, -30), scene);camera.setTarget(BABYLON.Vector3.Zero());camera.attachControl(canvas, true);var light = new BABYLON.HemisphericLight("light", new BABYLON.Vector3(0, 0, 0), scene);scale = 100;// initialize XRvar xr = await scene.createDefaultXRExperienceAsync();return scene;};
If you experience low-resolution when using the polyfill, make sure to resize the canvas to a higher resolution. This is a limitation of WebVR (that required resizing the canvas) which we didn't integrate for WebXR.
The WebXR Emulator
If you are developing and don't want to constantly test on a real device, use mozilla's WebXR Emulator which is available for chrome and firefox. We support it and actually use it during development. Highly recommended.
Getting started
The simplest way to get started is using a WebXR-enabled browser and add a single line of code to your scene:
const xr = scene.createDefaultXRExperienceAsync();
This will enable WebXR in VR immersive mode, including session init, input sources, the camera, teleportation and scene interactions. All using our WebXR Default Experience Helper.
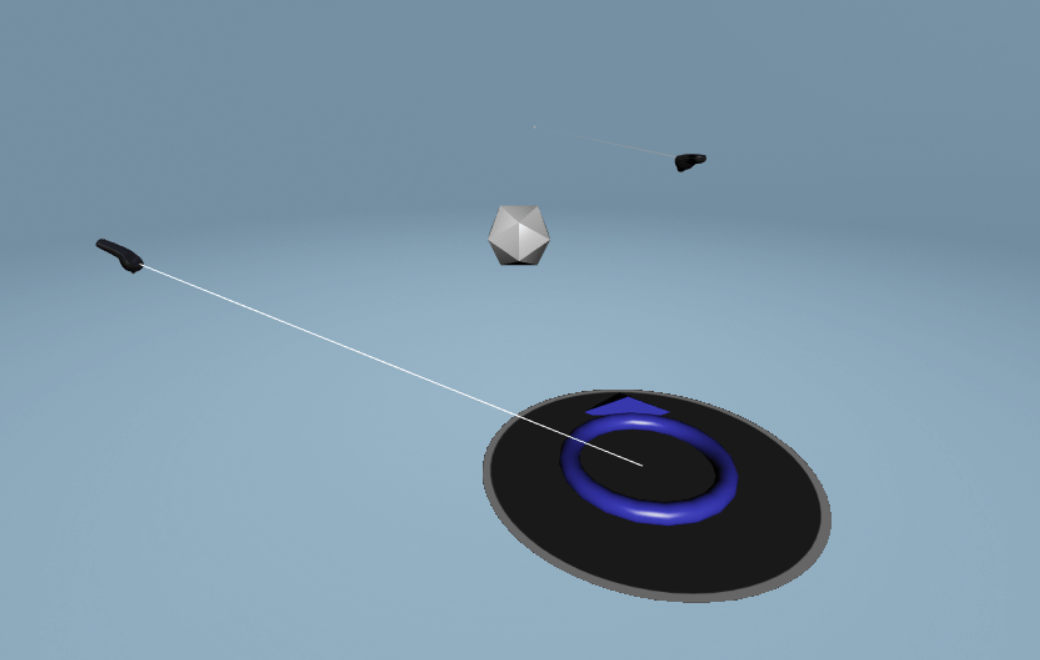
Note that the xr variable is a Promise. Using the async/await pattern will be simpler and more intuitive. It will also make sense to define floor meshes so we can define our ground and move on it. Here is a sphere in XR:
var createScene = async function () {var scene = new BABYLON.Scene(engine);var camera = new BABYLON.FreeCamera("camera1", new BABYLON.Vector3(0, 5, -10), scene);camera.setTarget(BABYLON.Vector3.Zero());camera.attachControl(canvas, true);var light = new BABYLON.HemisphericLight("light1", new BABYLON.Vector3(0, 1, 0), scene);light.intensity = 0.7;var sphere = BABYLON.Mesh.CreateSphere("sphere1", 16, 2, scene);sphere.position.y = 1;const env = scene.createDefaultEnvironment();// here we add XR supportconst xr = await scene.createDefaultXRExperienceAsync({floorMeshes: [env.ground],});return scene;};
And that's it!
Make sure to read more on the WebXR Experience Helper for further tips and tricks, and take a look at our Demos and examples page.
ES6 support with Tree Shaking
When using Babylon.js ES6 support with tree shaking, import WebXR modules from:
@babylonjs/core/XR/*
And import loaders and side-effects for loading default controller models from the WebXR Input Profiles github repository.
For example:
import { WebXRDefaultExperience } from '@babylonjs/core/XR/webXRDefaultExperience.js'// Enable GLTF/GLB loader for loading controller models from WebXR Input registryimport '@babylonjs/loaders/glTF'// Without this next import, an error message like this occurs loading controller models:// Build of NodeMaterial failed" error when loading controller model// Uncaught (in promise) Build of NodeMaterial failed: input rgba from block// FragmentOutput[FragmentOutputBlock] is not connected and is not optional.import '@babylonjs/core/Materials/Node/Blocks'
See also:
Migrating from WebVR
WebVR is deprecated and will soon end its life in most if not all browsers. It is highly recommended to port all WebVR implementations to WebXR.
Migrating from the VR Experience helper
If you used our VR experience helper remove the VR initializer and add the XR experience helper. So this:
var scene = new BABYLON.Scene(engine);var vrHelper = scene.createDefaultVRExperience();
turns to this:
var scene = new BABYLON.Scene(engine);var xrHelper = scene.createDefaultXRExperienceAsync();
The XR helper has full controller support per default, including interactions with the scene meshes, pointer events and more. Read more about the XR Experience helper.
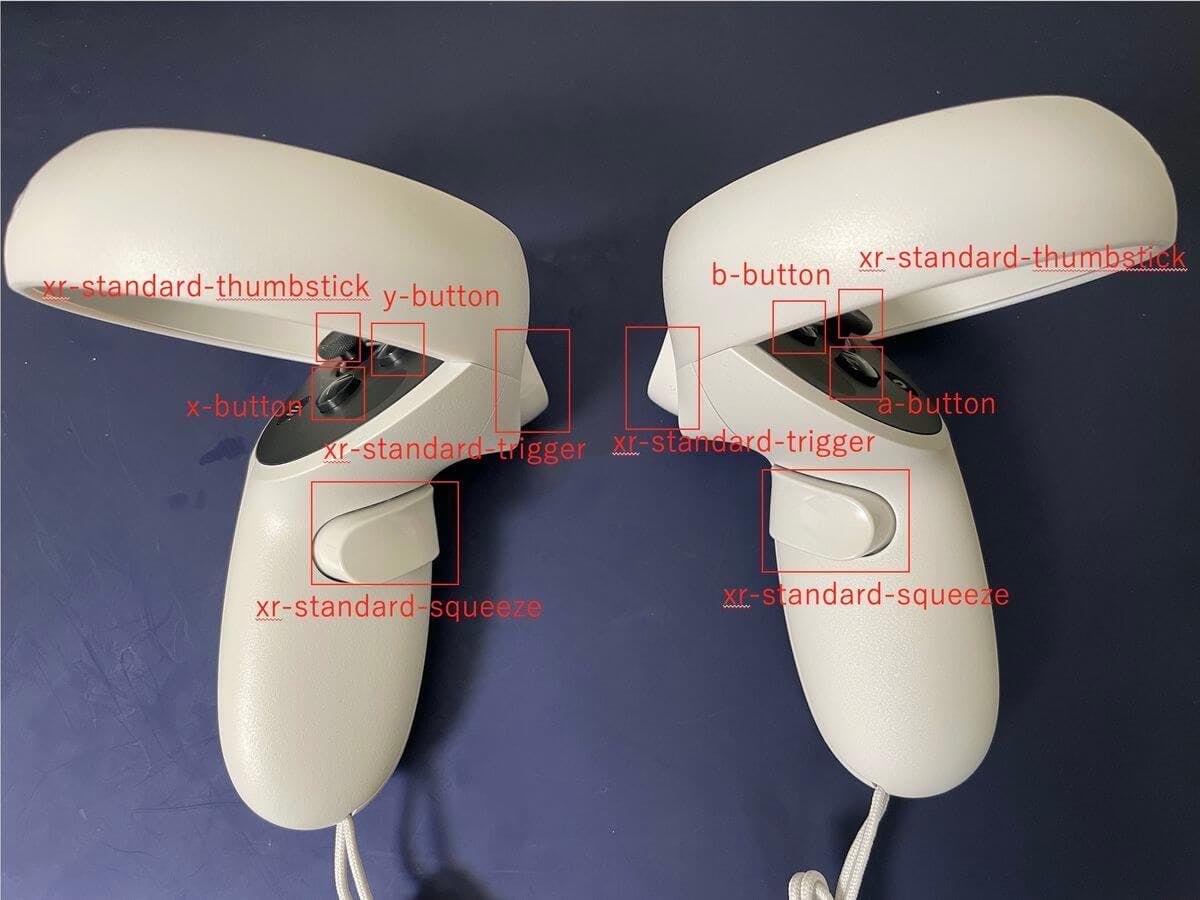
Migrating controller support
Since WebXR controllers are no longer considered to be Gamepads the architecture is a bit different.
The most important feature that was added is the full pointer events support for the controllers. The controllers support all pointer events, so you can use Pointer interactions just like you use to controller mouse interactions in your scene.
It is also important to note that it is now possible to query what features the controller has and act accordingly.
Here are the VR controllers' most used functions, and how to get them to work in XR:
// On new controller attached:// WebVR:webvrCamera.onControllersAttached = (vrController) => {// fun with the new controller, which is a gamepad!};// WebXR:const webXRInput = xr.input; // if using the experience helper, otherwise, an instance of WebXRInputinput.onControllerAddedObservable.add((xrController /* WebXRInputSource instance */) => {// more fun with the new controller, since we are in XR!inputSource.onMotionControllerInitObservable.add((motionController) => {// get the motionController, which is similar to but NOT a gamepad:});// xr supports all types of inputs, so some won't have a motion controllerif (!xrController.gamepad) {// using touch, hands, gaze, something else?}});// From this point we assume we have two variables: vrController and xrController.// We also assume motionController is present!// main button// WebVR:controller.onMainButtonStateChangedObservable.add((newState /* ExtendedGamepadButton */) => {// is the button pressed?if (newState.pressed) {// Do something}});// WebXR:// get the main component (decided by the controller's vendor!)const mainComponent = xrController.motionController.getMainComponent();// or get the trigger component, if present:const mainTrigger = xrController.motionController.getComponent(WebXRControllerComponent.TRIGGER);mainComponent.onButtonStateChanged.add((component /* WebXRControllerComponent */) => {// check for changes:// pressed changed?if (component.changes.pressed) {// is it pressed?if (component.changes.pressed.current === true) {// pressed}// or a different way:if (component.pressed) {// component is pressed.}}});// thumbpad / touchpad// in WebVR - you had to check what controller is being used, but in general this would work:vrController.onPadValuesChangedObservable.add(function (stateObject) {console.log(stateObject); // {x: 0.1, y: -0.3}});// in webXR you can check if it is present and work accordingly:const thumbstick = xrController.motionController.getComponent(WebXRControllerComponent.THUMBSTICK);if (thumbstick) {// Huzza! we have a thumbstick:thumbstick.onButtonStateChanged; // will trigger when the thumbstick is PRESSED or touched!thumbstick.onAxisValueChanged; // will trigger when axes of the thumbstick changed}// touchpad// in WebVR we had "pad" concept which was for both thumbstick and touchpadcontroller.onPadValuesChangedObservable.add(function (stateObject) {console.log(stateObject); // {x: 0.1, y: -0.3}});// in WebXR, it is much much better:const touchpad = xrController.motionController.getComponent(WebXRControllerComponent.TOUCHPAD);if (touchpad) {// Finally, a controller with a touchpadtouchpad.onButtonStateChanged; // will trigger when the touchpad is touched or pressedtouchpad.onAxisValueChanged; // will trigger when axes of the touchpad changed}
Read more about the XR Controllers system.
Legacy support
Thou we always encourage backwards compatibility We recommend using WebXR directly and stop using the WebVR experience helper. However:
The latest WebVR Experience helper has a new flag in its init options - useXR . This will check for XR support and will launch the VR session in WebXR, if possible. A working example can be found in WebVR Check for WebXR
var createScene = function () {// Create scenevar scene = new BABYLON.Scene(engine);// Create simple spherevar sphere = BABYLON.Mesh.CreateIcoSphere("sphere",{radius: 0.2,flat: true,subdivisions: 1,},scene,);sphere.position.y = 3;sphere.material = new BABYLON.StandardMaterial("sphere material", scene);// Lights and cameravar light = new BABYLON.DirectionalLight("light", new BABYLON.Vector3(0, -0.5, 1.0), scene);light.position = new BABYLON.Vector3(0, 5, -2);var camera = new BABYLON.ArcRotateCamera("camera", -Math.PI / 2, Math.PI / 4, 3, new BABYLON.Vector3(0, 3, 0), scene);camera.attachControl(canvas, true);scene.activeCamera.beta += 0.8;// Default Environmentvar environment = scene.createDefaultEnvironment({enableGroundShadow: true,groundYBias: 2.8,});environment.setMainColor(BABYLON.Color3.FromHexString("#74b9ff"));// Shadowsvar shadowGenerator = new BABYLON.ShadowGenerator(1024, light);shadowGenerator.useBlurExponentialShadowMap = true;shadowGenerator.blurKernel = 32;shadowGenerator.addShadowCaster(sphere, true);// Enable VR, use XR when possiblevar vrHelper = scene.createDefaultVRExperience({createDeviceOrientationCamera: false,useXR: true, // This will enable XR if supportedfloorMeshes: [environment.ground],});// Runs every frame to rotate the spherescene.onBeforeRenderObservable.add(() => {sphere.rotation.y += 0.0001 * scene.getEngine().getDeltaTime();sphere.rotation.x += 0.0001 * scene.getEngine().getDeltaTime();});// GUIvar plane = BABYLON.Mesh.CreatePlane("plane", 1);plane.position = new BABYLON.Vector3(0.4, 4, 0.4);var advancedTexture = BABYLON.GUI.AdvancedDynamicTexture.CreateForMesh(plane);var panel = new BABYLON.GUI.StackPanel();advancedTexture.addControl(panel);var header = new BABYLON.GUI.TextBlock();header.text = "Color GUI";header.height = "100px";header.color = "white";header.textHorizontalAlignment = BABYLON.GUI.Control.HORIZONTAL_ALIGNMENT_CENTER;header.fontSize = "120";panel.addControl(header);var picker = new BABYLON.GUI.ColorPicker();picker.value = sphere.material.diffuseColor;picker.horizontalAlignment = BABYLON.GUI.Control.HORIZONTAL_ALIGNMENT_CENTER;picker.height = "350px";picker.width = "350px";// This will work in XR, since we are using native pointer events!picker.onValueChangedObservable.add(function (value) {sphere.material.diffuseColor.copyFrom(value);});panel.addControl(picker);vrHelper.onAfterEnteringVRObservable.add(() => {// This callback will still work! Would be better to use the XR native observables.});return scene;};
The color picker works since it is using the pointer architecture. If XR is present, XR will be used. Otherwise, it will use WebVR as a fallback.
Note that some features will not work correctly or will not work at all. For example, camera gaze will not work at all. Controller will work, but since the interaction architecture is different, it is highly likely you will need to adjust a few observers in order to get it to work, especially if there are VR-specific callbacks.
We recommend using the WebXR polyfill instead.