WebXR Selected Features
This contains the documentation of all features that are not AR-Exclusive. For AR Features, see the BabylonJS WebXR AR Features page.
Teleportation Module
A lot of (native) VR games have a teleportation feature to allow movement in the scene. It is the most convenient way of moving in a scene without the user feeling dizzy or disoriented.
Babylon has supported teleportation in WebVR and has now upgraded the feature to have a lot of different abilities.
The teleportation feature enabled the following ways to interact with the camera's position:
- Move forward using direct/indirect rays
- Move backwards
- Rotate in place.
Quick note about the WebXR emulator - Even thou it doesn't have support for it just yet, the WebXR emulator adds a Thumbstick to the emulated controller, making it impossible to simulate teleportation. To get teleportation working you will need to enable useMainComponentOnly (described below) to disable the thumbstick's teleportation. It is recommended to only enable this during development, unless this is the required behavior.
Enabling teleportation
The teleportation module is turned on per default when using the WebXR Default Experience Helper. To turn it on or re-enable it use the following code:
const featuresManager = xr.baseExperience.featuresManager; // or any other way to get a features managerfeaturesManager.enableFeature(WebXRFeatureName.TELEPORTATION, "stable" /* or latest */, {xrInput: xr.input,// add options herefloorMeshes: [ground, secondFloor, thirdFloor],});
The latest options can be found in the WebXR teleportation feature's source code.
Some teleportation parameters are needed during construction and are therefore only configurable in the constructor's options parameter. To reconfigure parameters which have no public getter/setter, re-enable the feature:
var xrHelper = await scene.createDefaultXRExperienceAsync({xrInput: xrHelper.input,floorMeshes: [ground] /* Array of meshes to be used as landing points */,});// ...// needs a reconfigure - re-enable the feature (will discard the old one and create a new one!)xrHelper.teleportation = featuresManager.enableFeature(WebXRFeatureName.TELEPORTATION, "stable" /* or latest */, {xrInput: xrHelper.input,floorMeshes: [ground],renderingGroupId: 1,});
Notice that the only obligatory option for the teleportation feature is the xrInput, which are the controllers it is going to use in order to teleport the user.
Setting floor meshes
Floor meshes are most important for teleportation, as the module needs to know where the users are allowed to land and where not.
When using the WebXR Default Experience Helper you can set the floorMeshes during initialization:
var xrHelper = await scene.createDefaultXRExperienceAsync({xrInput: xr.input,floorMeshes: [ground] /* Array of meshes to be used as landing points */,});const teleportation = xrHelper.teleportation;
When enabling the feature yourself you can provide it in the options object:
const teleportation = featuresManager.enableFeature(WebXRFeatureName.TELEPORTATION, "stable", {xrInput: xr.input,floorMeshes: [ground],});
If you want to add a mesh after the teleportation feature was enabled, you can use the addFloorMesh function:
teleportation.addFloorMesh(ground2);
And to remove simply use the removeFloorMesh function:
teleportation.removeFloorMesh(ground2);
A simple example for enabling floor meshes: Enable Floor Meshes
Direct and indirect landing zones
The teleportation landing zone is defined by the person holding the controllers. There are two ways of teleportation: direct teleportation and indirect (parabolic) teleportation.
Direct teleportation means - the user aims at the position they want to land at (a straight line). This is used when the ground and the landing location is in sight and is the most convenient and straight-forward way of moving forward.
An indirect line means the user aims up high and creates a parabolic path. This is used to go across obstacles, or to teleport from one floor to the other.

The direct teleportation is always enabled. The indirect teleportation is enabled per default, but it is possible to disable it using a flag:
// disable the parabolic (indirect) teleportation rayteleportation.parabolicRayEnabled = false;
To make the parabolic ray go further you can set the radius that is used to create the inspection ray when pointing the ray at 90 degrees up (Default is 5):
teleportation.parabolicCheckRadius = 10;
Note that the parabolic ray's radius is bigger, the lower the rotation angle of the controller. The compensation calculation is done using this formula:
const compensation = 1 + (Math.PI / 2 - Math.abs(rotationOnTheXAxis));
The compensation is multiplied by the defined radius and changes the current ray intersection radius.
Different input sources
The default input source is an XR headset with two handheld controllers. This input source in WebXR is called TrackedPointer .
When the input source has a thumbstick or a touchpad, moving the finger forward will trigger the ray-casting mode. Rotating the finger after seeing the ray casted will rotate the direction in which the user lands. Releasing the finger when seeing a landing zone will move the user there.
When no thumbstick or touchpad is available, the main component (usually a trigger) will be used. See WebXR input sources for more information about the main component. When using the main component, which is usually a button, you can define a certain amount of time in milliseconds after which the user will teleport, if still holding the trigger. The default is 3 seconds.
This configuration value can be found in the constructor's options and it is called timeToTeleport :
const teleportation = featuresManager.enableFeature(WebXRFeatureName.TELEPORTATION, "stable", {xrInput: xr.input,floorMeshes: [ground],timeToTeleport: 5000,});
Note that when using a button, it is impossible to allow rotation, so the user's orientation will stay the same as it was before they teleported.
To force the user to use the main component only (even if a thumbstick is available) use the useMainComponentOnly flag when constructing:
const teleportation = featuresManager.enableFeature(WebXRFeatureName.TELEPORTATION, "stable", {xrInput: xr.input,floorMeshes: [ground],timeToTeleport: 5000,useMainComponentOnly: true,});
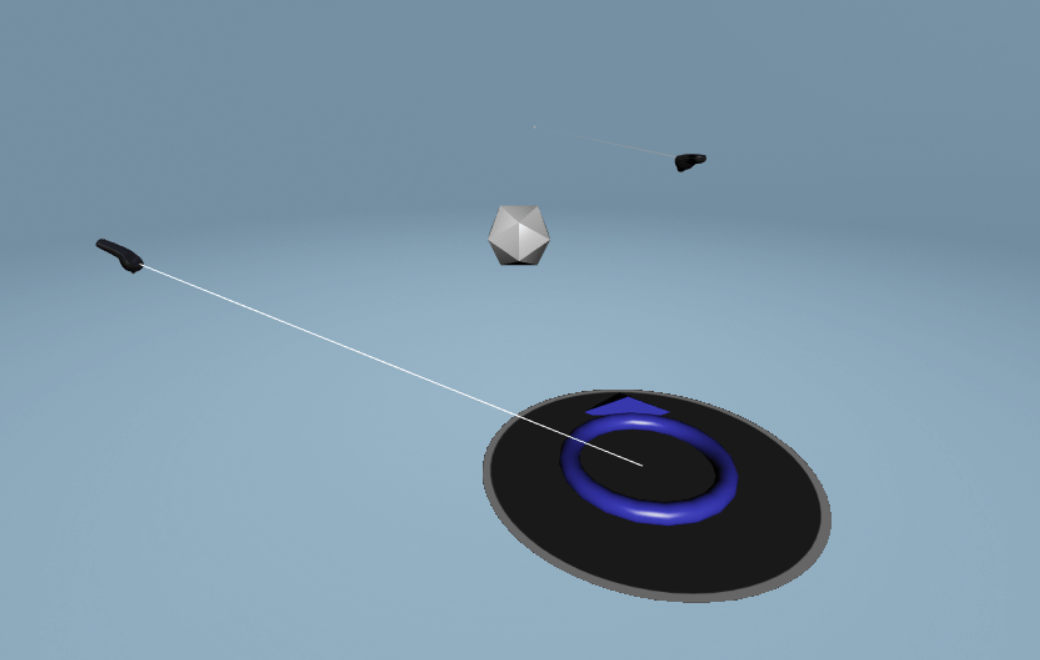
The teleportation landing zone
The teleportation landing zone is a group of meshes means to show the user where they are going to land and in which direction. Its default version looks like this:

Each part of the teleportation landing zone is configurable:
The landing zone's material
The material of the landing zone (the dark circle on the floor) can be configured when constructing the feature using css colors:
const teleportation = featuresManager.enableFeature(WebXRFeatureName.TELEPORTATION, "stable", {xrInput: xr.input,floorMeshes: [ground],defaultTargetMeshOptions: {teleportationFillColor: "#55FF99",teleportationBorderColor: "blue",},});
Which looks like this:

The example can be found here: Custom Landing Zone
The ring's material
The rotation ring's material can be provided by the user:
let myCustomMaterial = new BABYLON.StandardMaterial("ground", scene);myCustomMaterial.backFaceCulling = false;myCustomMaterial.diffuseColor = BABYLON.Color3.Green();myCustomMaterial.diffuseTexture = new BABYLON.Texture("textures/grass.png", scene);const teleportation = featuresManager.enableFeature(WebXRFeatureName.TELEPORTATION, "stable", {xrInput: xr.input,floorMeshes: [ground],defaultTargetMeshOptions: {torusArrowMaterial: myCustomMaterial,},});
Will look like this:

Disable the ring up-and-down animation
const teleportation = featuresManager.enableFeature(WebXRFeatureName.TELEPORTATION, "stable", {xrInput: xr.input,floorMeshes: [ground],defaultTargetMeshOptions: {disableAnimation: true,},});
And now the ring won't animate up and down when the target zone is casted
Disable lighting on the ring
To make sure the ring is always visible no matter the lighting in the scene is, set the disableLighting flag when constructing the feature:
const teleportation = featuresManager.enableFeature(WebXRFeatureName.TELEPORTATION, "stable", {xrInput: xr.input,floorMeshes: [ground],defaultTargetMeshOptions: {disableLighting: true,},});
This will look like this with light intensity 0.5:

Rotating while teleporting
It is possible to not allow the user to rotate after casting the initial ray. It is a flag straight on the teleportation object and it is called rotationEnabled :
teleportation.rotationEnabled = false;
Backwards movement
Backwards movement is on per default. When the user "pulls" the thumbstick or the touchpad backwards they will move a predefined distance, if this distance is available on any floor mesh behind them.
To configure the distance to move use the backwardsTeleportationDistance flag:
teleportation.backwardsTeleportationDistance = 1.0; // Default is 0.7
To disable backwards moving use this flag:
teleportation.backwardsMovementEnabled = false; // Default is 0.7
Rotation in place
When moving the thumbstick left and right (X-Axis movement on the thumbstick/touchpad) the user will rotate a predefined amount. To default rotation is 22.5 degrees (in radians: Math.PI / 8 ). To change this use the rotationAngle flag:
// rotate 45 degreesteleportation.rotationAngle = Math.PI / 4;
Rendering to a different layer or rendering group
If you want the render the teleportation target zone on top of the rest of the meshes you can use one of two ways:
- rendering group id (See Rendering groups)
- Utility layer (See UtilityLayerRenderer)
To set the rendering group id :
const teleportation = featuresManager.enableFeature(WebXRFeatureName.TELEPORTATION, "stable", {xrInput: xr.input,floorMeshes: [ground],renderingGroupId: 1,});
This will look like this (notice it renders on top of the ground that should hide it):

To set a utility layer:
const teleportation = featuresManager.enableFeature(WebXRFeatureName.TELEPORTATION, "stable", {xrInput: xr.input,floorMeshes: [ground],useUtilityLayer: true,// optionalcustomUtilityLayerScene: customScene, // a different utility layer scene to use. If not the default utility layer scene will be used});
Snap-to (Hotspots)
Some XR experiences require the user to land at an exact location (and sometimes ONLY at exact locations). The teleportation snap-to feature allows you to define spots where the user can land and where the teleportation ray will snap (with a specific threshold).
To enable snap-to points you can use one of the two:
- provide an array of hotspots (Vector3) to the options when enabling the feature:
const interestingSpot = new BABYLON.Vector3(-4, 0, 4);const interestingSpot2 = new BABYLON.Vector3(4, 0, 4);const teleportation = featuresManager.enableFeature(WebXRFeatureName.TELEPORTATION, "stable", {xrInput: xr.input,floorMeshes: [ground],snapPositions: [interestingSpot, interestingSpot2],});
- Add points after the feature is enabled:
teleportation.addSnapPoint(new BABYLON.Vector3(0, 0, 6));
Note that it is always expected that the snap-to points will be on a mesh that is defined as a floor mesh. Babylon will not check that! If you put the hotspot too far away from a floor mesh, the results will be unexpected (for example, the user might hover).
To change the snap-to radius, use the snapToPositionRadius parameter. Default is 0.8 units or 80 cm and it cannot be 0:
const interestingSpot = new BABYLON.Vector3(-4, 0, 4);const interestingSpot2 = new BABYLON.Vector3(4, 0, 4);const teleportation = featuresManager.enableFeature(WebXRFeatureName.TELEPORTATION, "stable", {xrInput: xr.input,floorMeshes: [ground],snapPositions: [interestingSpot, interestingSpot2],snapToPositionRadius: 1.2,});
Now any position of target zone within a 1.2 units (meters) radius of one of the snap-to points will change the target zoné location to be the close point. You can test it in this playground:
If you want to disable the user's free movements and only let the user land on snap-to points, set the snapPointsOnly , either during construction:
const interestingSpot = new BABYLON.Vector3(-4, 0, 4);const interestingSpot2 = new BABYLON.Vector3(4, 0, 4);const teleportation = featuresManager.enableFeature(WebXRFeatureName.TELEPORTATION, "stable", {xrInput: xr.input,floorMeshes: [ground],snapPositions: [interestingSpot, interestingSpot2],snapToPositionRadius: 1.2,snapPointsOnly: true,});
or afterwards:
teleportation.snapPointsOnly = true;
The feature will look like this:
You can play around in this playground:
Snap-to Hotspot ExampleHand tracking
Some devices and browsers support tracking the hand joints directly, with no need for external controllers. Such devices are the oculus quest (1 and 2) using the native oculus browser.
25 points on each hand are being tracked and delivered to you on each frame. Babylon's hand tracking feature uses this information to constantly update the WebXRHand object and its 25 childrens' transformations.
Please note that when referring to "hands" on this page we are referring to the actual handedness of the user and not left-handed vs. right-handed system. WebXR is right-handed in its nature.
Getting started
To get started you will first need a supported devices. As written before there are currently two main devices with hand support - the oculus quest 1 and 2 using their native browser (and not using oculus link).
To enable hand joint tracking support in your oculus quest, make sure to go to chrome://flags and enable webxr joints-tracking. Once this is enabled Babylon will be able to read the hand information on each frame.
To enable hand support in your babylon scene, enable the WebXR feature:
const featureManager = xrHelper.baseExperience.featuresManager;featureManager.enableFeature(BABYLON.WebXRFeatureName.HAND_TRACKING, "latest", {xrInput: xrHelper.input,});
This will enable basic hand support - 25 hidden spheres will be created for each hand, and each hand will have the default hand mesh loaded and enabled:

Configuration Options
The current options for the plugin can always be found at the WebXR hand tracking feature source code. Most of them will be explained later.
Hand meshes
Babylon's default hand meshes are enabled per default. You can disable them entirely, or provide different ones.
To disable them use the disableDefaultHandMesh flag when creating the feature:
const featureManager = xrHelper.baseExperience.featuresManager;featureManager.enableFeature(BABYLON.WebXRFeatureName.HAND_TRACKING, "latest", {xrInput: xrHelper.input,jointMeshes: {disableDefaultHandMesh: true,},});
This will disable the mesh load and will enable the 25 points to be shown (defaults to 25 spheres per hand):

If you want to provide different hand meshes (for example if you want to have your users wear gloves) it is recommended to take the current RHS (right hand system) hand meshes from the hand meshes assets directory and modify them. Otherwise you will need to create your own skeleton/bones and weight the skin correctly.
Once you are down creating you will need two important objects per hand. The first is the actual mesh per hand. The other is the mapping between the native XR tracked joint and the bone in your model. It is an structured array with the names of the bones of each hand as strings, sorted according to the XR mapping of the joints. The default one is this:
this._rigMapping = ["wrist_","thumb_metacarpal_","thumb_proxPhalanx_","thumb_distPhalanx_","thumb_tip_","index_metacarpal_","index_proxPhalanx_","index_intPhalanx_","index_distPhalanx_","index_tip_","middle_metacarpal_","middle_proxPhalanx_","middle_intPhalanx_","middle_distPhalanx_","middle_tip_","ring_metacarpal_","ring_proxPhalanx_","ring_intPhalanx_","ring_distPhalanx_","ring_tip_","little_metacarpal_","little_proxPhalanx_","little_intPhalanx_","little_distPhalanx_","little_tip_",].map((joint) => `${joint}${handedness === "right" ? "R" : "L"}`);
Once you have both objects per hand, you can provide them when enabling the feature:
const rightHandMesh = getRightHandMesh(); // get it any way you wantconst leftHandMesh = getLeftHandMesh(); // get it any way you wantconst featureManager = xrHelper.baseExperience.featuresManager;featureManager.enableFeature(BABYLON.WebXRFeatureName.HAND_TRACKING, "latest", {xrInput: xrHelper.input,jointMeshes: {disableDefaultHandMesh: true,handMeshes: {right: rightHandMesh,left: leftHandMesh,},rigMapping: {right: [//... mapping for the right hand mesh],left: [//... mapping for the left hand mesh],},},});
25 tracked points per hand
As mentioned before, WebXR allows us to track 25 points per hand. Those points are listed here: XR Skeleton Joints.
It looks roughly like this:
.
Each of those 25 points has an InstancedMesh created upon enabling the hand tracking feature. Those meshes can be used for physics, gesture recognition, collision detection and more. The default mesh is a sphere. To provide a different mesh use the sourceMesh option:
const featureManager = xrHelper.baseExperience.featuresManager;featureManager.enableFeature(BABYLON.WebXRFeatureName.HAND_TRACKING, "latest", {xrInput: xrHelper.input,jointMeshes: {sourceMesh: BoxBuilder.CreateBox("jointParent", { size: 1 }),},});
Babylon will take this sourceMesh and use it to create the 25 instances per hand. This mesh will then be set invisible, unless you ask for it to stay visible for your own reasons:
const featureManager = xrHelper.baseExperience.featuresManager;featureManager.enableFeature(BABYLON.WebXRFeatureName.HAND_TRACKING, "latest", {xrInput: xrHelper.input,jointMeshes: {sourceMesh: BoxBuilder.CreateBox("jointParent", { size: 1 }),keepOriginalVisible: true, // will keep the original instance visible},});
Those instances will be visible if there is no hand mesh enabled. if you want them to be invisible set the invisible flag:
const featureManager = xrHelper.baseExperience.featuresManager;featureManager.enableFeature(BABYLON.WebXRFeatureName.HAND_TRACKING, "latest", {xrInput: xrHelper.input,jointMeshes: {disableDefaultHandMesh: true,invisible: true,},});
If you want to modify those meshes individually (for example provide a different material per joint) you can use the onHandJointMeshGenerated callback:
const featureManager = xrHelper.baseExperience.featuresManager;featureManager.enableFeature(BABYLON.WebXRFeatureName.HAND_TRACKING, "latest", {xrInput: xrHelper.input,jointMeshes: {disableDefaultHandMesh: true,onHandJointMeshGenerated: (instance) => {// do whatever you want with the instancereturn instance; // you can return a whole new mesh or the instance itself. If the instance is not returned, babylon will dispose the unused instance for you.},},});
Pointer support
The underlying system will provide native pointer ray for each hand. Babylon's WebXR Pointer system will automatically detect it and will allow the user to interact with the scene using the pointer down/move/up events. Each hand will be provided with a pointer id to differentiate its pointer events. You can use this information to find the hand object from the pointer selection and the hand tracking features:
const featureManager = xrHelper.baseExperience.featuresManager;const xrHandFeature = featureManager.enableFeature(BABYLON.WebXRFeatureName.HAND_TRACKING, "latest", {xrInput: xrHelper.input,});// ... at a later pointscene.onPointerObservable.add((evt) => {const pointerId = evt.event.pointerId;const xrController = xrHelper.pointerSelection.getXRControllerByPointerId(pointerId);const webxrHandObject = xrHandFeature.getHandByControllerId(xrController.uniqueId);});
Note that each system might have different gestures for "select". In the quest it is executed when holding the index finger and the thumb together. Other systems might have a different gesture for that.
Using the hand and skeleton joint data
Each hand has its own WebXRHand object associated with it. The WebXR hand object references the following information:
- the
trackedMeshesobject, holding all 25 joint meshes, sorting according to the XR joints tracking - the
handMeshobject (if enabled) - the
xrControllerassociated with this hand
There are a few ways to get the hand object:
- Use the controller id as described before
- use the handedness:
const xrHandFeature = featureManager.enableFeature(BABYLON.WebXRFeatureName.HAND_TRACKING, "latest", {xrInput: xrHelper.input,});// after the controllers were initializedconst rightHand = xrHandFeature.getHandByHandedness("right");
- The recommended way - use the
onHandAddedObservable:
const xrHandFeature = featureManager.enableFeature(BABYLON.WebXRFeatureName.HAND_TRACKING, "latest", {xrInput: xrHelper.input,});xrHandFeature.onHandAddedObservable.add((newHand) => {// celebrate, we have a new hand!scene.onBeforeRenderObservable.add(() => {// get the real world wrist position on each frameconsole.log(newHand.trackedMeshes[0].position);});});
Hands physics
To enable physics on each of the 25 tracked points use the enablePhysics flag:
const featureManager = xrHelper.baseExperience.featuresManager;featureManager.enableFeature(BABYLON.WebXRFeatureName.HAND_TRACKING, "latest", {xrInput: xrHelper.input,jointMeshes: {enablePhysics: true,},});
To configure the physics impostor (which defaults to a sphere with the default friction and restitution) use the physics props option:
const featureManager = xrHelper.baseExperience.featuresManager;featureManager.enableFeature(BABYLON.WebXRFeatureName.HAND_TRACKING, "latest", {xrInput: xrHelper.input,jointMeshes: {enablePhysics: true,physicsProps: {impostorType: PhysicsImpostor.BoxImpostor,friction: 0.5,restitution: 0.3,},},});
Notice that you can't define the mass. that is because the tracked joints will always have mass 0 to prevent them from constantly "falling down" towards the center of gravity.
Movement Module
The movement feature allows movement in the scene with the controllers. It is separate from the teleportation module and designed to not be used at the same time.
In order to enable this feature you must first ensure that teleportation is not switched on.
Teleportation can be disabled in the default XR experience:
const xr = await scene.createDefaultXRExperienceAsync({disableTeleportation: true,});
You can also disable teleportation manually before enabling the movement feature.
const featureManager = xrHelper.baseExperience.featuresManager;featureManager.disableFeature(BABYLON.WebXRFeatureName.TELEPORTATION);
The movement feature enables the camera's position to be changed with the controllers. Default configuration (can be changed in options below):
- Left Controller - Rotation counter + clockwise
- Right Controller - Move forward/backwards/left/right
const featureManager = xrHelper.baseExperience.featuresManager;featureManager.enableFeature(BABYLON.WebXRFeatureName.MOVEMENT, "latest", {xrInput: xrHelper.input,});
Movement Configuration Options
The current options for the plugin can always be found at the WebXR movement feature source code. Most of them will be explained here.
One important option is movementOrientationFollowsViewerPose, which defaults to true. When configured to false the forward direction will not adjust with the viewer pose, but only to the controller rotation. This can be useful for some experiences where the viewer pose should not affect movement direction. ie: If you are moving forward and look left that you should not drift left, but continue straight. You can try out in the above playground by changing the option.
The controllers themselves can be configured differently. If you want to swap which hand controls rotation vs. movement, for example, then override the option customRegistrationConfigurations array. The movement state rotation and movement is handled automatically by the feature and ignored accordingly if rotation (rotationEnabled) or movement (movementEnabled) are not enabled and will automatically be adjusted to speed (rotationSpeed & movementSpeed).
This would swap handedness of the default configuration and maintain feature sensitivity thresholds:
const swappedHandednessConfiguration = [{allowedComponentTypes: [BABYLON.WebXRControllerComponent.THUMBSTICK_TYPE, BABYLON.WebXRControllerComponent.TOUCHPAD_TYPE],forceHandedness: "right",axisChangedHandler: (axes, movementState, featureContext, xrInput) => {movementState.rotateX = Math.abs(axes.x) > featureContext.rotationThreshold ? axes.x : 0;movementState.rotateY = Math.abs(axes.y) > featureContext.rotationThreshold ? axes.y : 0;},},{allowedComponentTypes: [WebXRControllerComponent.THUMBSTICK_TYPE, WebXRControllerComponent.TOUCHPAD_TYPE],forceHandedness: "left",axisChangedHandler: (axes, movementState, featureContext, xrInput) => {movementState.moveX = Math.abs(axes.x) > featureContext.movementThreshold ? axes.x : 0;movementState.moveY = Math.abs(axes.y) > featureContext.movementThreshold ? axes.y : 0;},},];const featureManager = xrHelper.baseExperience.featuresManager;featureManager.enableFeature(BABYLON.WebXRFeatureName.MOVEMENT, "latest", {xrInput: xrHelper.input,customRegistrationConfigurations: swappedHandednessConfiguration,});
Other useful options are to change movement and rotation speed and to enable/disable movement (movementEnabled) and rotation (rotationEnabled), but these ones are also available on the feature itself to change at runtime. The threshold options determine the sensitivity when the input is accepted - the default is 0.25, which prevents accidental movements and jittering.
Walking Locomotion
WebXRWalkingLocomition is an experimental Babylon.js capability which
enables users to traverse VR spaces by "walking in place."
scene.createDefaultXRExperienceAsync({ disableTeleportation: true }).then((xr) => {const xrRoot = new BABYLON.TransformNode("xrRoot", scene);xr.baseExperience.camera.parent = xrRoot;xr.baseExperience.featuresManager.enableFeature(BABYLON.WebXRFeatureName.WALKING_LOCOMOTION, "latest", { locomotionTarget: xrRoot });});
While it is highly recommended to articulate the WebXRCamera's parent
node in order to avoid conflating virtual positional data with XR
sensory readings, it is also possible to articulate the WebXRCamera
itself.
scene.createDefaultXRExperienceAsync({ disableTeleportation: true }).then((xr) => {xr.baseExperience.featuresManager.enableFeature(BABYLON.WebXRFeatureName.WALKING_LOCOMOTION, "latest", { locomotionTarget: xr.baseExperience.camera.parent });});
To move, simply face in the direction you want to go and "walk in place," lifting and replacing each foot in turn much as you would if you were actually walking forward. This is a control technique and is not expected to work "magically"; it may take a small amount of practice to perform a motion that the system recognizes as walking.
Under the hood, what the XR system is actually reacting to is the user's
head motion, specifically the characteristic back-and-forth "rocking"
motion traced by most people's heads when walking in place (or, for
example, on a treadmill). Because of this, walking-in-place motions which
keep the head stationary, or which cause the head to move erratically,
will not be recognized as "walking" by the WebXRWalkingLocomotion
feature. However, once a recognizable motion is performed, it should be
very easy and comfortable to replicate. Walking detection of a recognizable
motion should also be resilient to head orientation; because walking is
recognized from the movement of the head (at a guesstimated "nape of the
neck" position, which remains relatively stationary as the head rotates),
looking around while performing a recognizable "walking in place" motion
will not disrupt the locomotion feature.
When to Use This Feature
WebXRWalkingLocomotion is a form of continuous traversal, similar to
walking around in real life and distinct from discontinuous traversal
alternatives such as teleportation. The most common example of continuous
traversal in VR, as in other forms of interactive 3D, is controller-based
and typically leverages a thumbstick to sort of "slide" the user around
the world in a continuous manner. Many users find this "sliding" effect
to be uncomfortable in VR, and for this reason teleportation is often
chosen as the default traversal alternative in VR applications.
However, there are times when teleportation and other discontinuous
traversal techniques are unsuitable, and in such circumstances
WebXRWalkingLocomotion can serve as an alternative to controller-based
continuous traversal. Early tests indicate that walking locomotion can
feel noticeably more comfortable than controller-based continuous
traversal, perhaps because the familiar "walking" motion reduces the
dissonance between the visual and vestibular stimuli presented to the
user.
It is also notable that WebXRWalkingLocomotion, because it assesses only
head motion, can be used entirely controller-free. This is particularly
powerful in combination with WebXRHandTracking because it allows for a
fully traversal-enabled VR experience where users can use their natural
hands without any controllers at all. This is not possible using other
traversal technologies without customizing the virtual space to support
point-to-point navigation and/or advanced hand gestures.